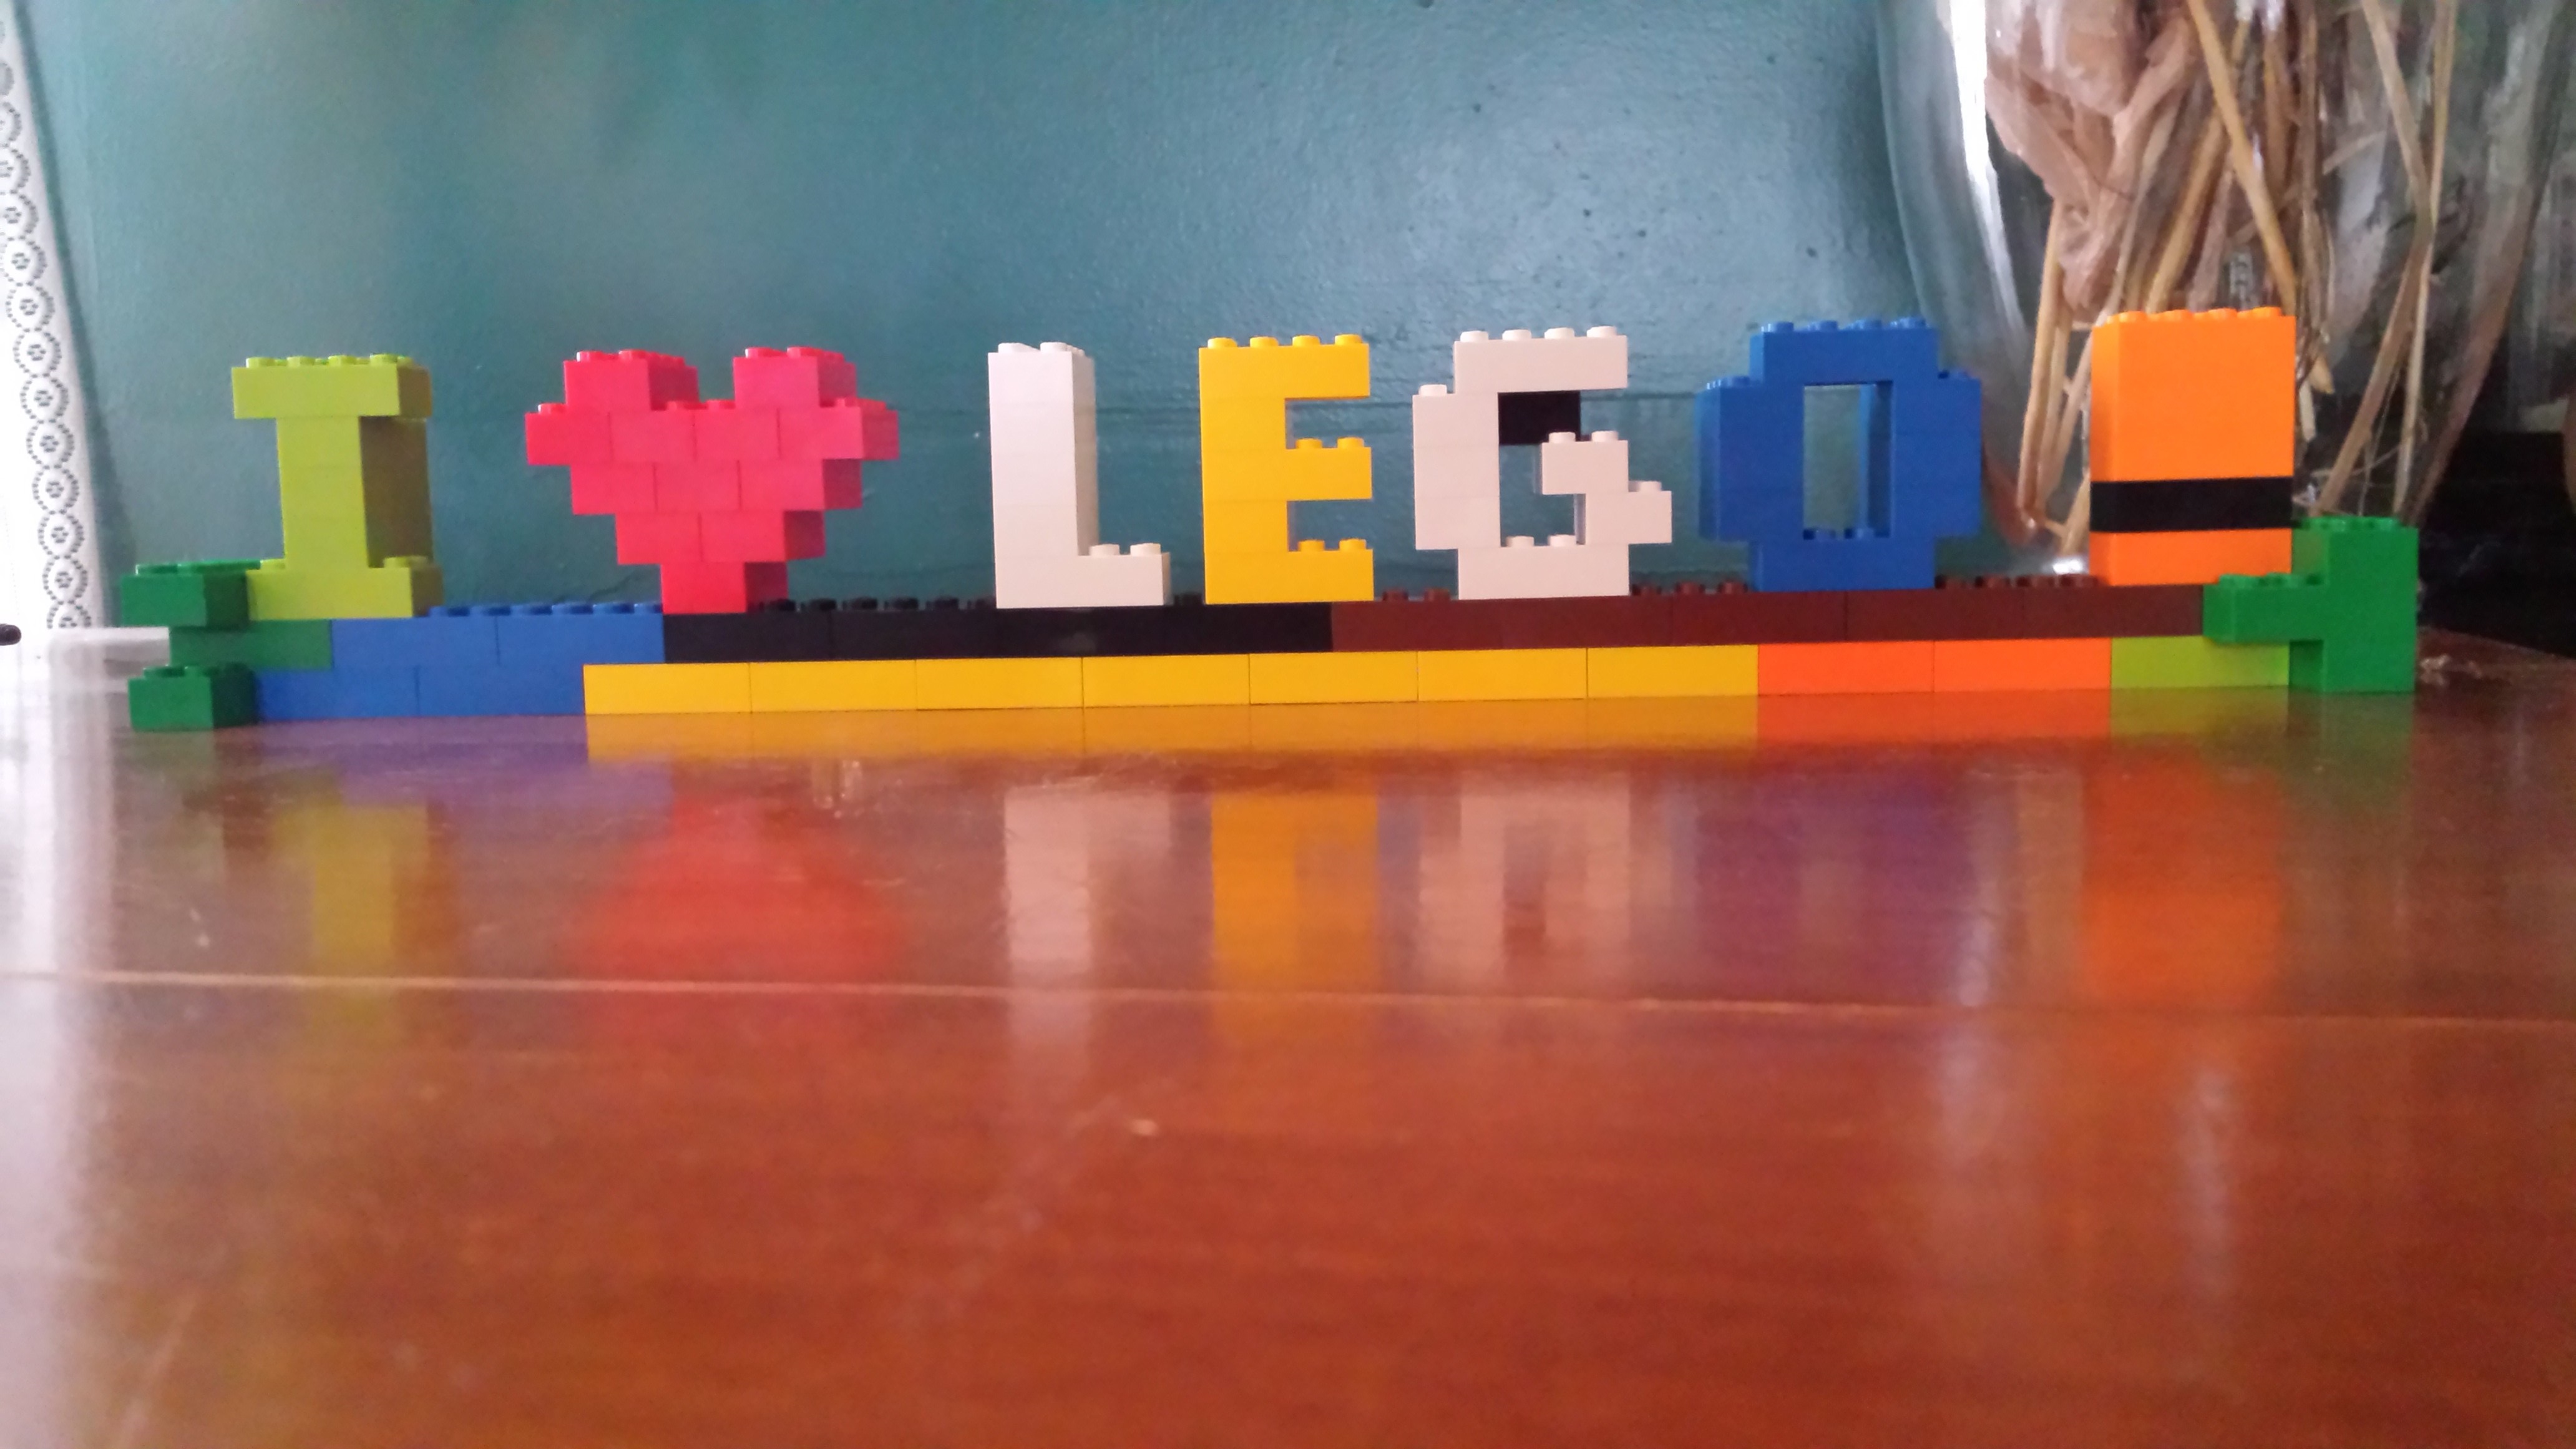
I admit it, I am a AFOL with a severe
MOC addiction. But I like it that way!
In case you do not already know this,
an AFOL is an Adult Fan Of Lego and a
MOC is a My Own Creation. Below are
just some of my MOCs which I have made
with Legos over the years.
Some of these have a parts list and/or
build details. Click on the "BUILD"
button (if there is one) located below
the model description. Parts with
known Lego element ID numbers have
them listed in parenthesis. Feel free
to use differnt pieces or modify the
model to your liking, that is what
Lego is all about!
The reason I like Legos so much is
that you can create something, use it
for awhile, tear it down, and create
something else. No waste, just reuse
material over and over.
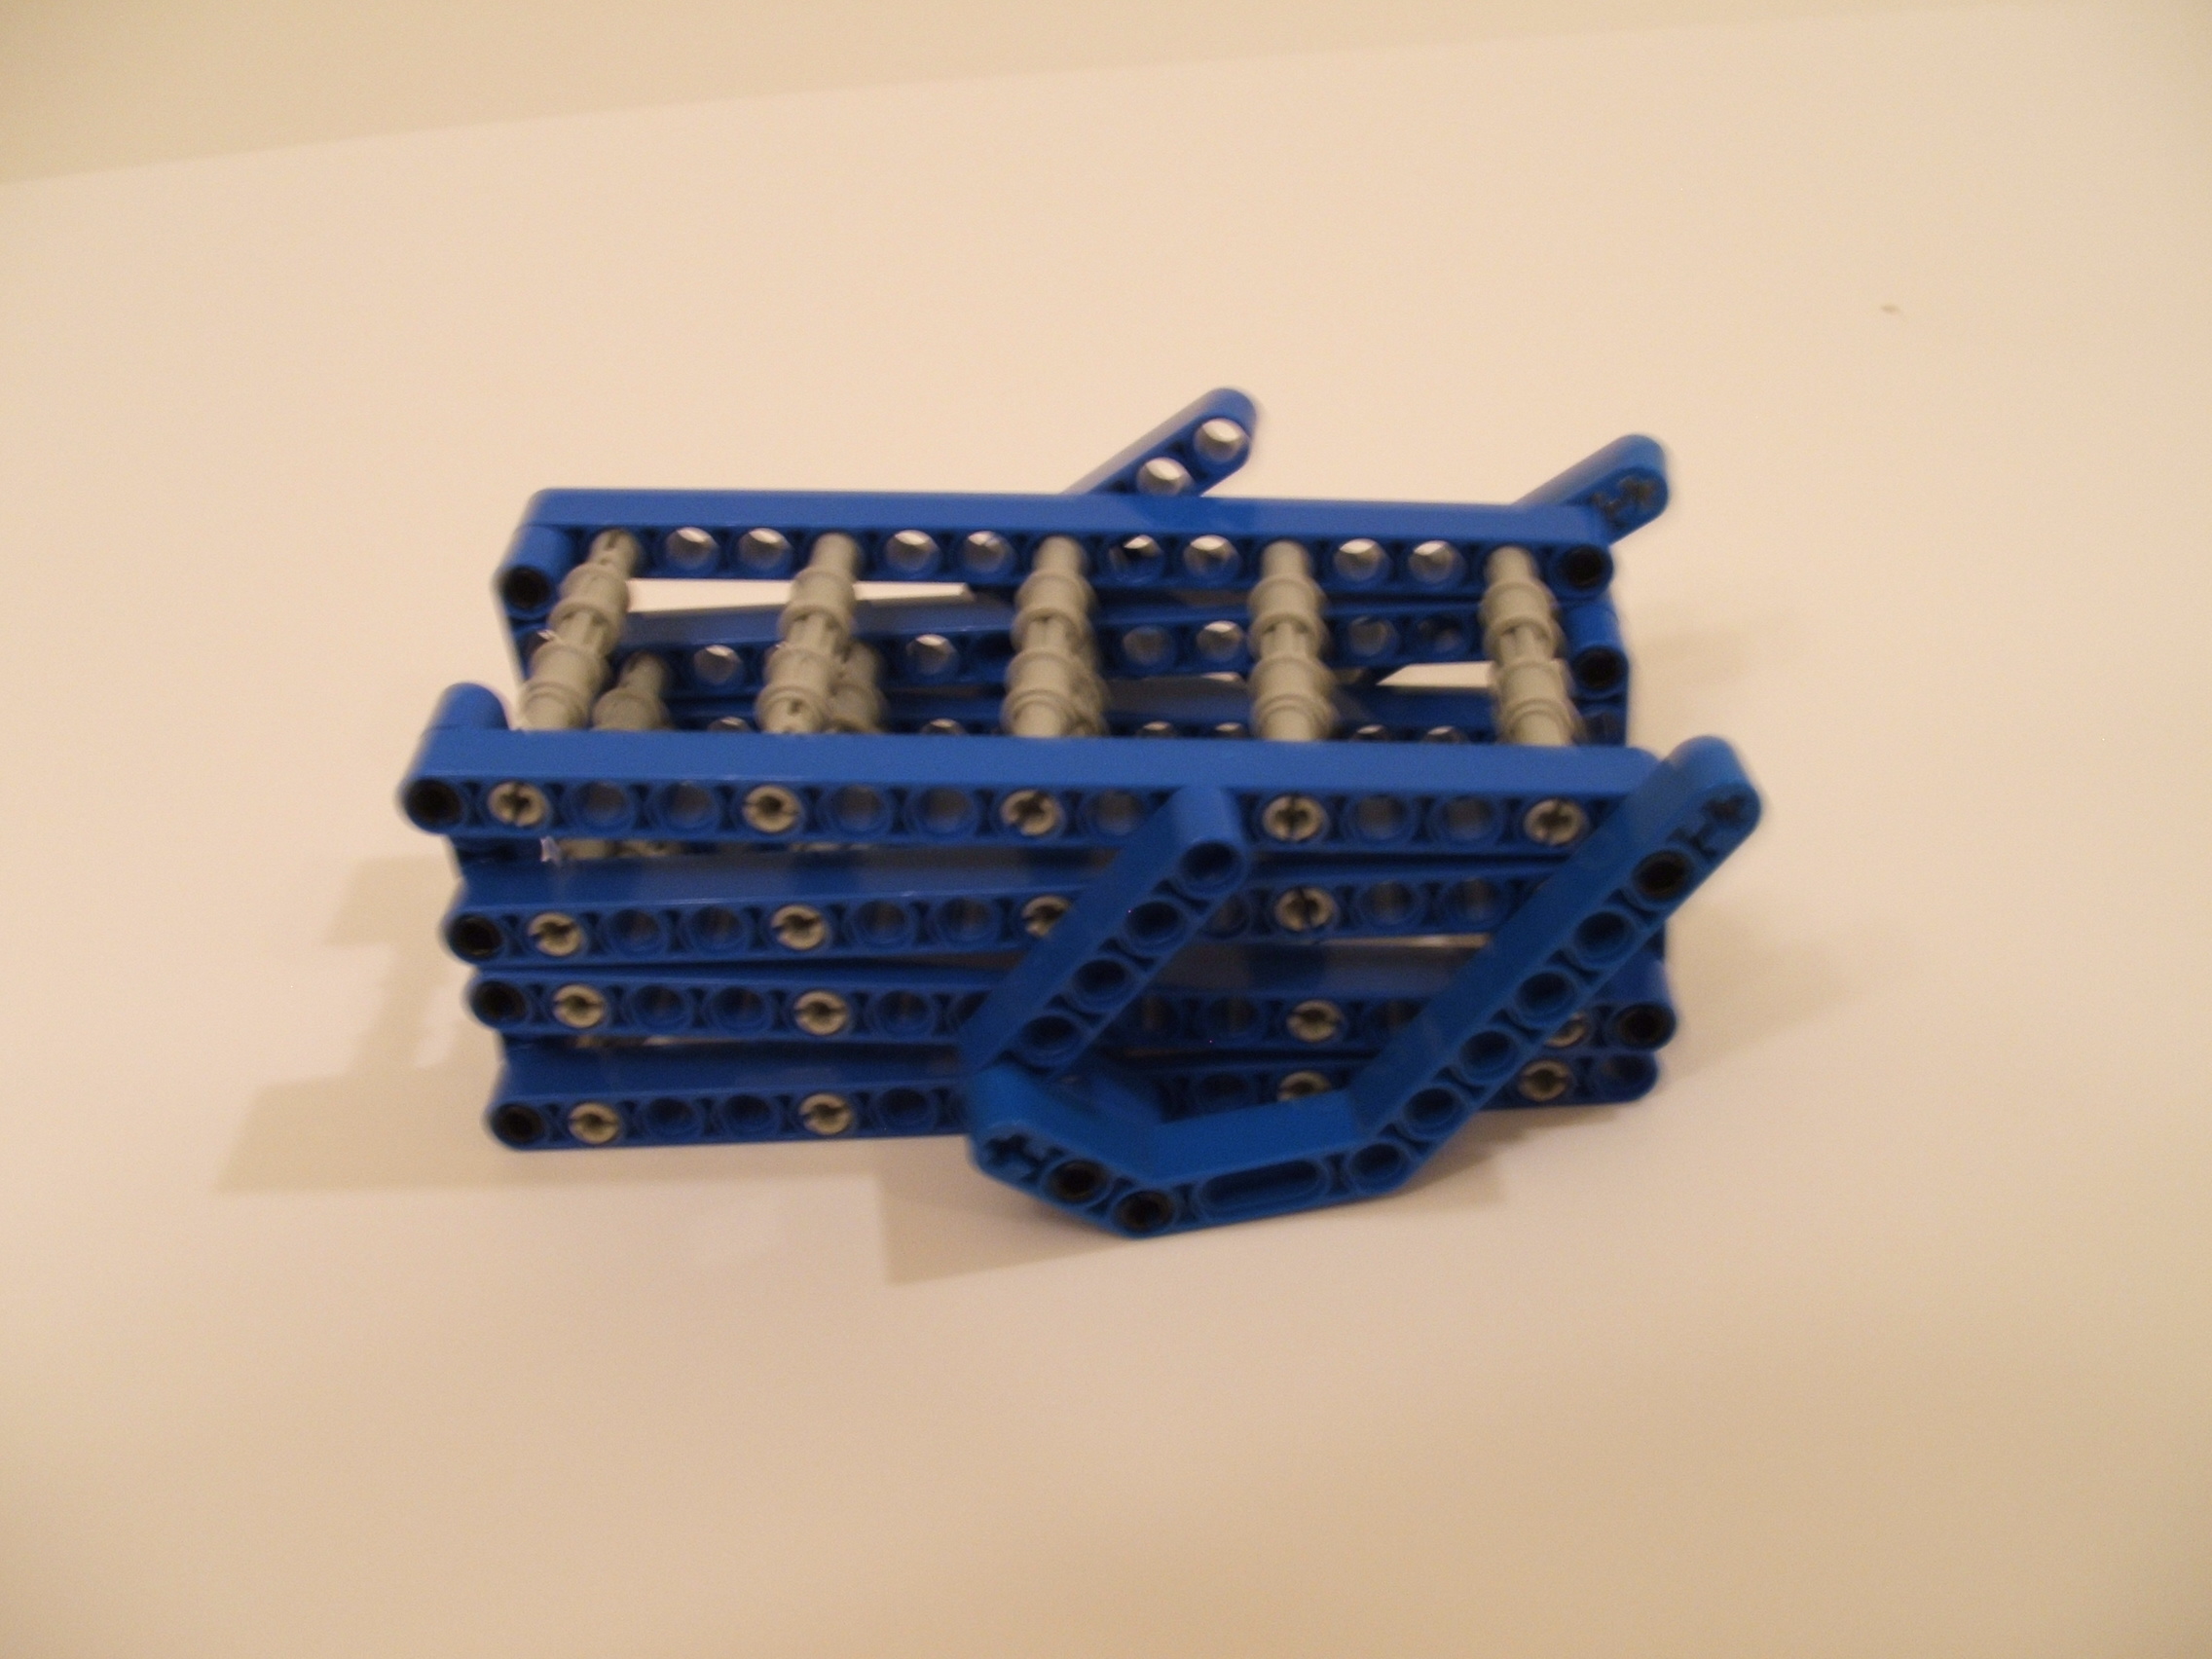
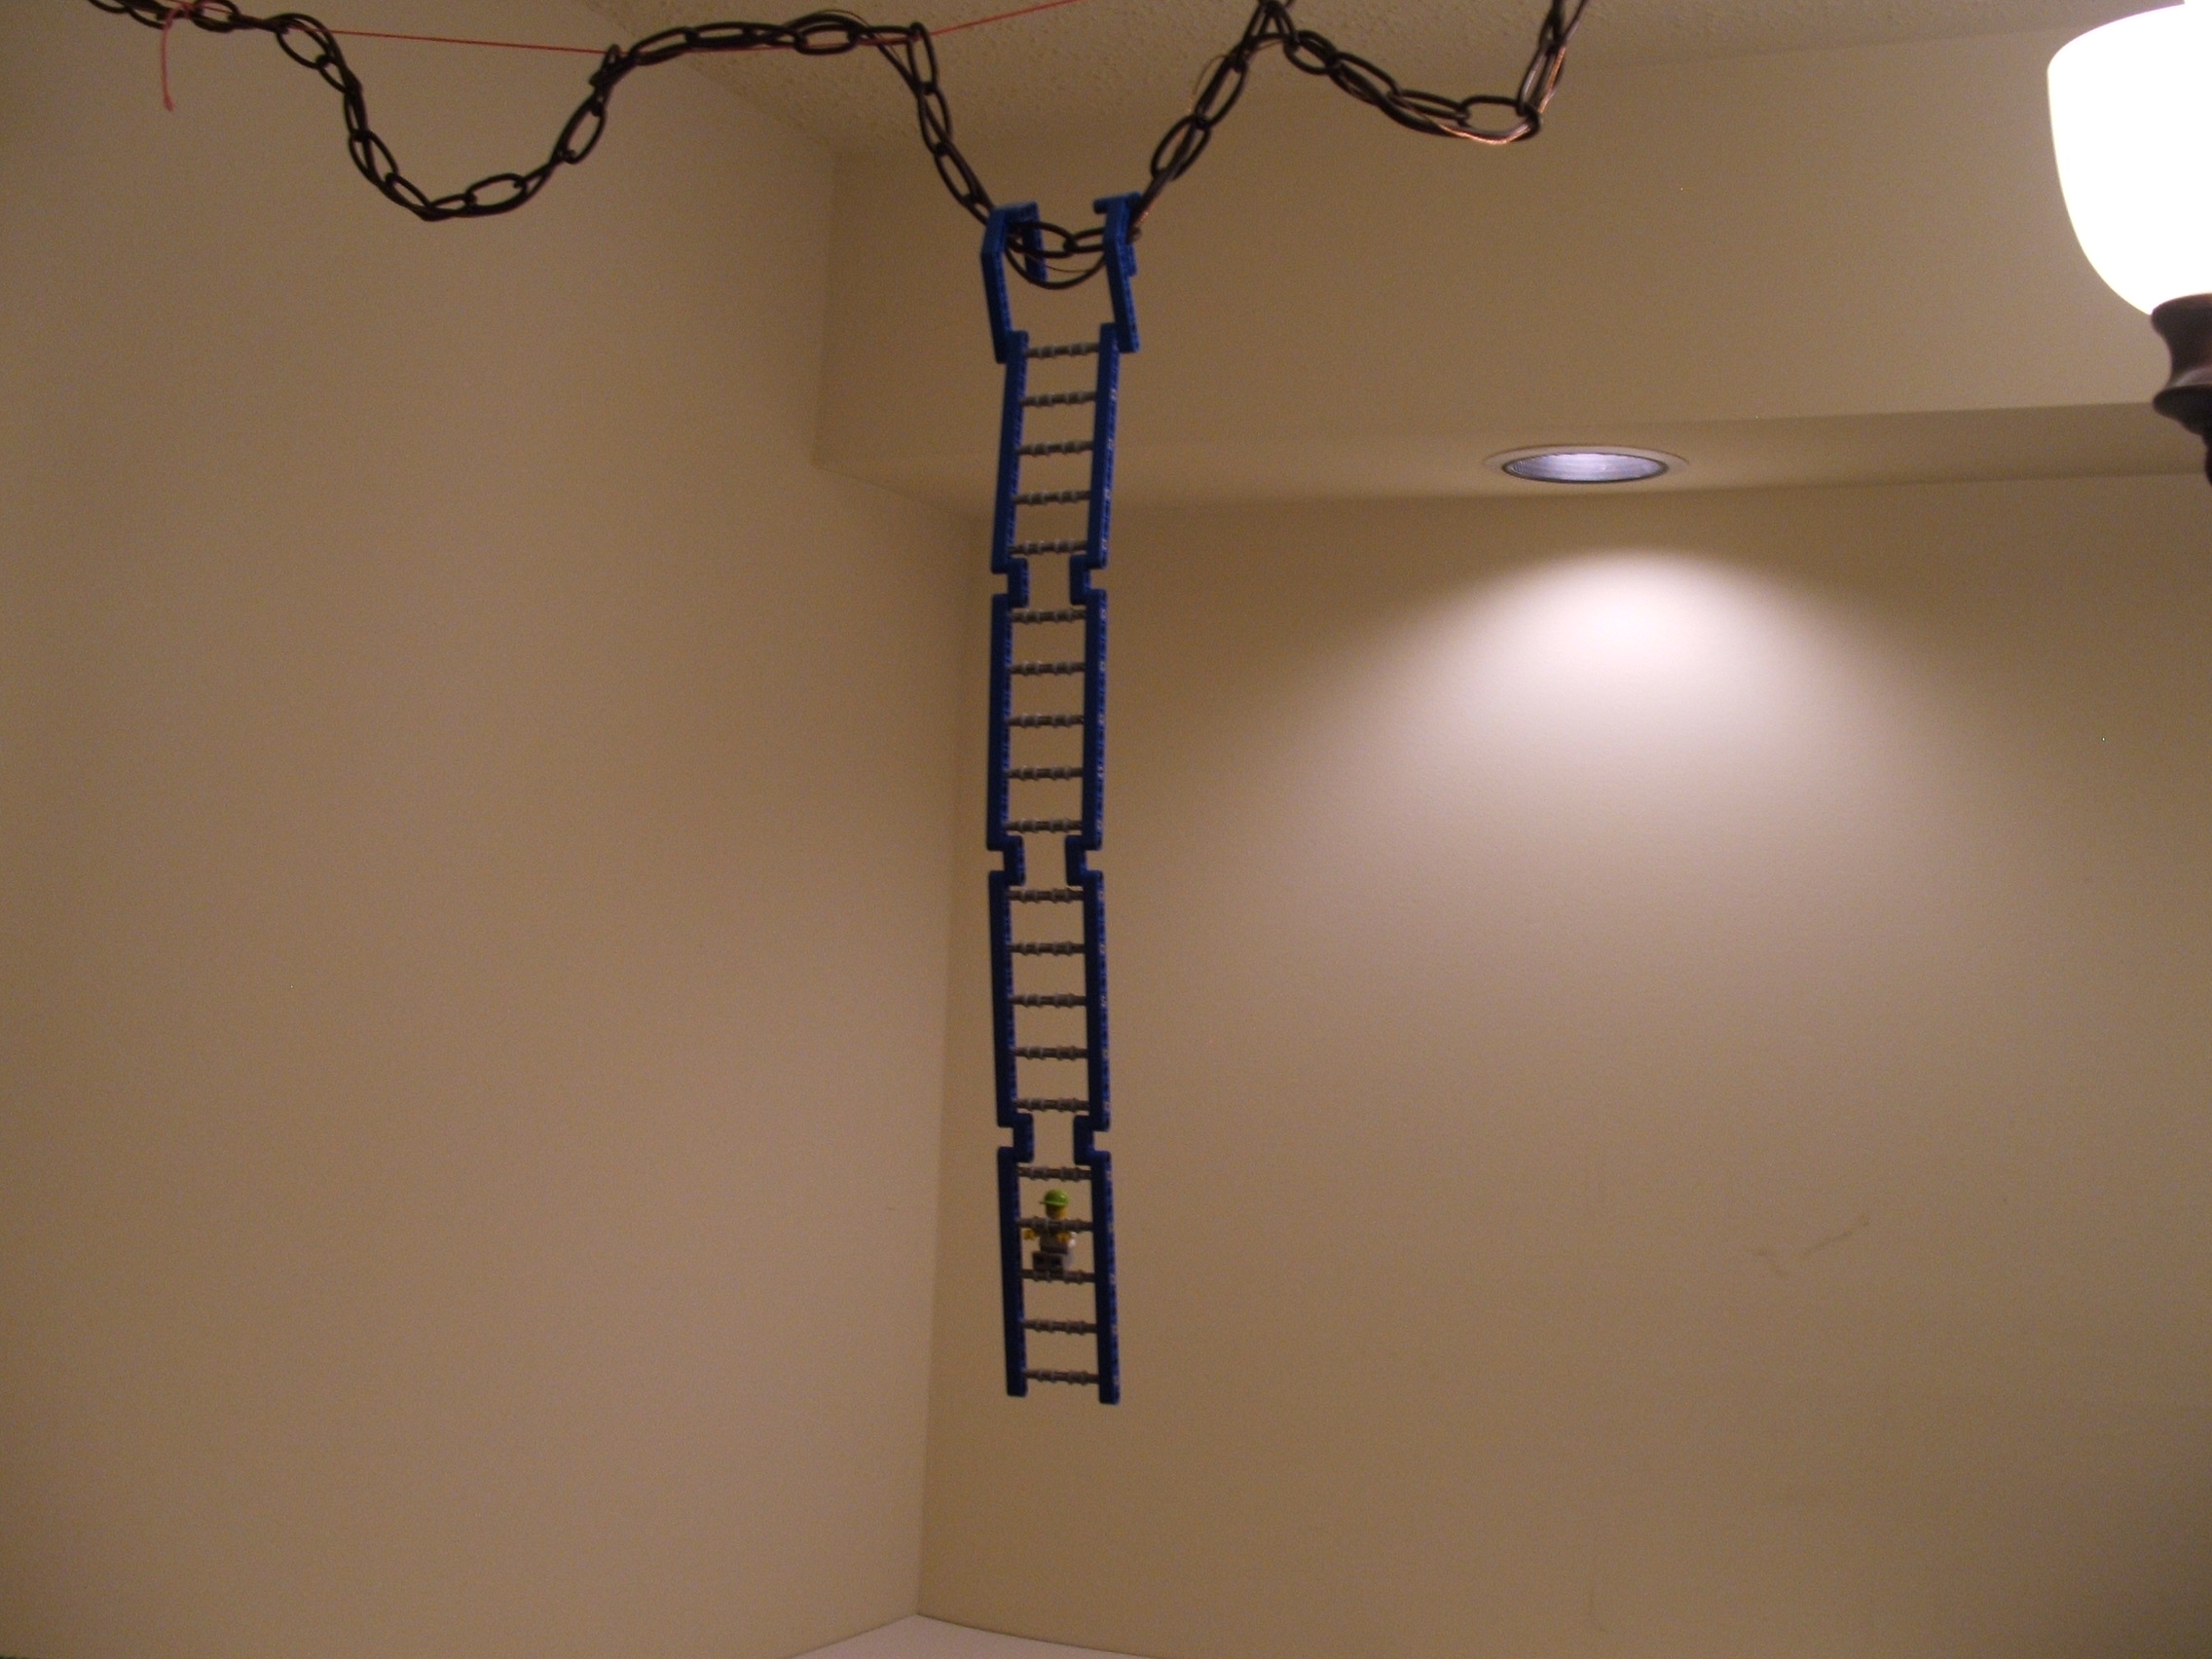
What Is It?
First we play a game. This is a
model I built. Shown here it is
collapsed. Can you guess what it
is when expanded? Answer below.
Guess what this is!
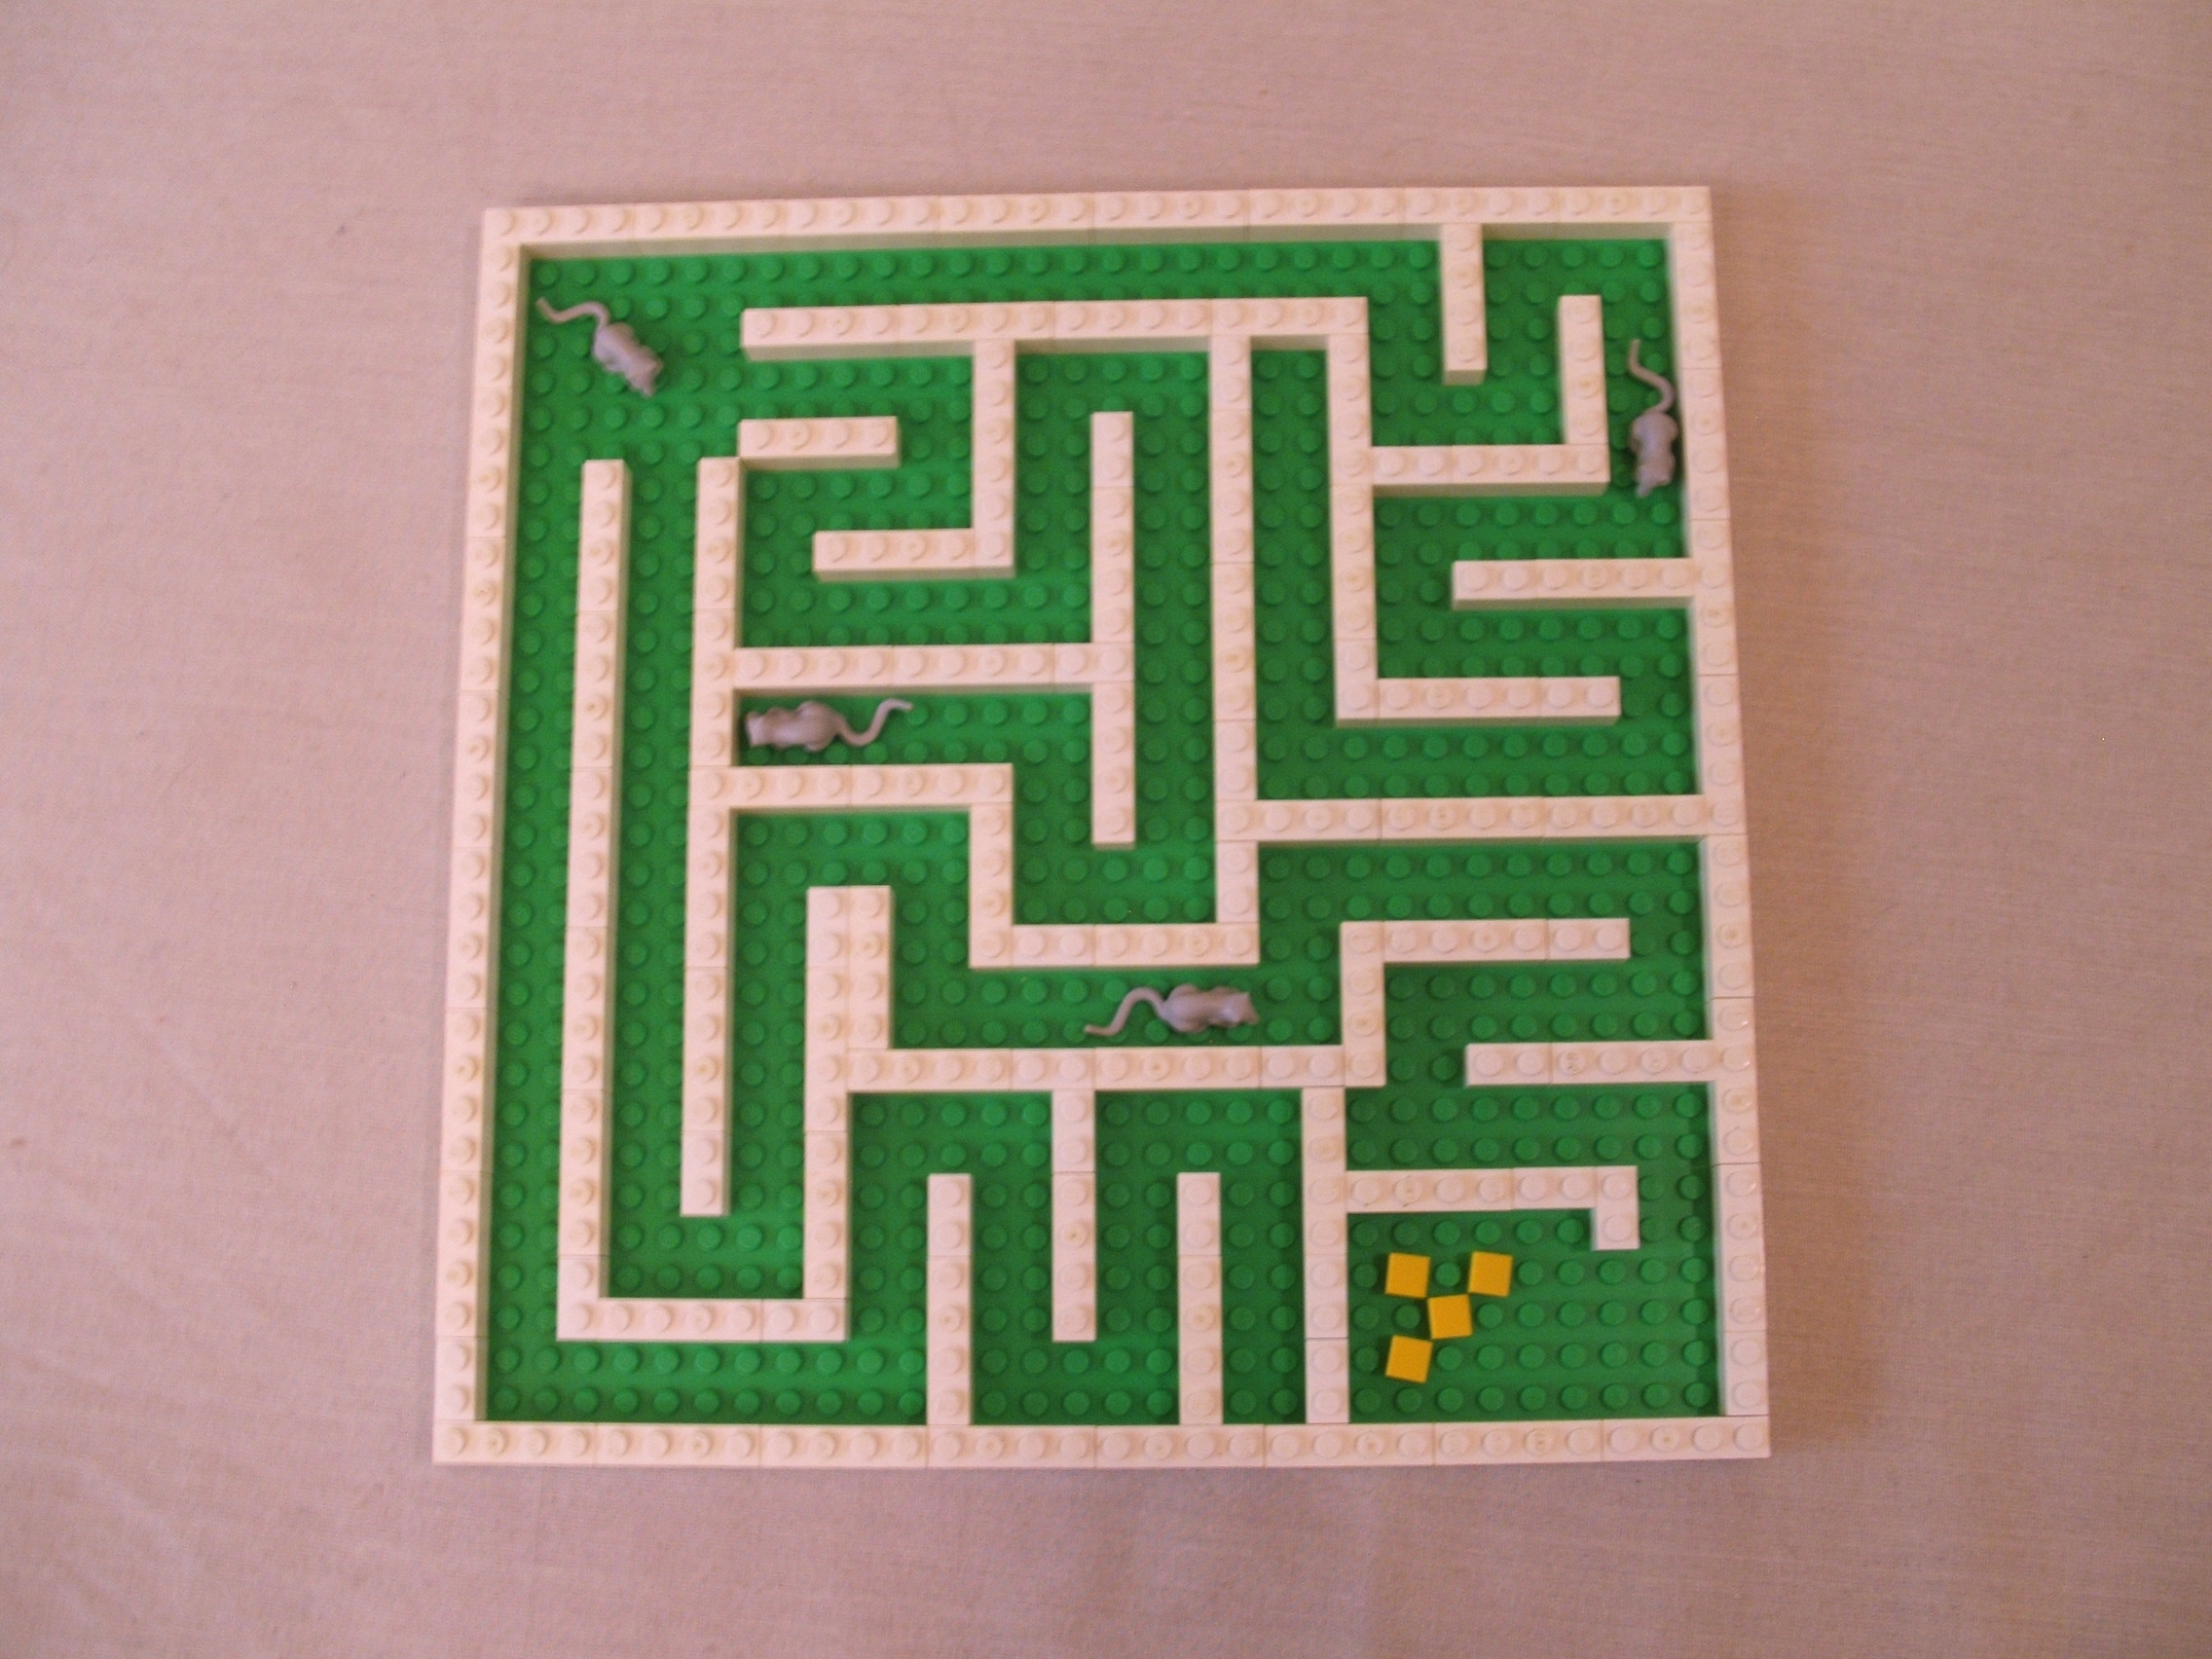
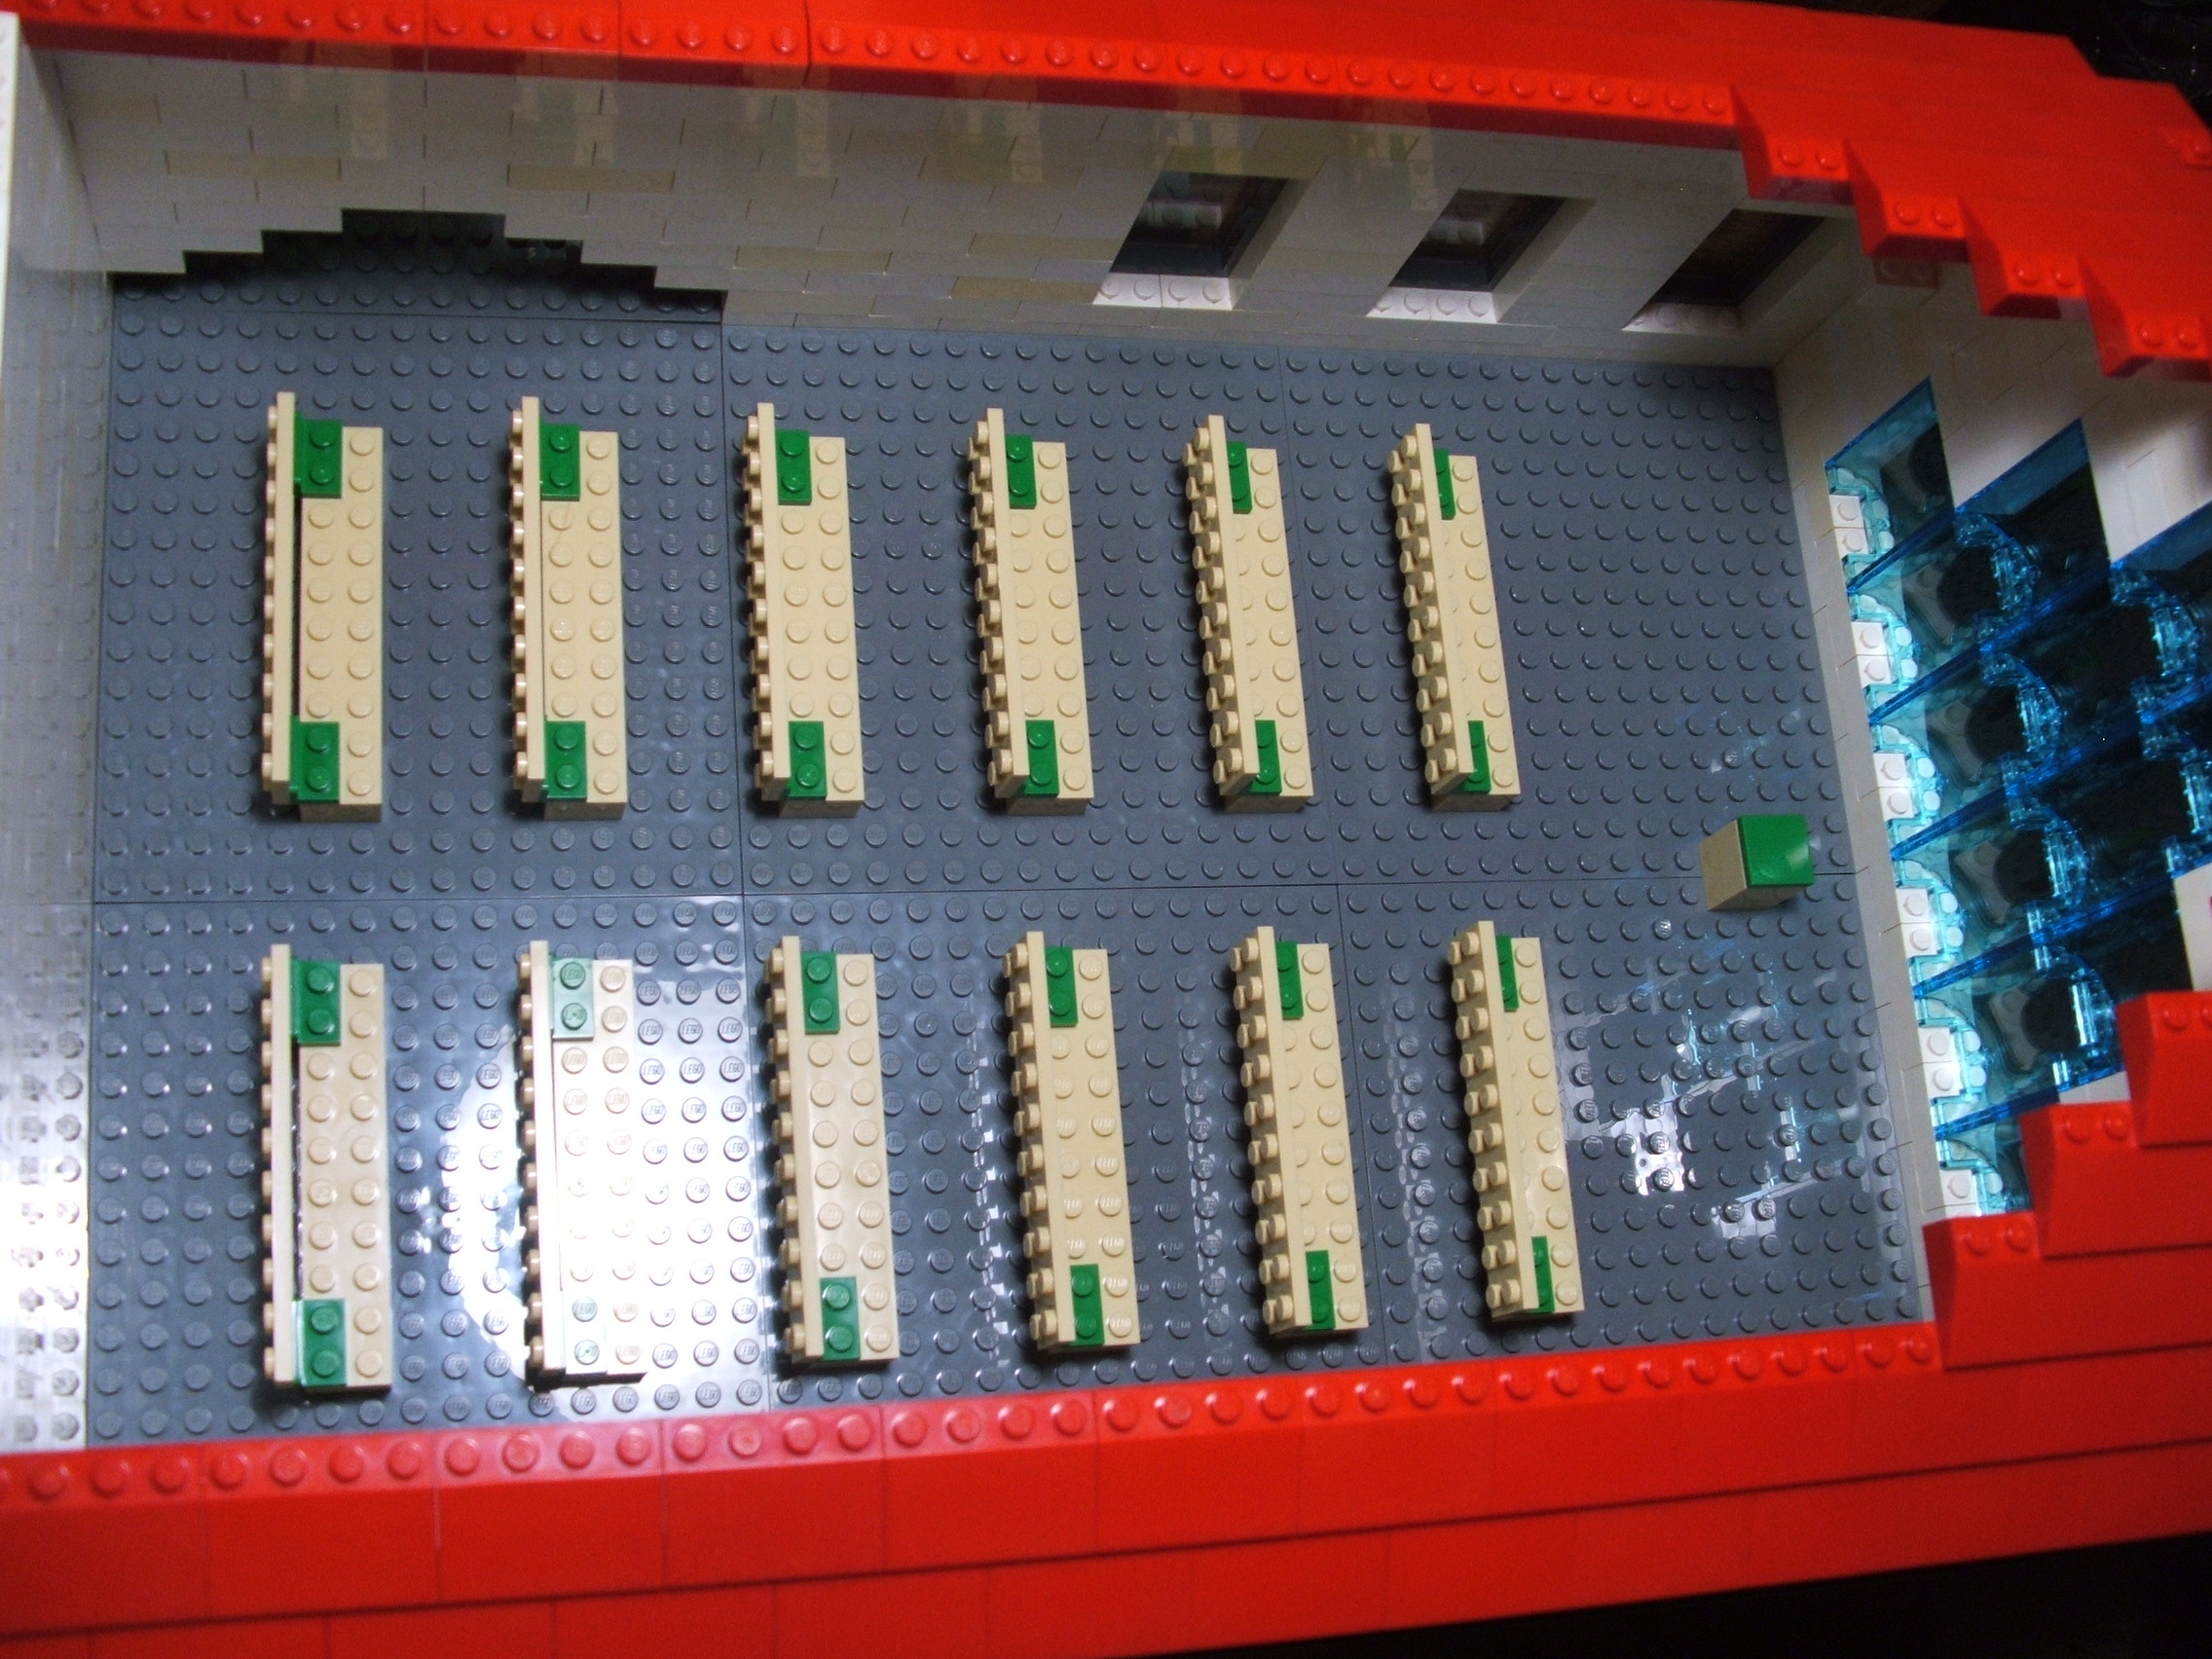
Terrys Mouse maze
Mice are often used for
testing. I recall where
they proved mice (and
other animals) could
"learn" the
pattern of a static
maze in order to get to
the treat faster.
In that spirit, I made
a mouse maze. Similar
to a laboRATory setup
only in theory, but it
is still an aMAZing
model. Although I have
had this almost a full
month I am still
amused when I see it.
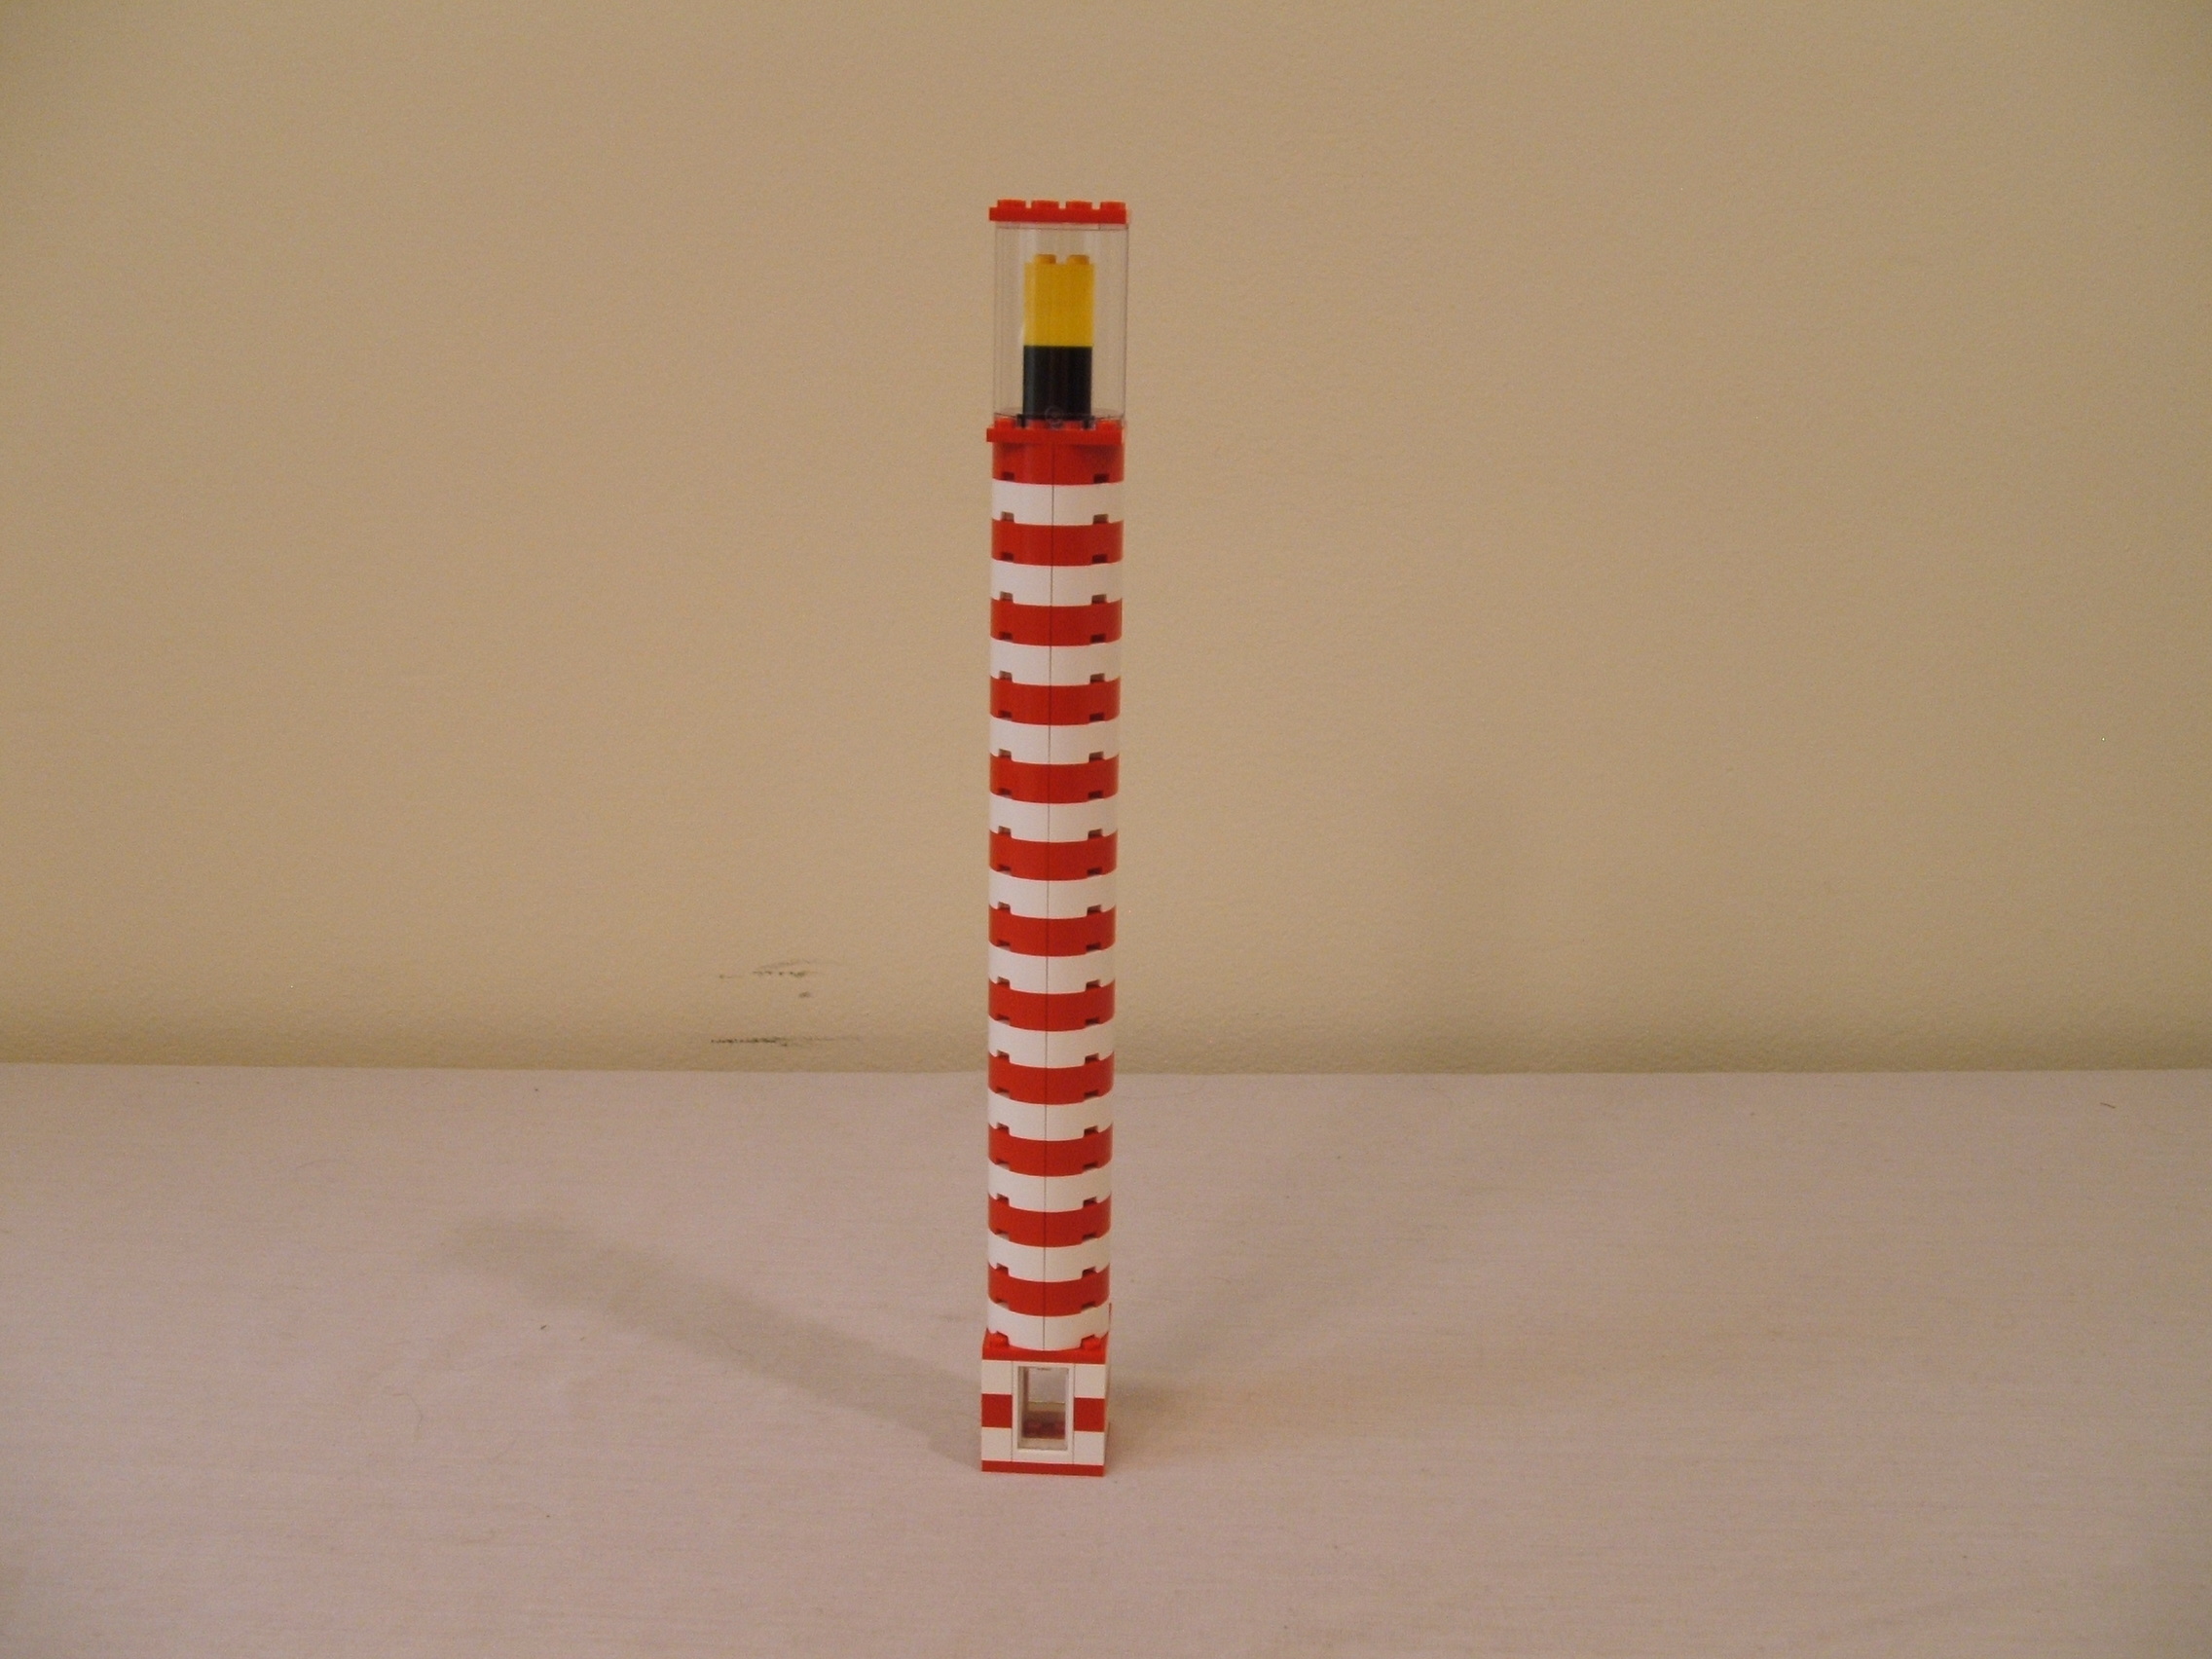
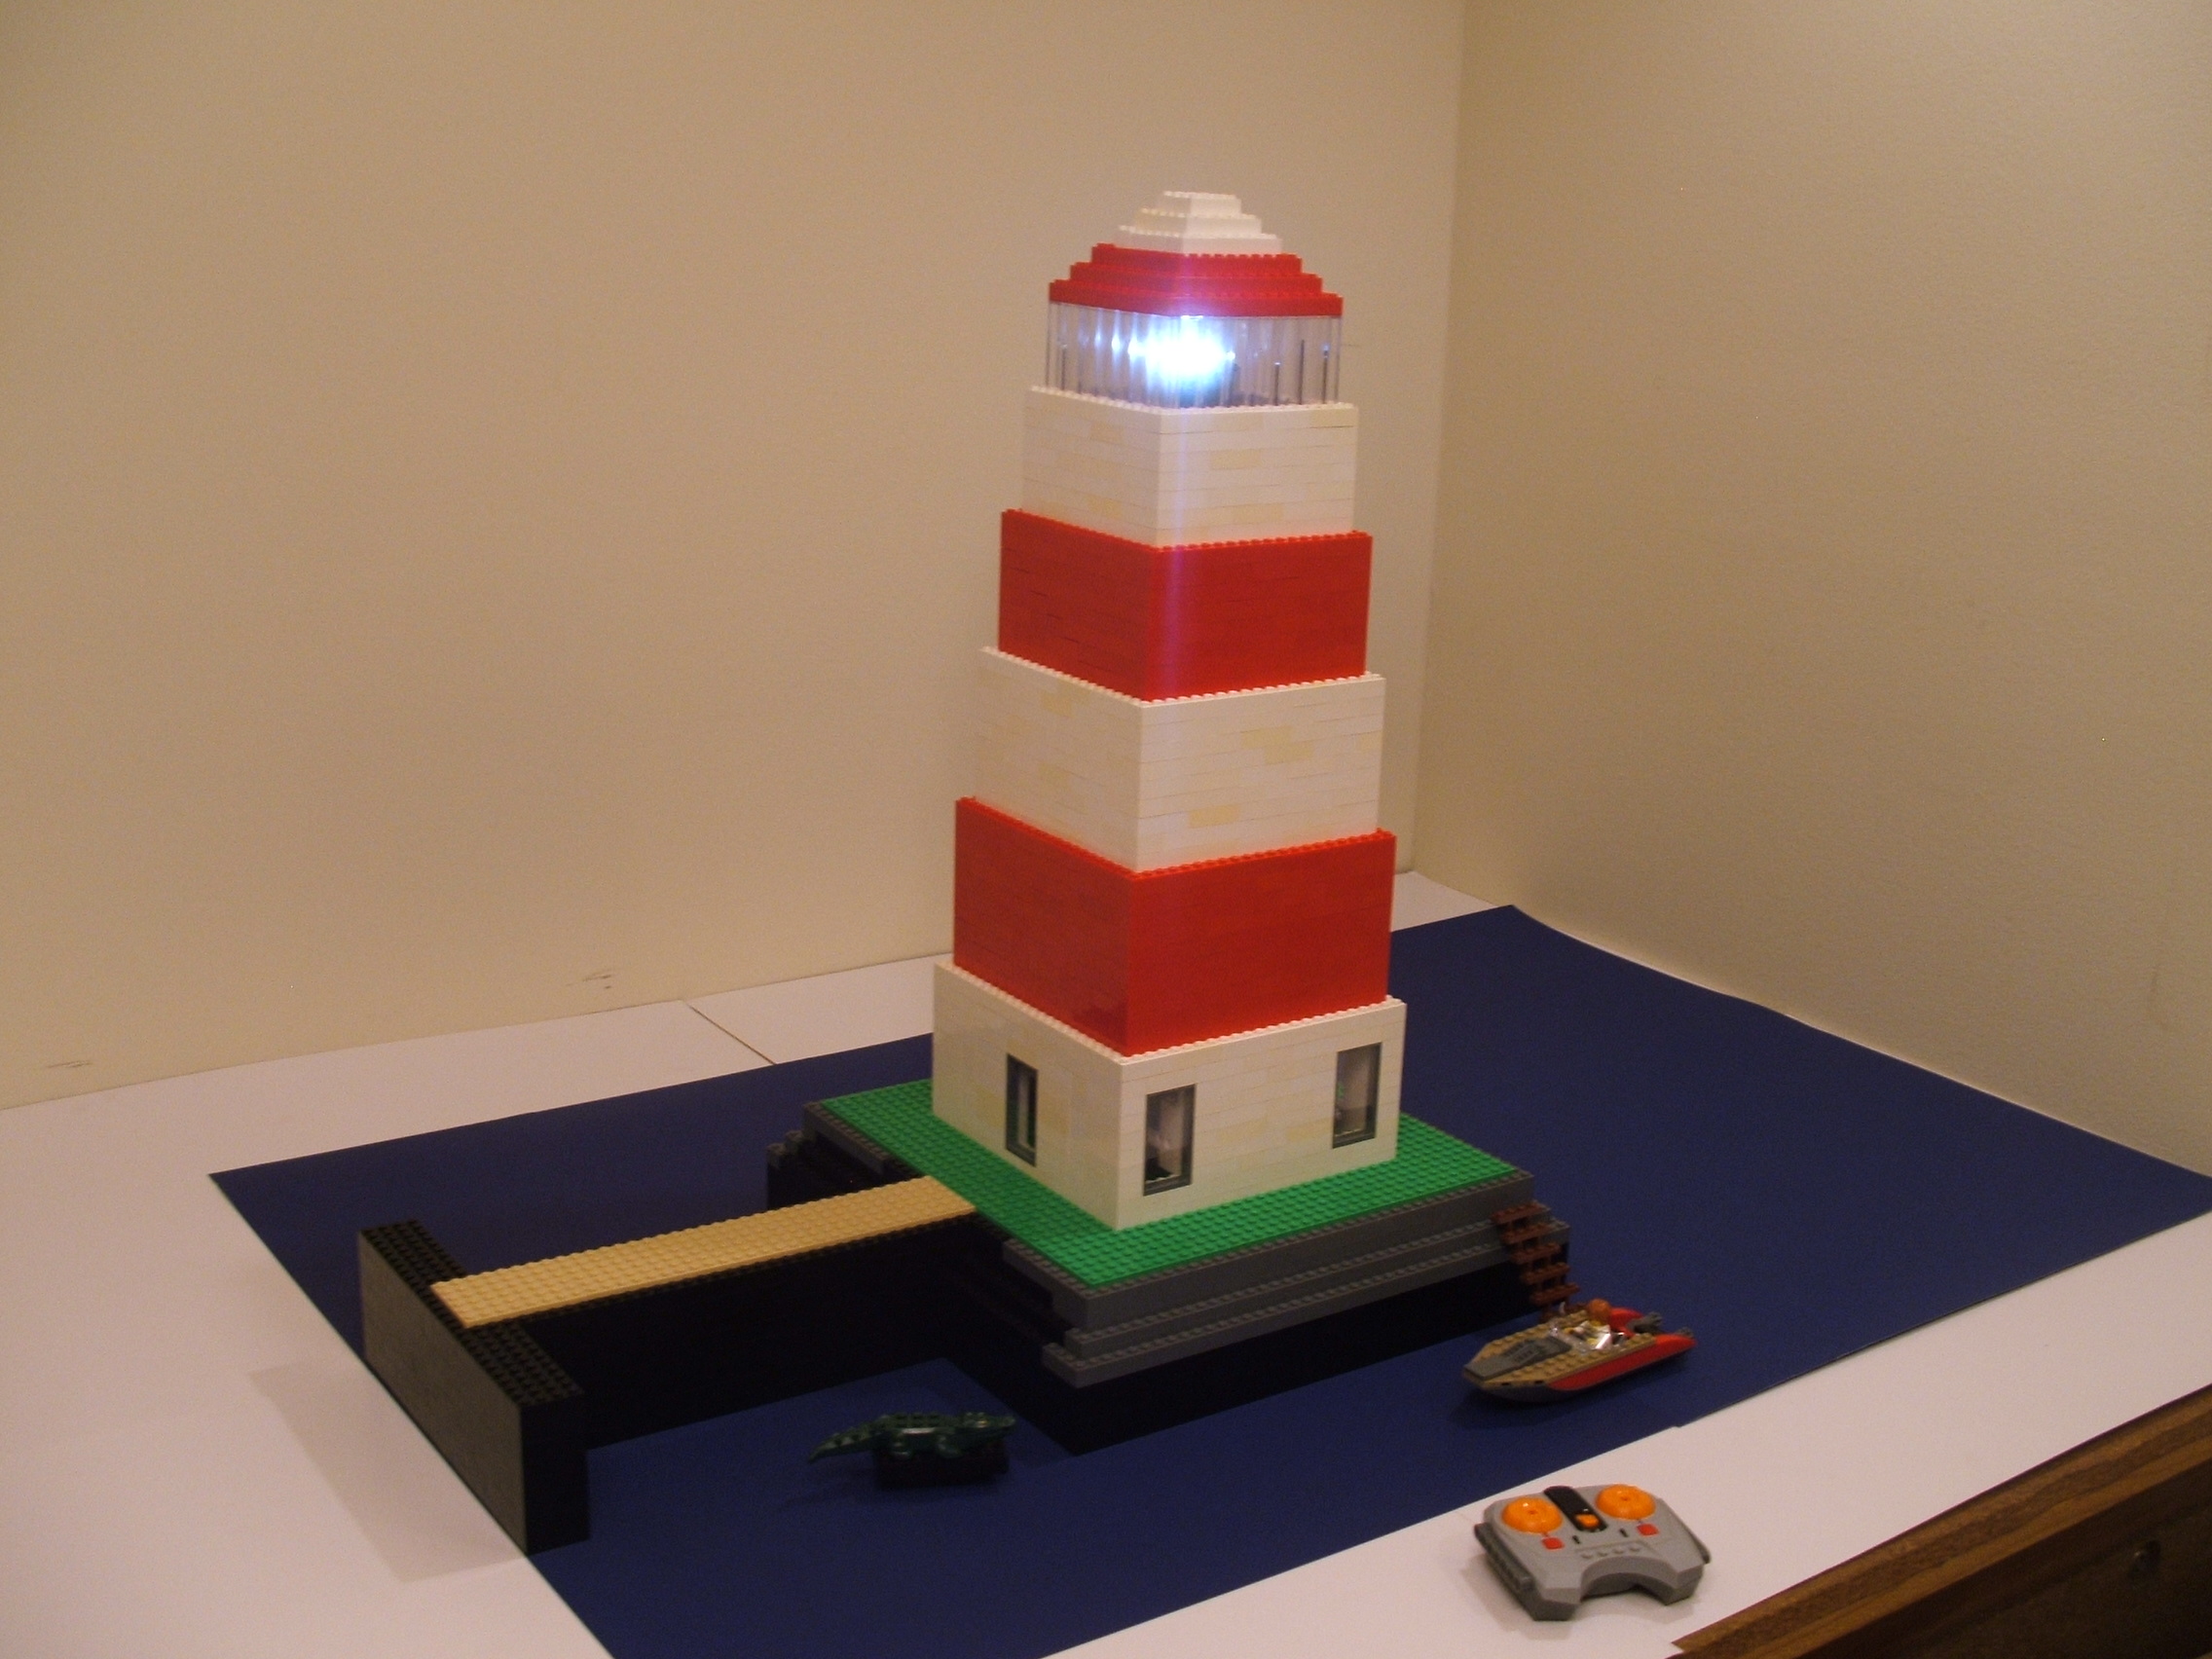
Terrys Mini lighthouse
I have built several
lighthouse styles.
This one is a small
version which takes
up less space and is
easier to transport
to events.
Although this has no
mechanicals nor a
light, it is still
easily recognized as
a lighthouse.
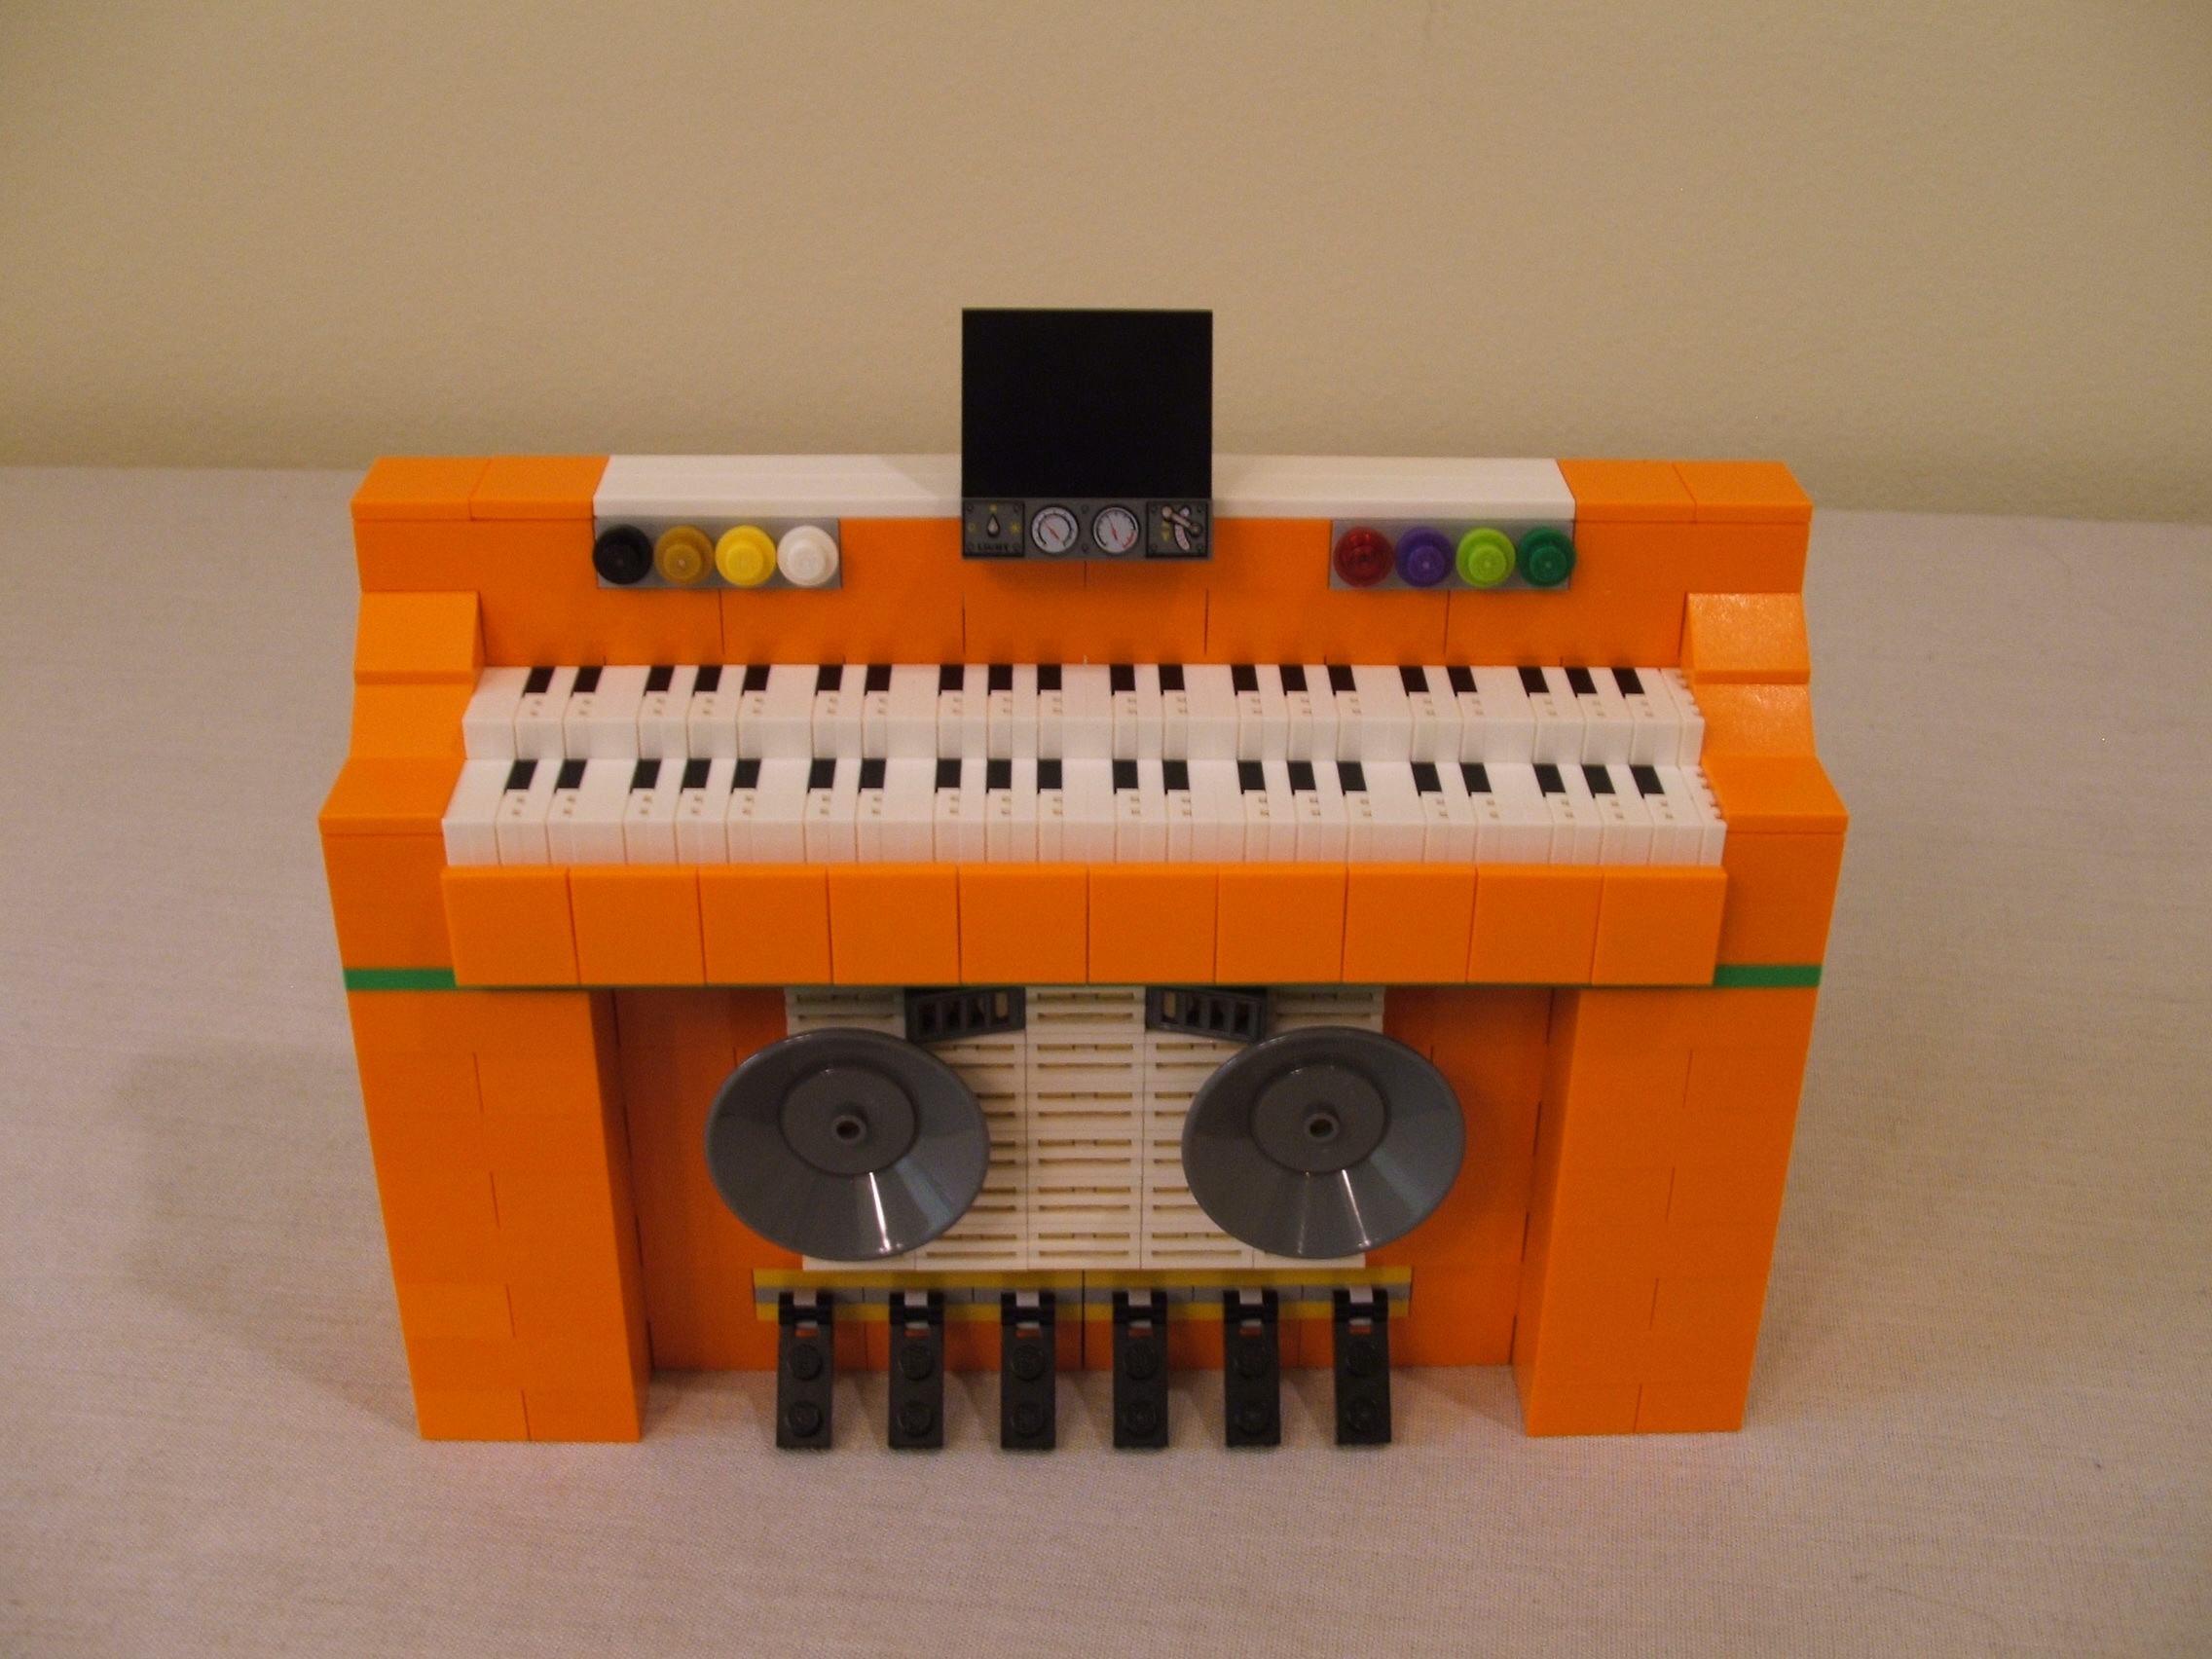
Terrys Organ
My mother loved to
play the piano so
for quite some time I
wanted to make a Lego
piano. But I could
not figure out how to
do a realistic keyboard
on a scaled model that
did not take up an
entire table.
Research revealed that
some organs have the
same number of keys
but are arranged in
two rows. This made
it more practical to
build. Combine that
with getting the right
elements to make a
compact (sort of)
keyboard and I was
ready to build.
My organ features
foot pedals, vent
and speakers, a
sheet music stand,
and sound controls.
The organ is close
to scale based upon
the size of the
keyboard area.
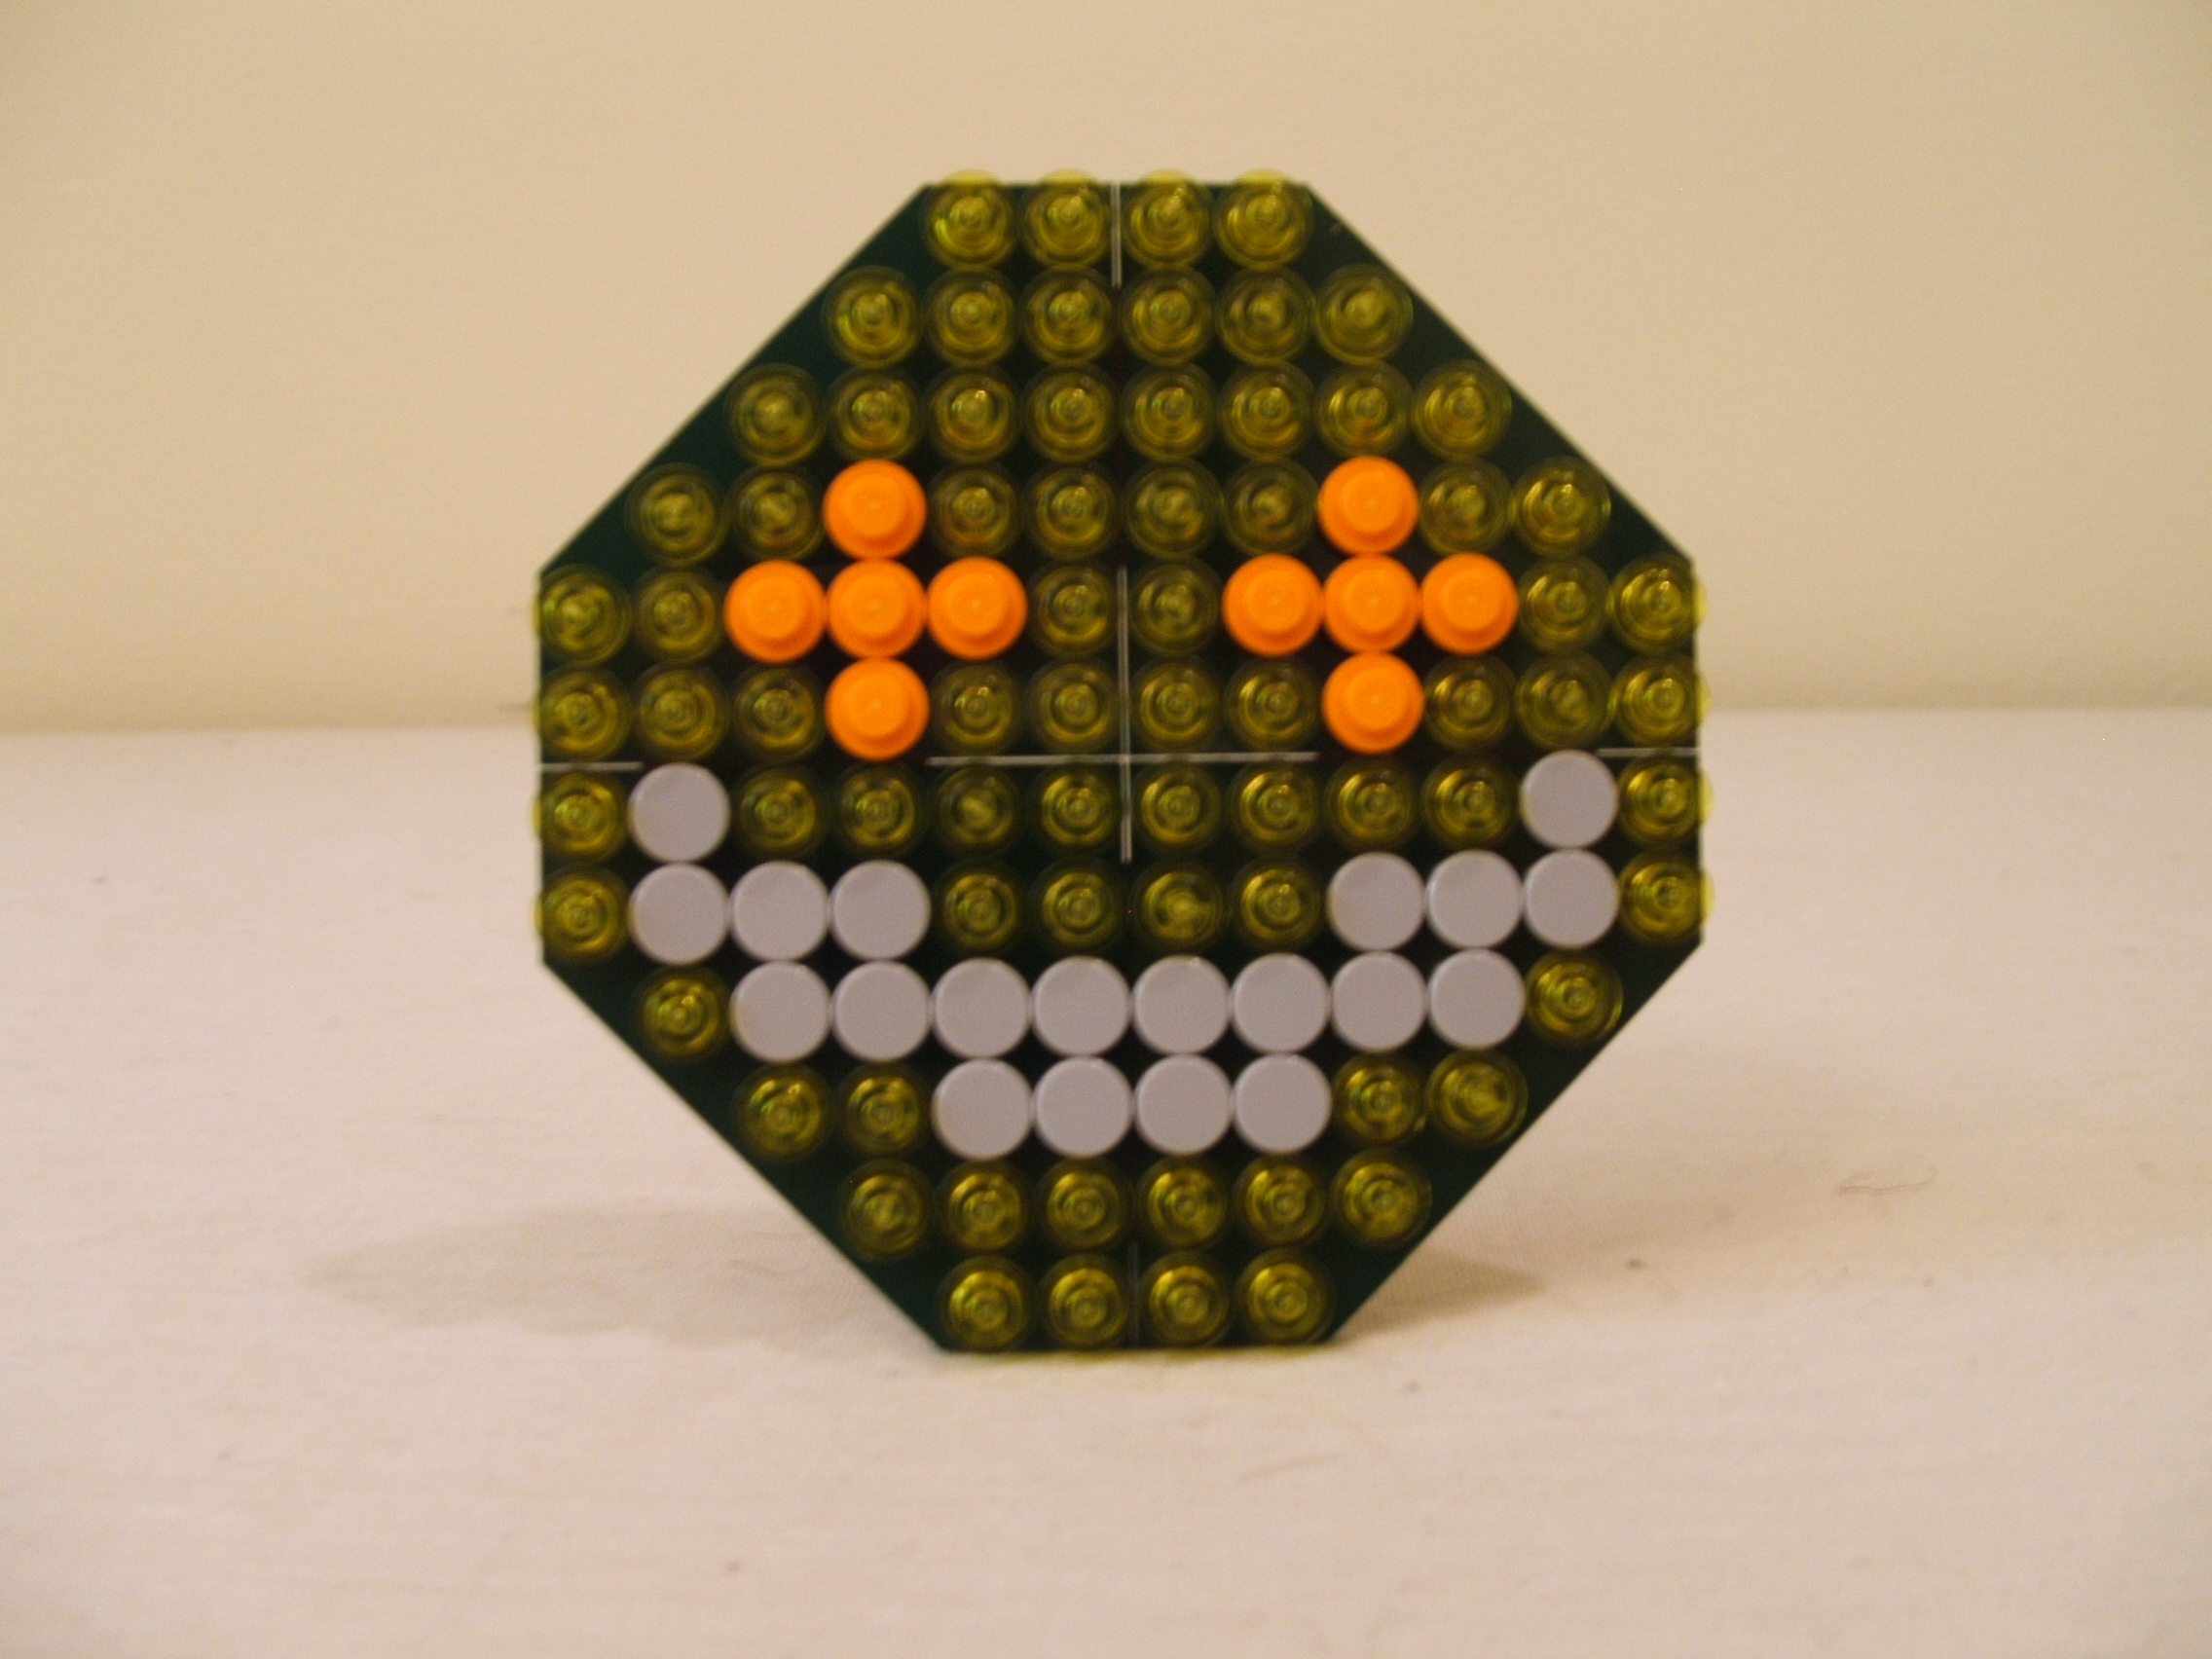
Terrys Smiley
This very simple and
silly model is my
attempt at Lego art.
Have a nice day!
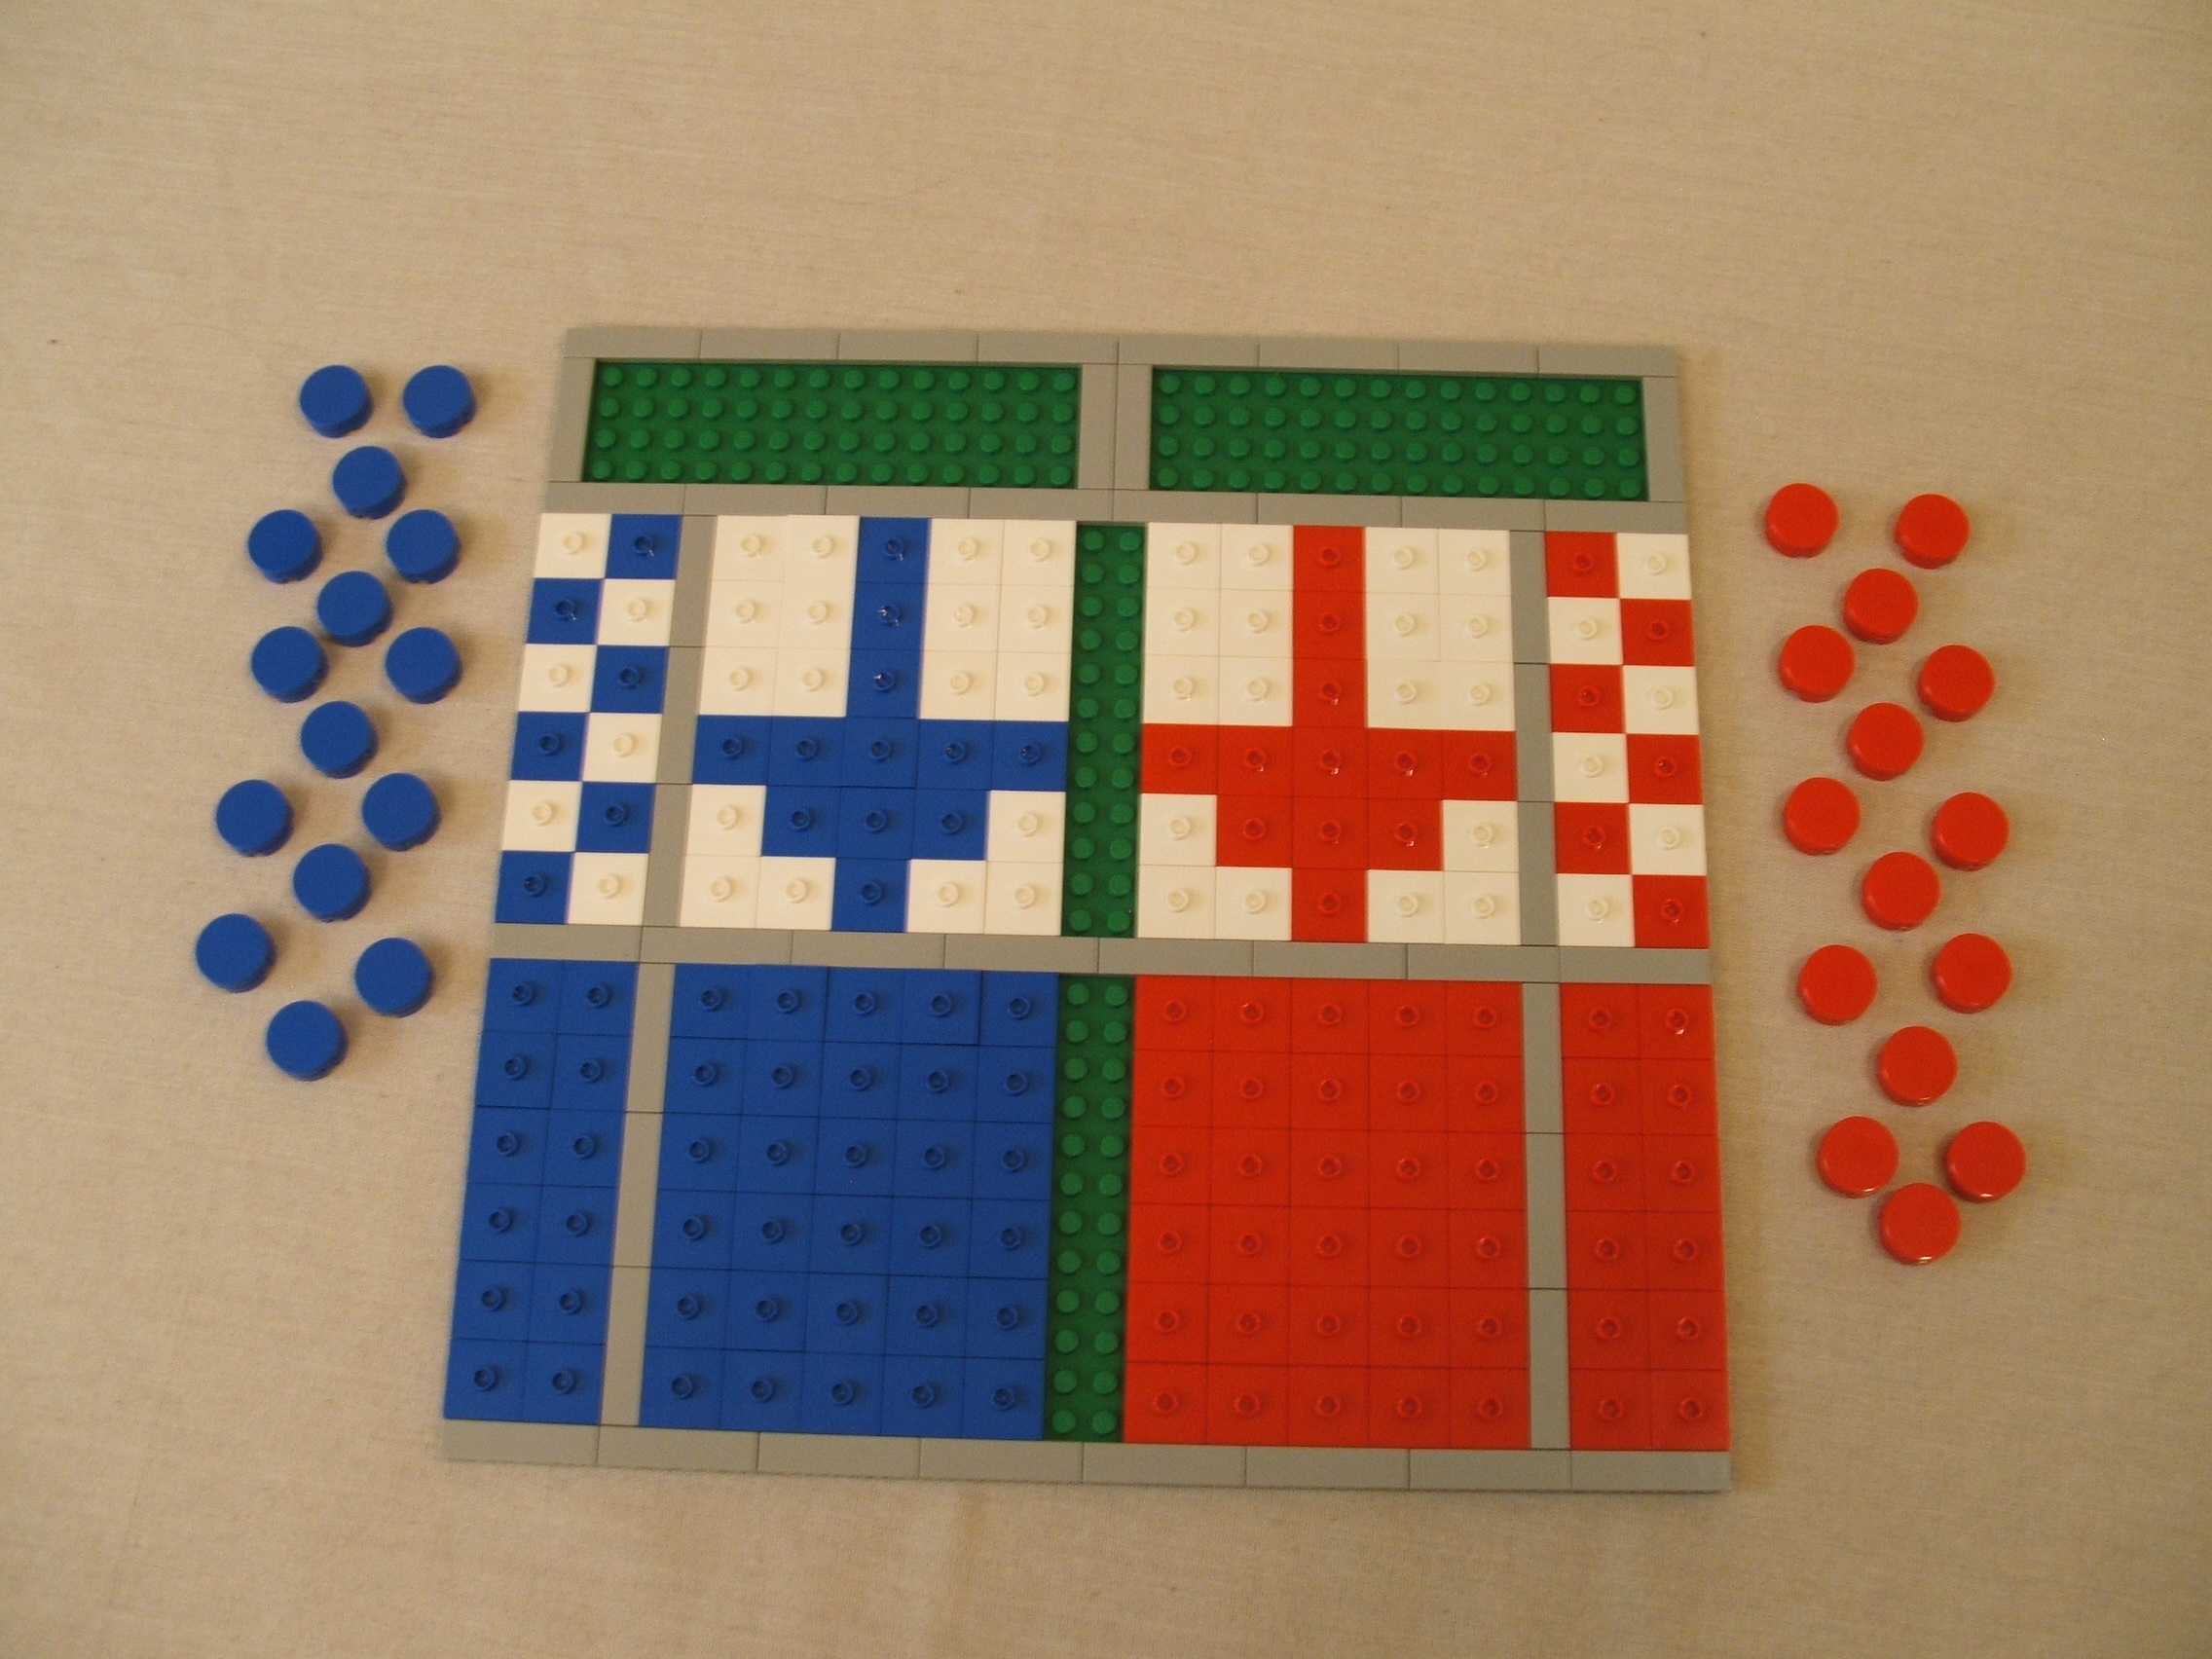
Terrys Backgammon
I have always liked to
play Backgammon. So in
the style of the Lego
Chess/Checkers set, I
created a backgammon
board.
Using the same principal
and whatever colors
desired, most any
board game can be
created with Lego.
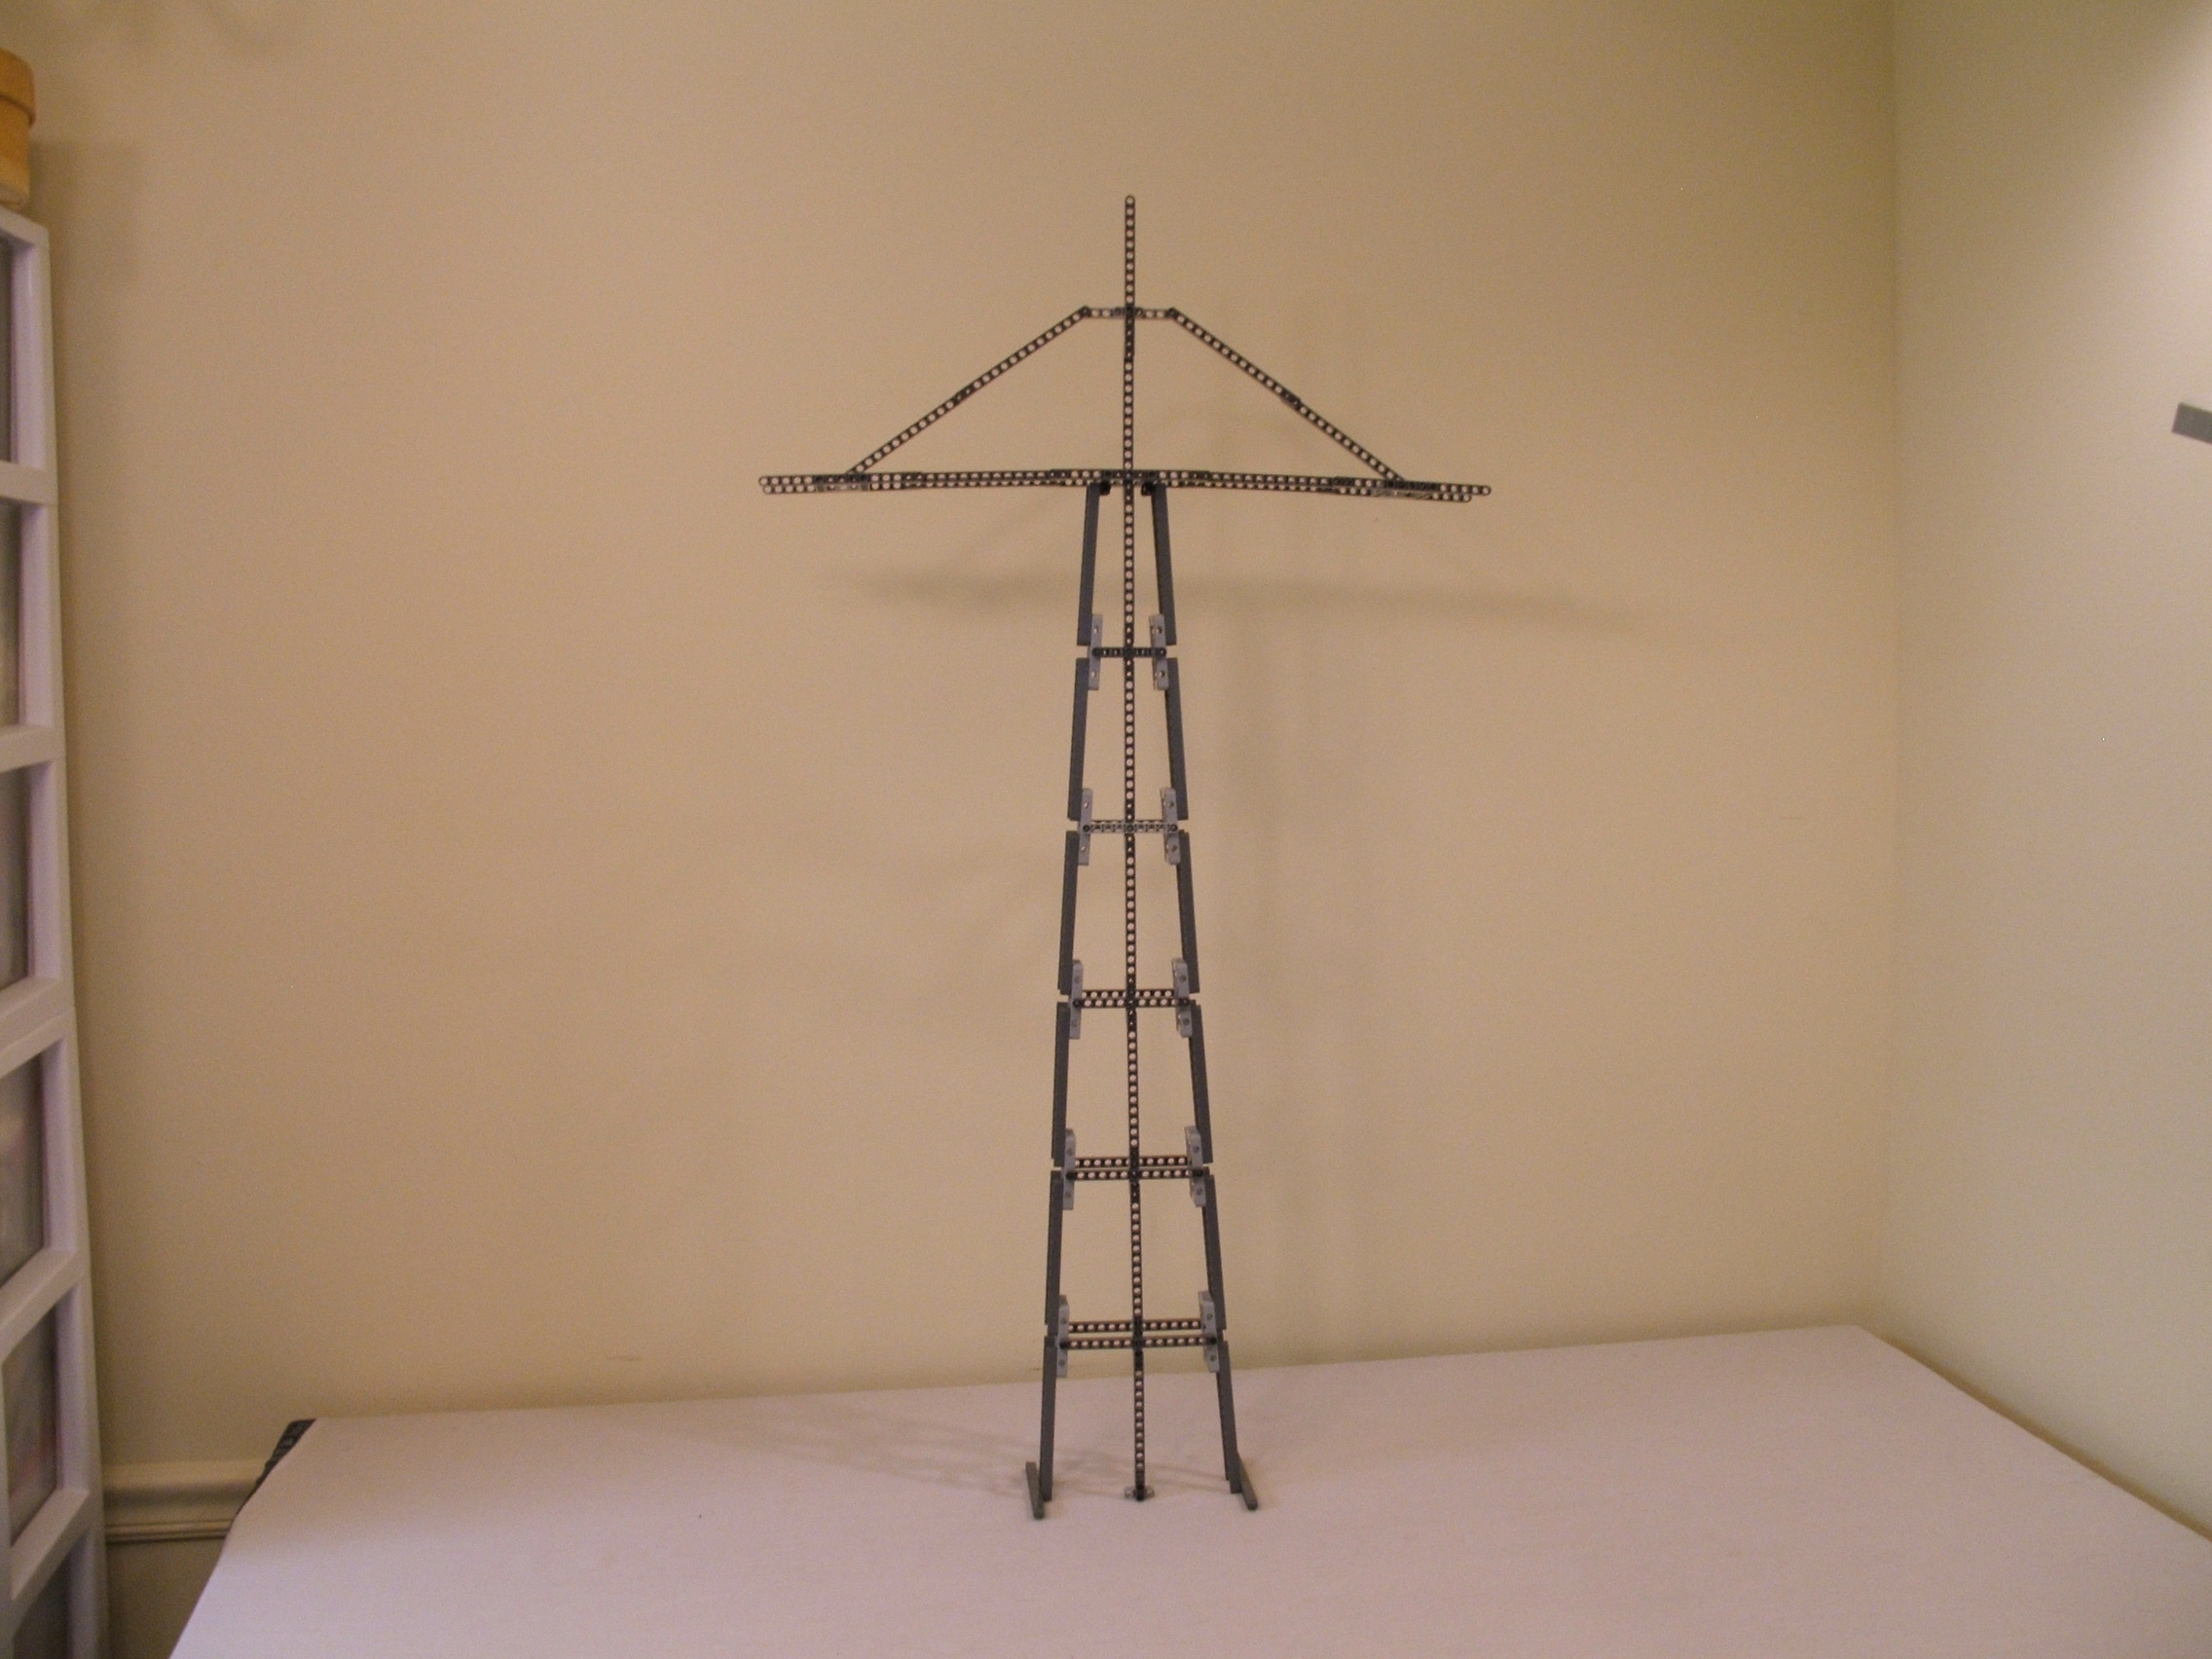
Terrys Radio tower
The radio tower was
specifically built for
the Roselle Library
display. It has a
truss system which
extends outward from
near the top, which
is used to suspend
the materials from.
Built using only
Technic elements, it
is an example of how
Technic is useful
for structures and
framework. It
incorporates bracing
and connections that
are similar to real
tower construction.
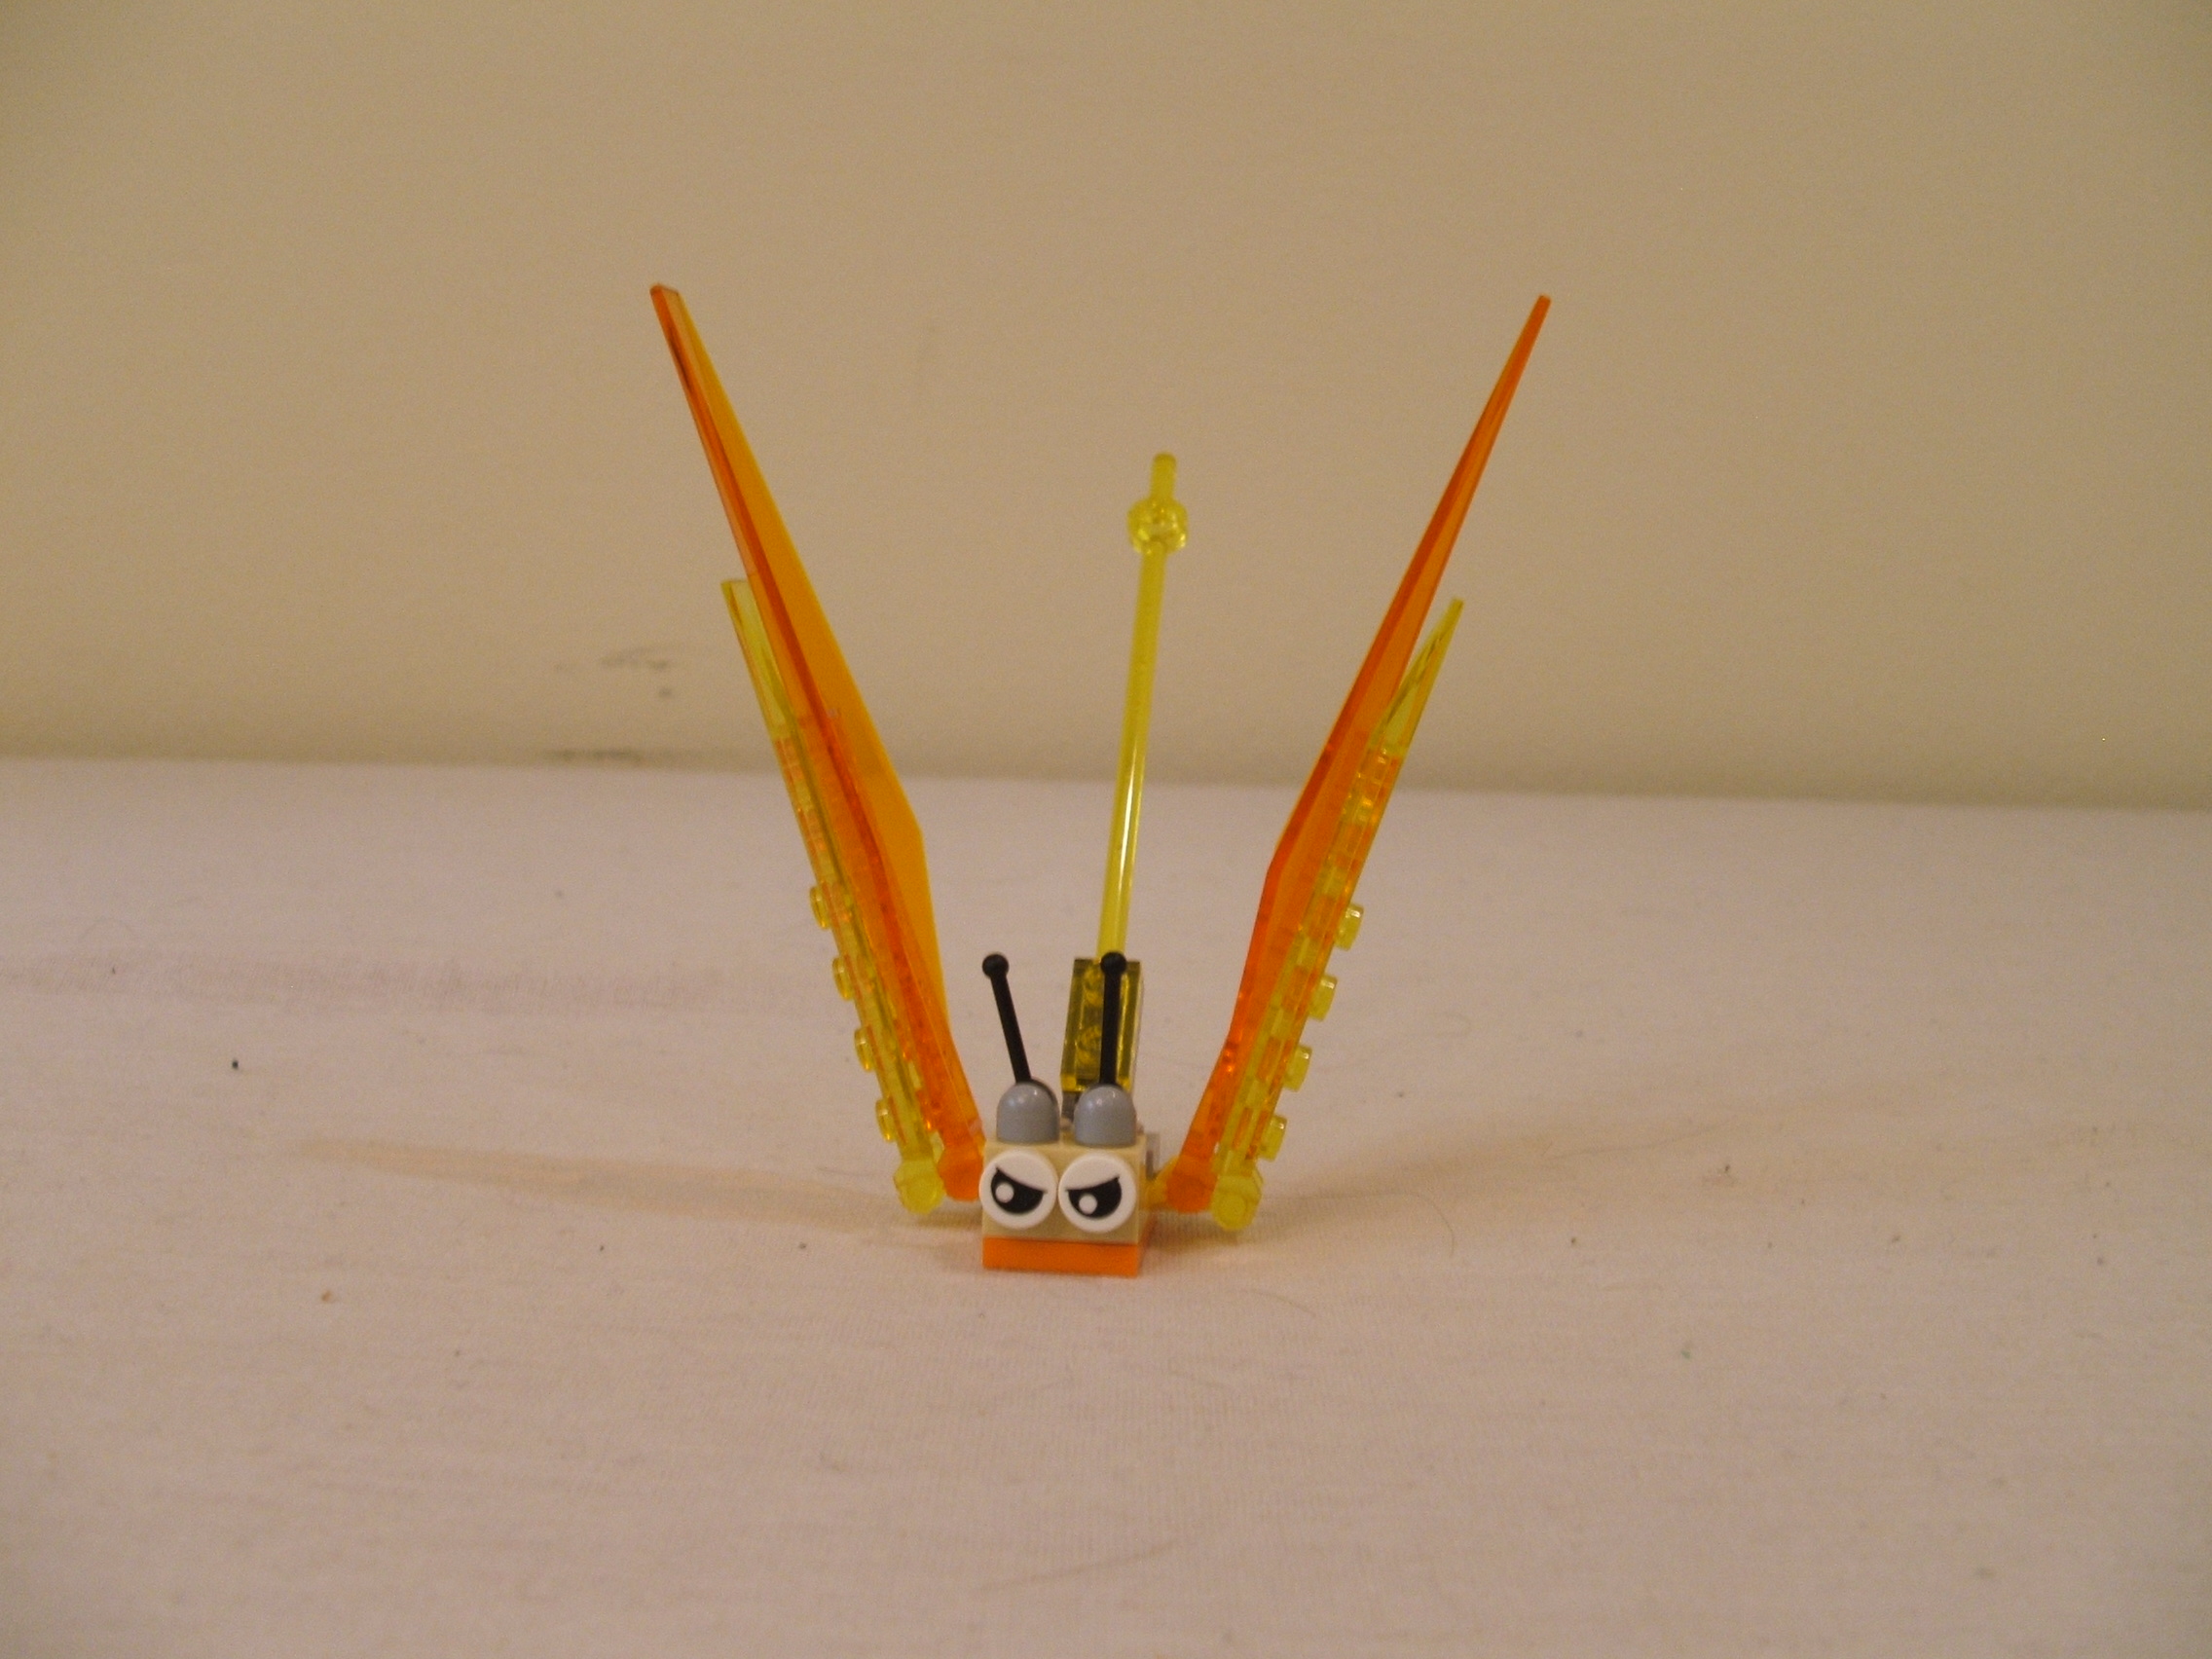
Terrys Insect
This insect is my
sarcastic
"tribute"
to mosquitos whom
I truly dislike.
Note the angry eyes.
Probably due to the
fact that it knows
I am about to swat
it.
Terrys Cubs logo
Chicago Cubs lego logo
Made from 2x4 bricks but
ends are toward front.
Model measures 19.5x19.5
inches.
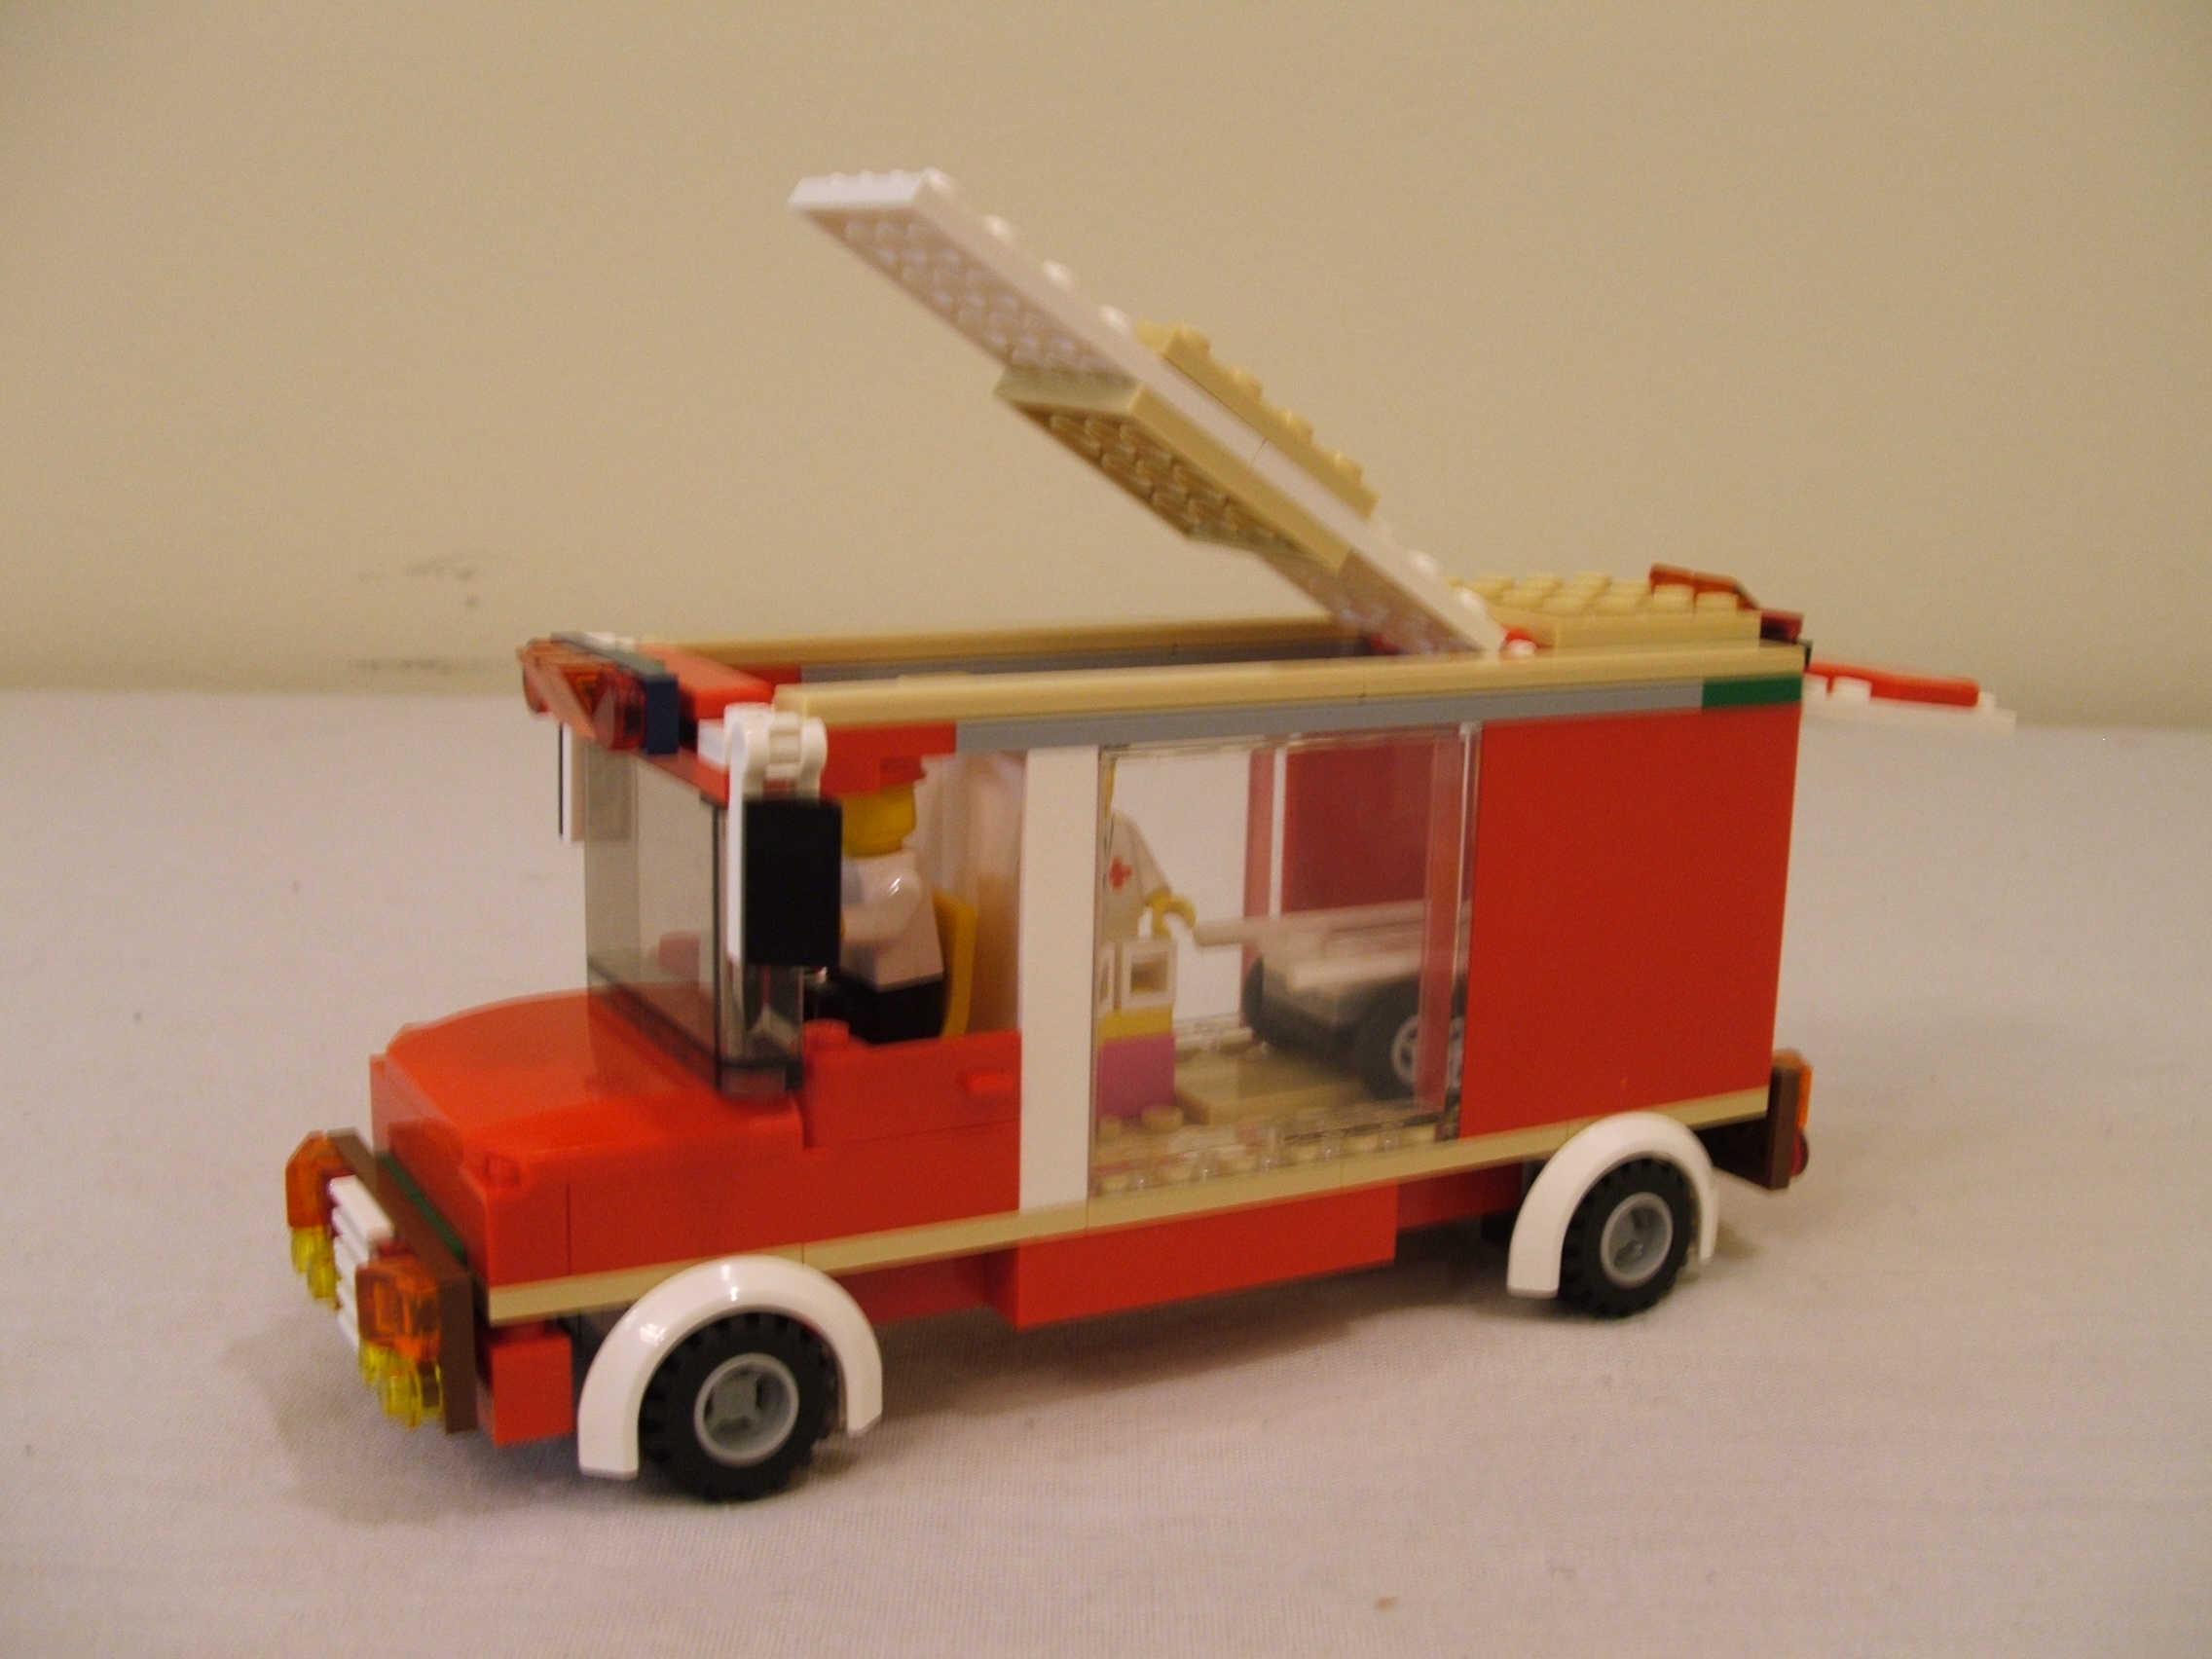
Terrys Lego ambulance
Partially based upon a Lego
ambulance that has been
retired, this has some
pieces used in that set.
Note the large side windows
that allow inside view of
the nurse and stretcher. My
version of stretcher has
wheels for easy transport.
Rear door allows easy access
and the roof is hinged to
allow easy access to nurse
and driver.
This is a rebuild of the
earlier version which I
did not have all of the
RED pieces for.
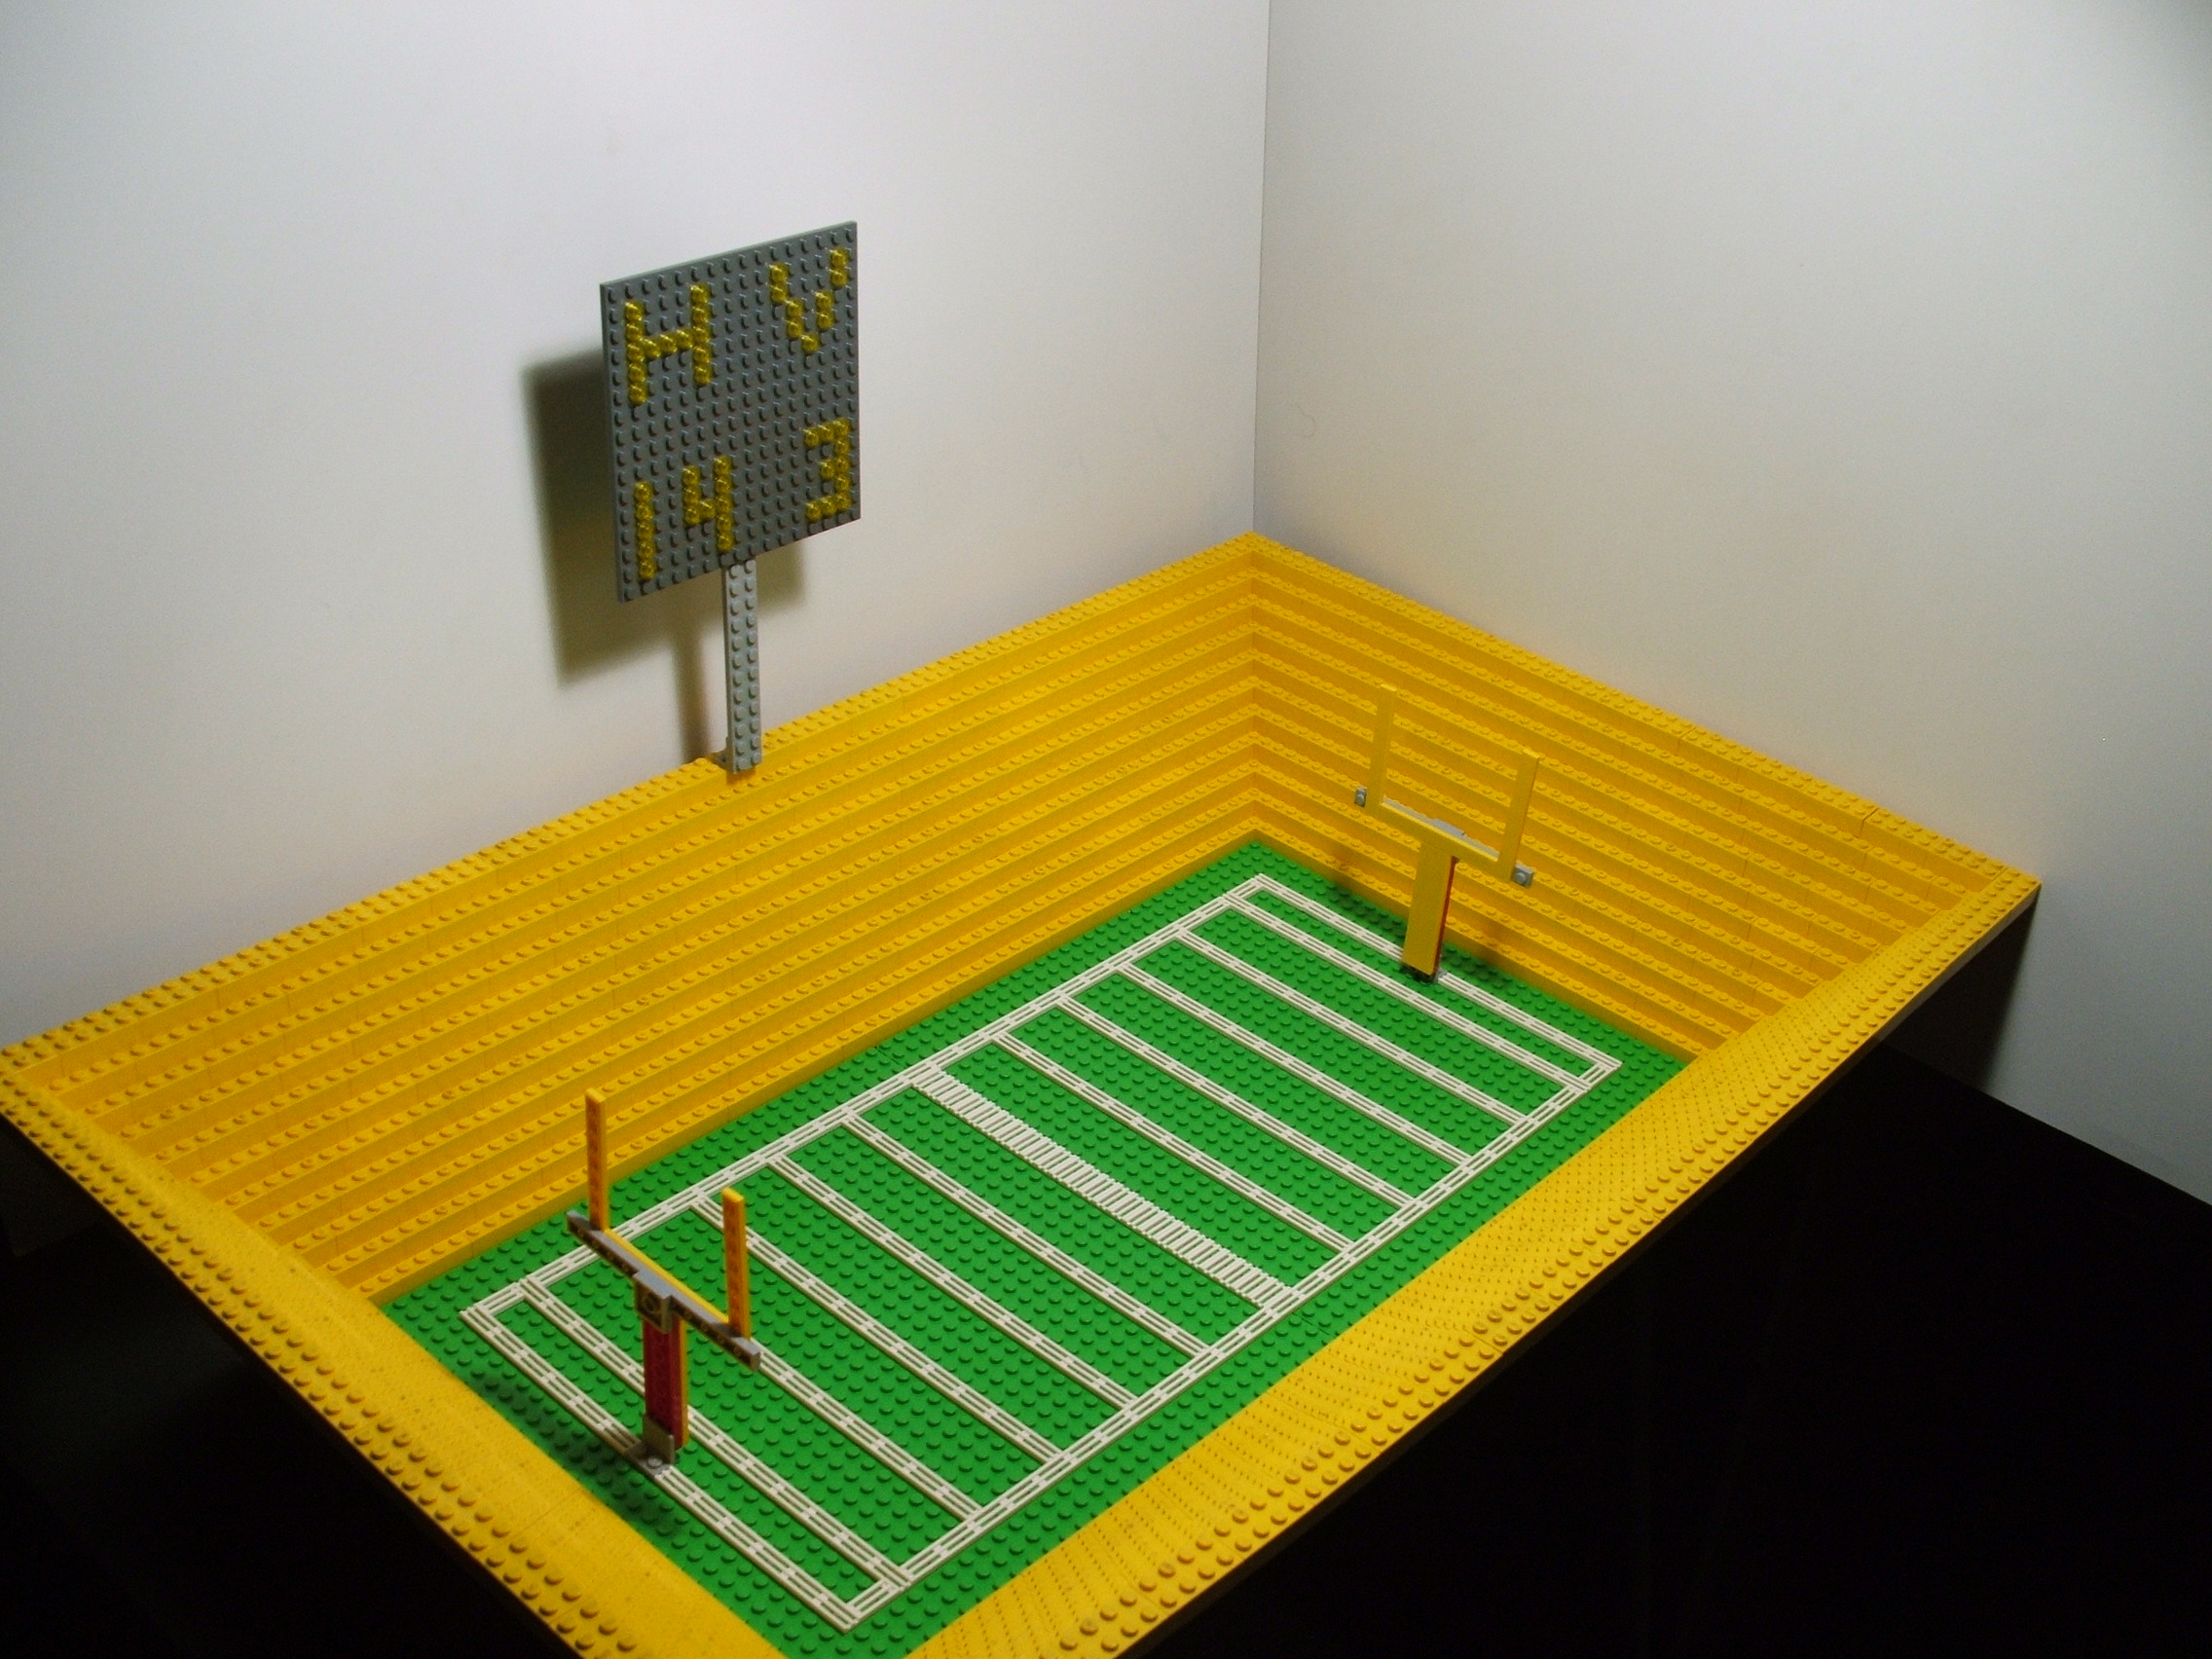
Terrys Lego Football field
Football field.
Just for fun the day before
the Super Bowl I created a
basic football field layout.
Not fancy but it works.
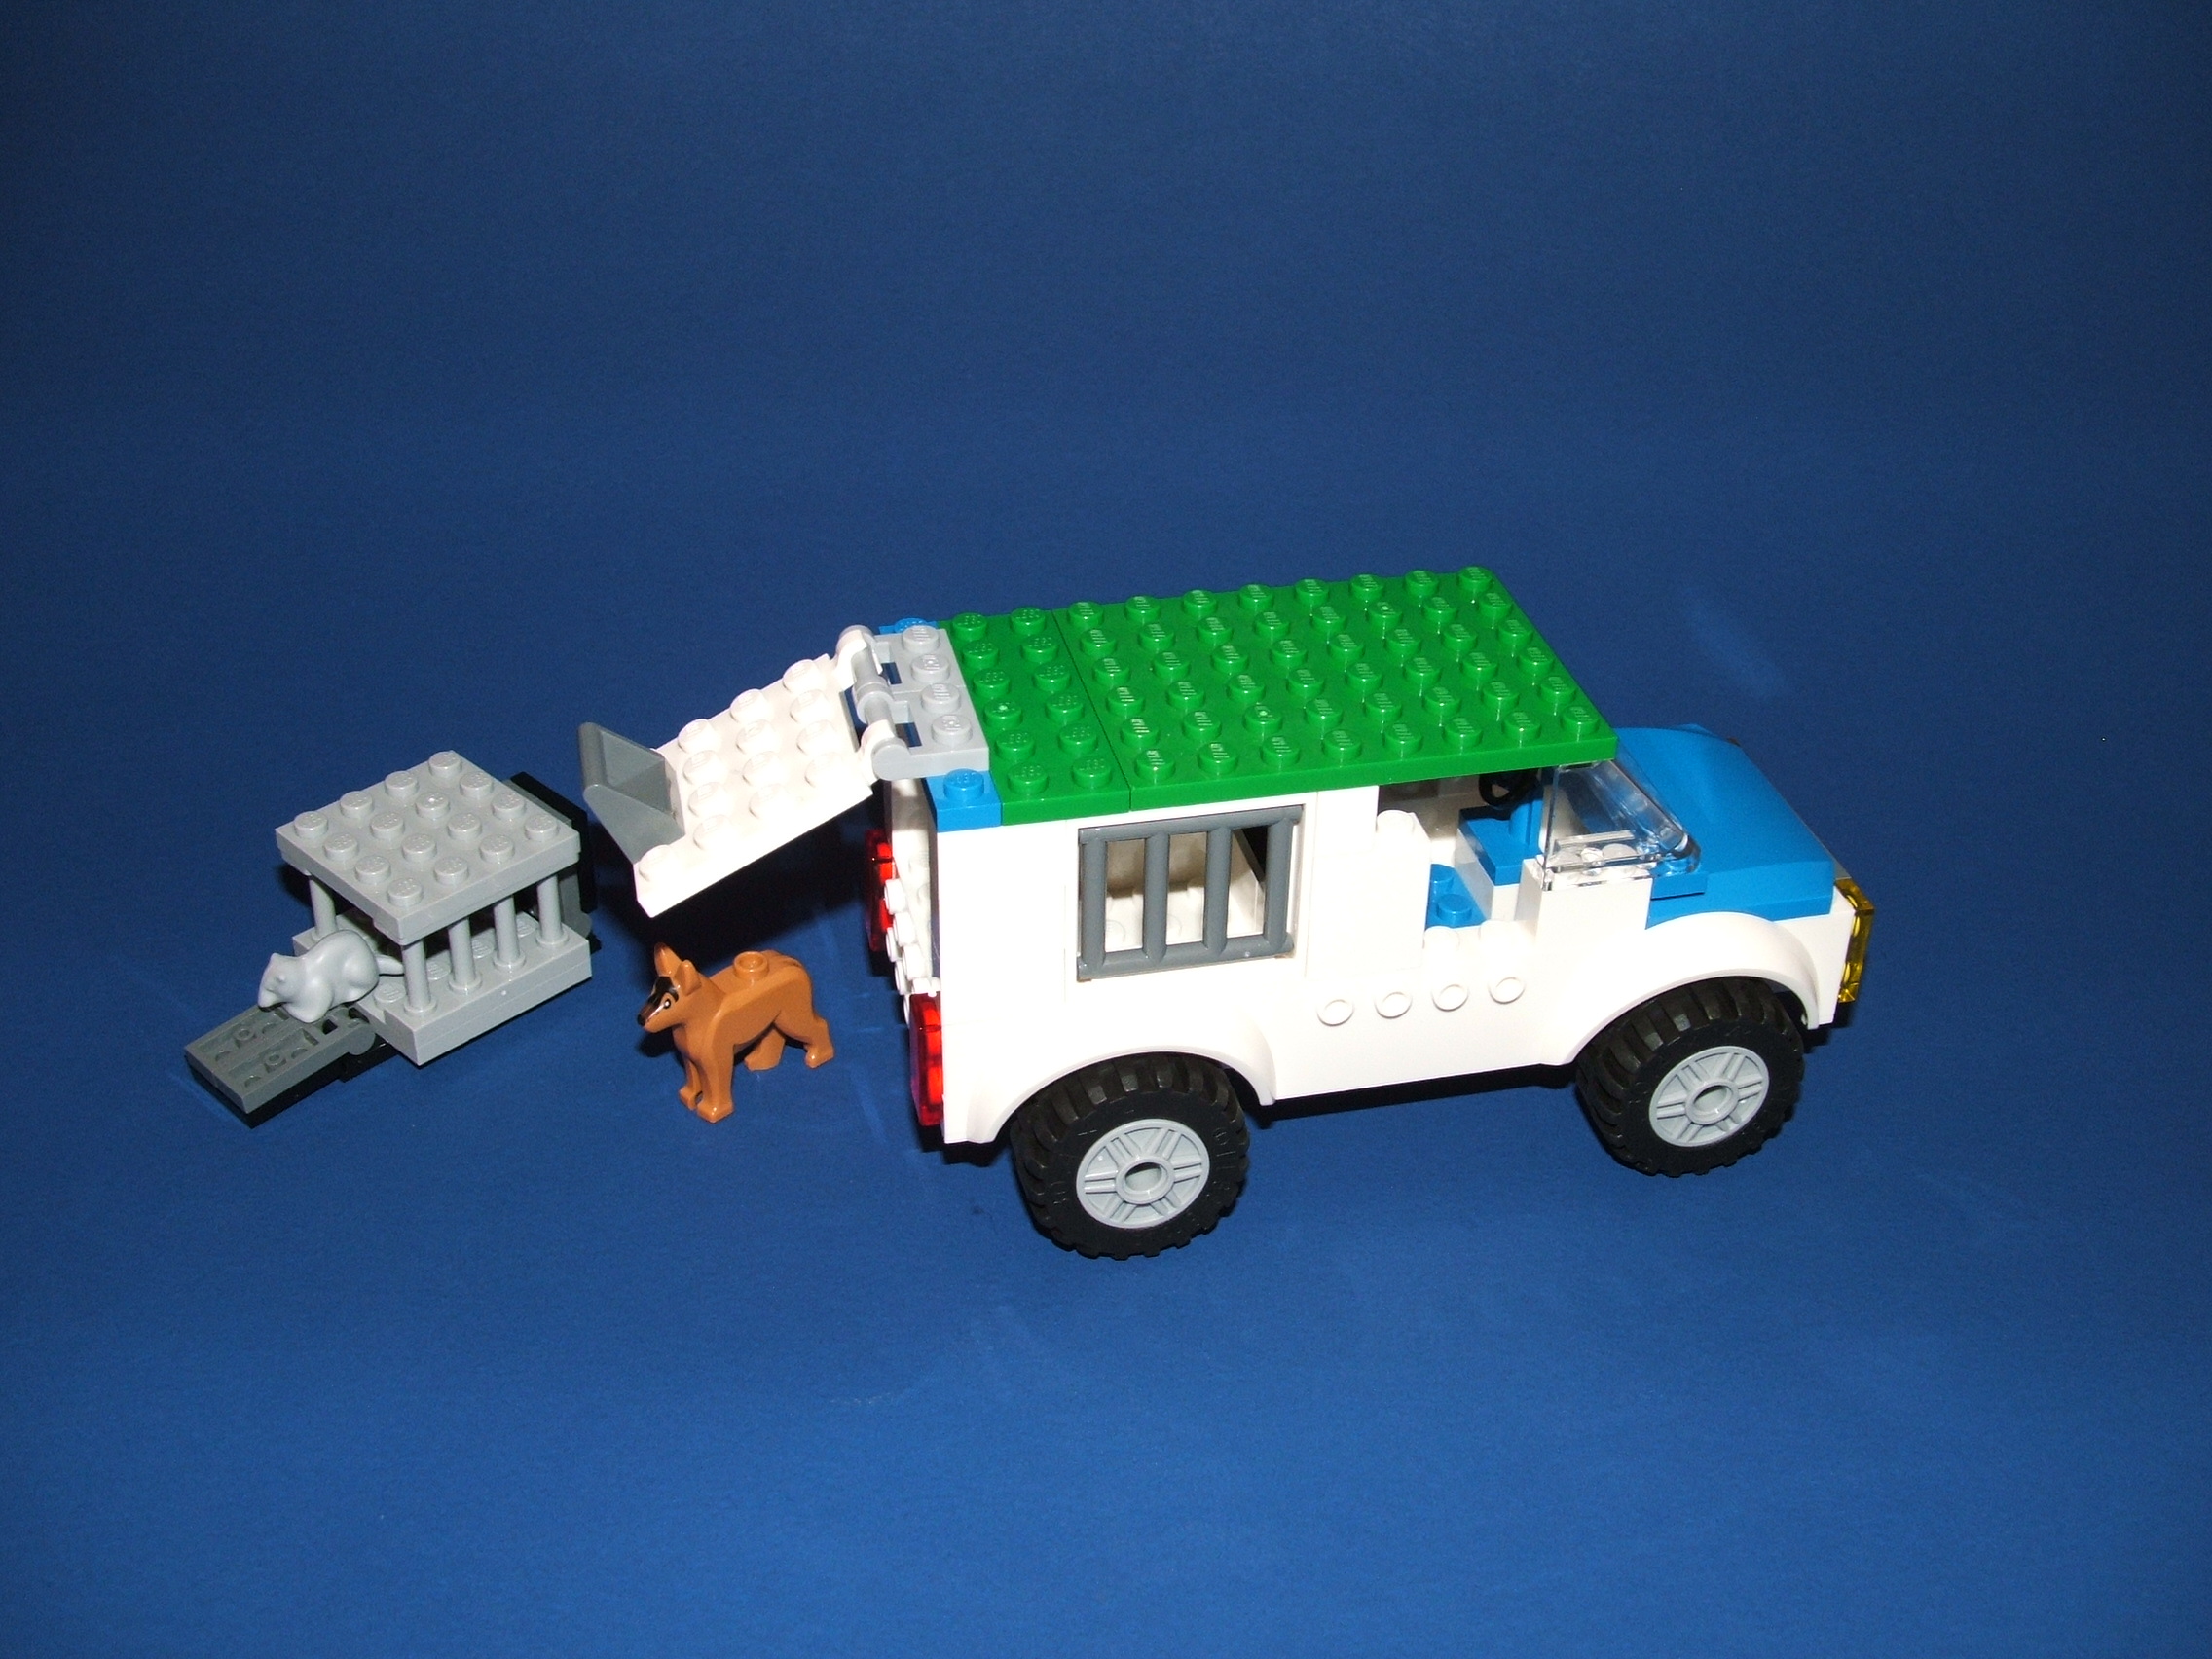
Terrys Lego Animal rescue
Animal rescue.
A small vehicle designed for
transporting animals. The
rear of the van opens for
animal access in the cage
area. I also created a small
animal cage. In this photo
a dog and mouse are shown to
demonstrate sizes of the items.
Terrys Lego Bus
My version of a public bus.
The bus is 8 posts wide and 42
posts long (3x13 inches). Thus
minifigures can actually walk
to their place and sit.
A view from the back.
Another angle showing the bench
style seating as oppossed to the
individual seat style.
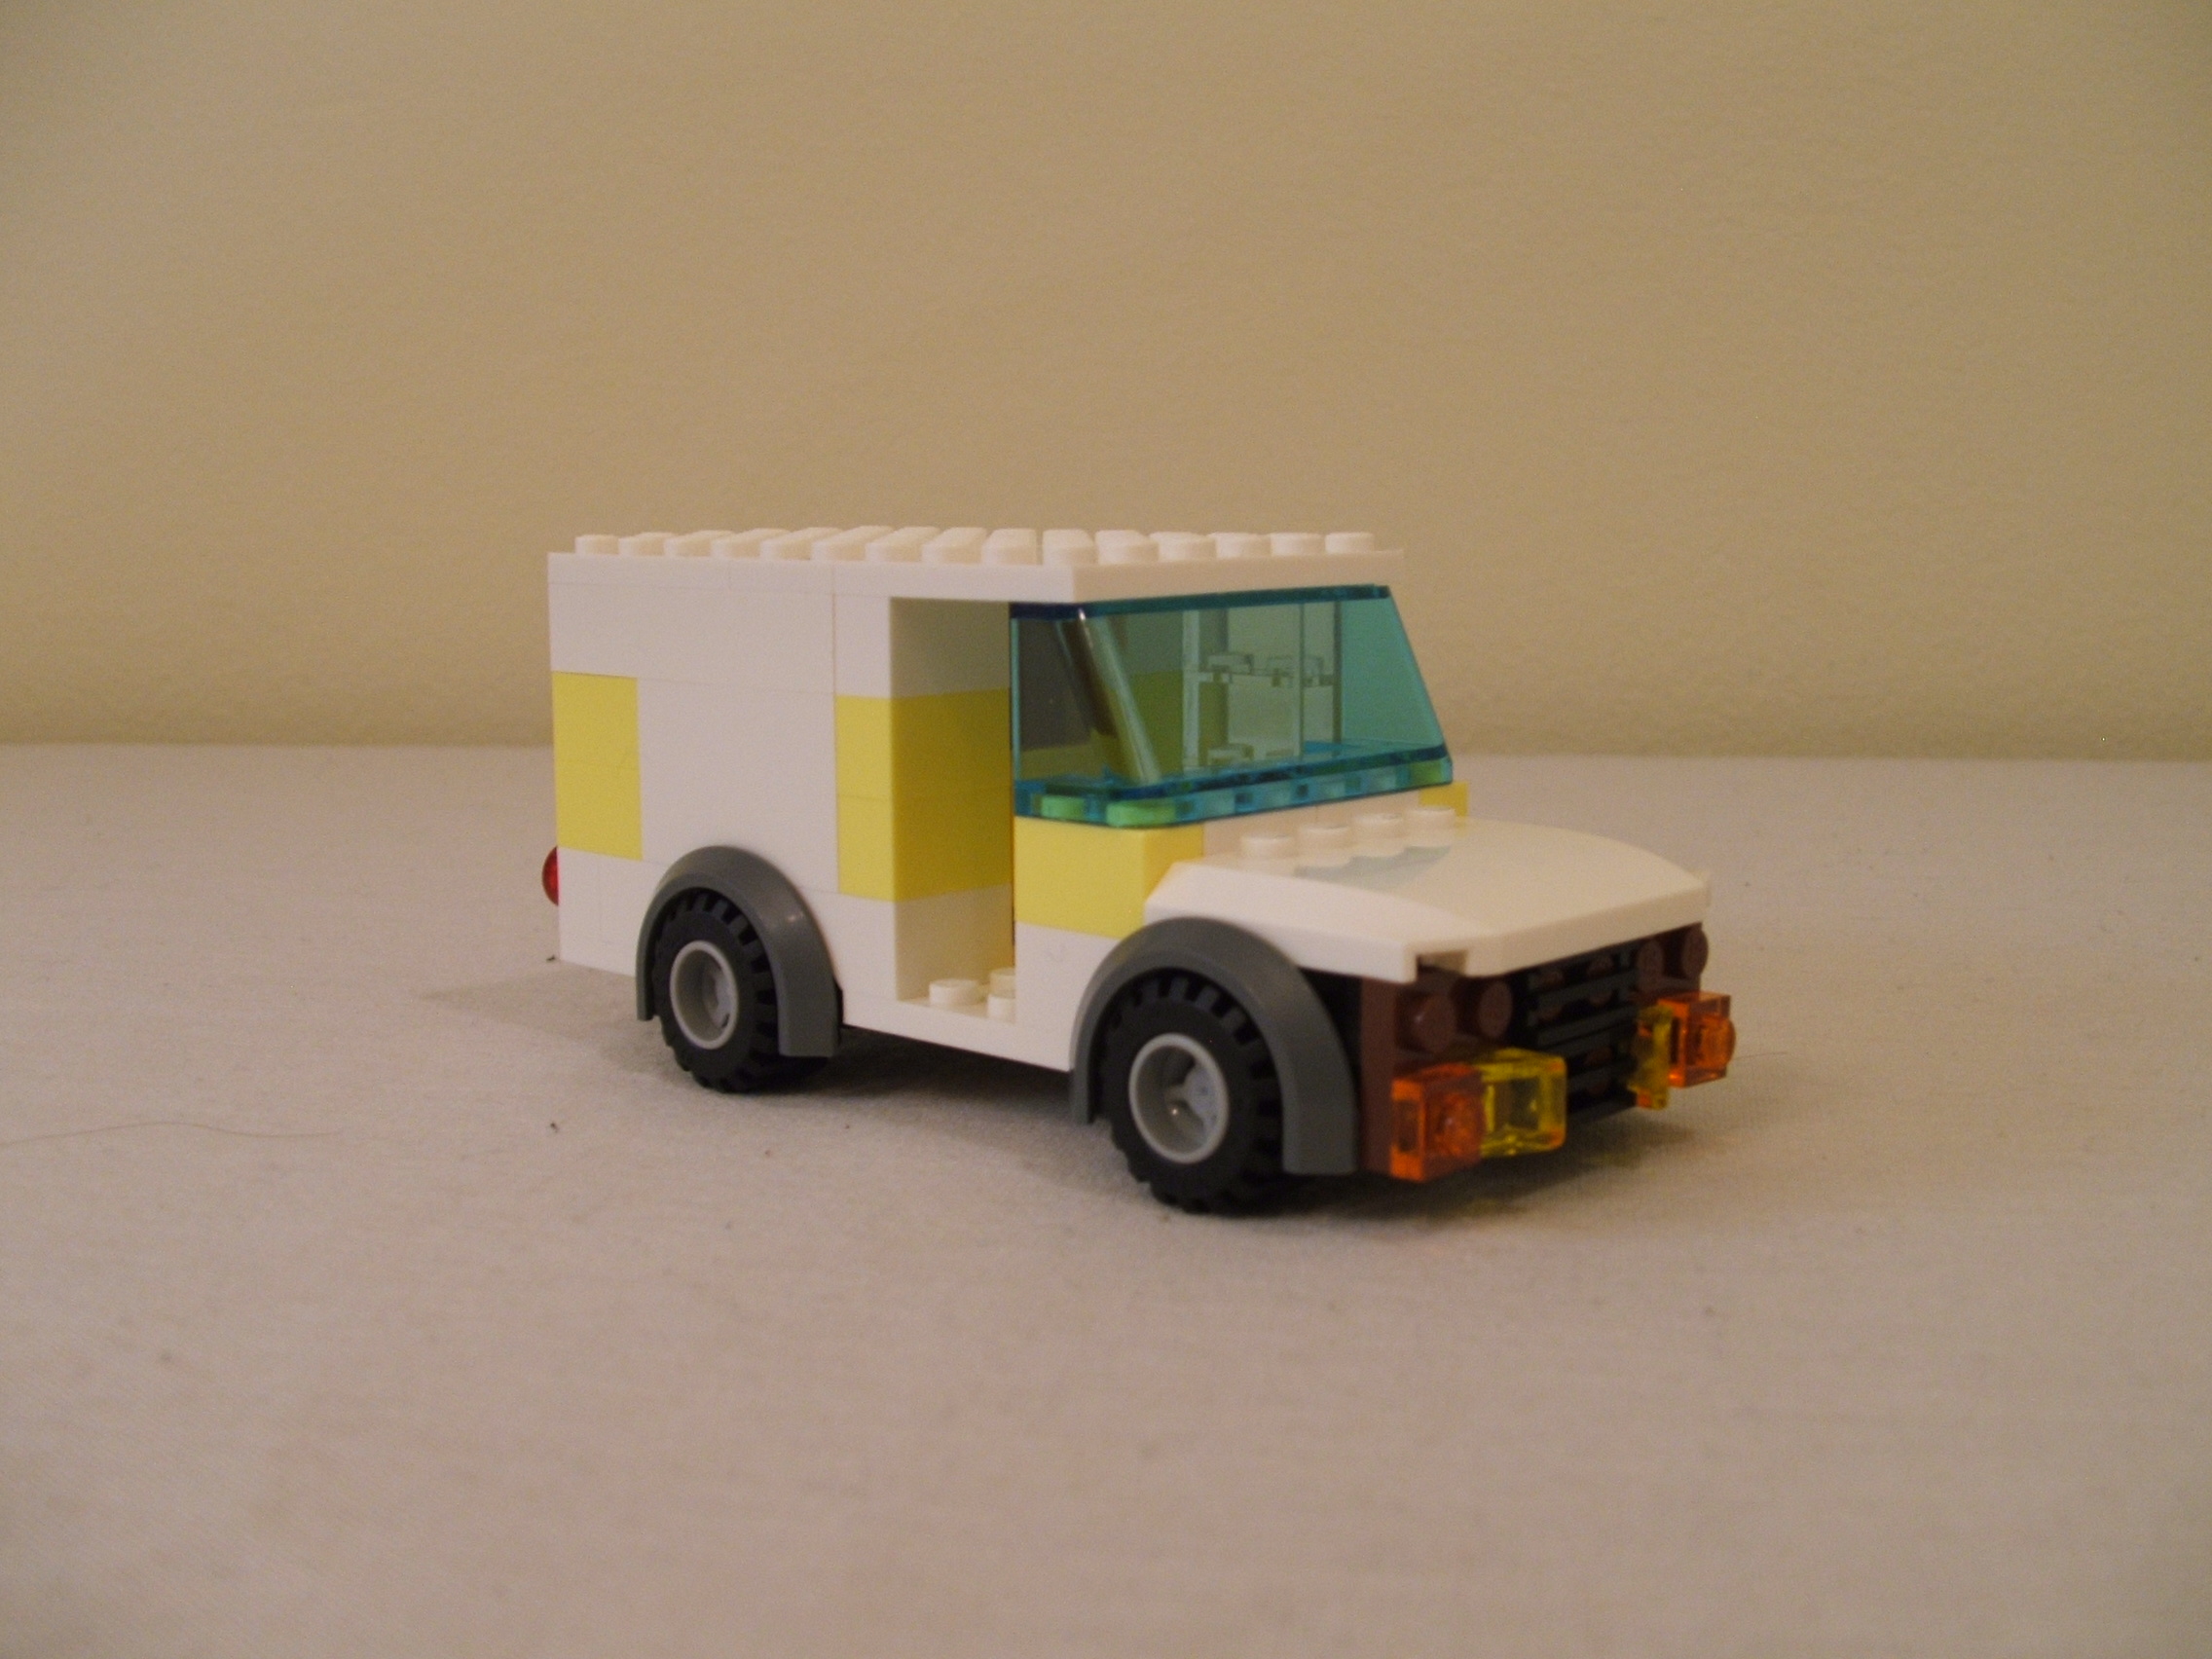
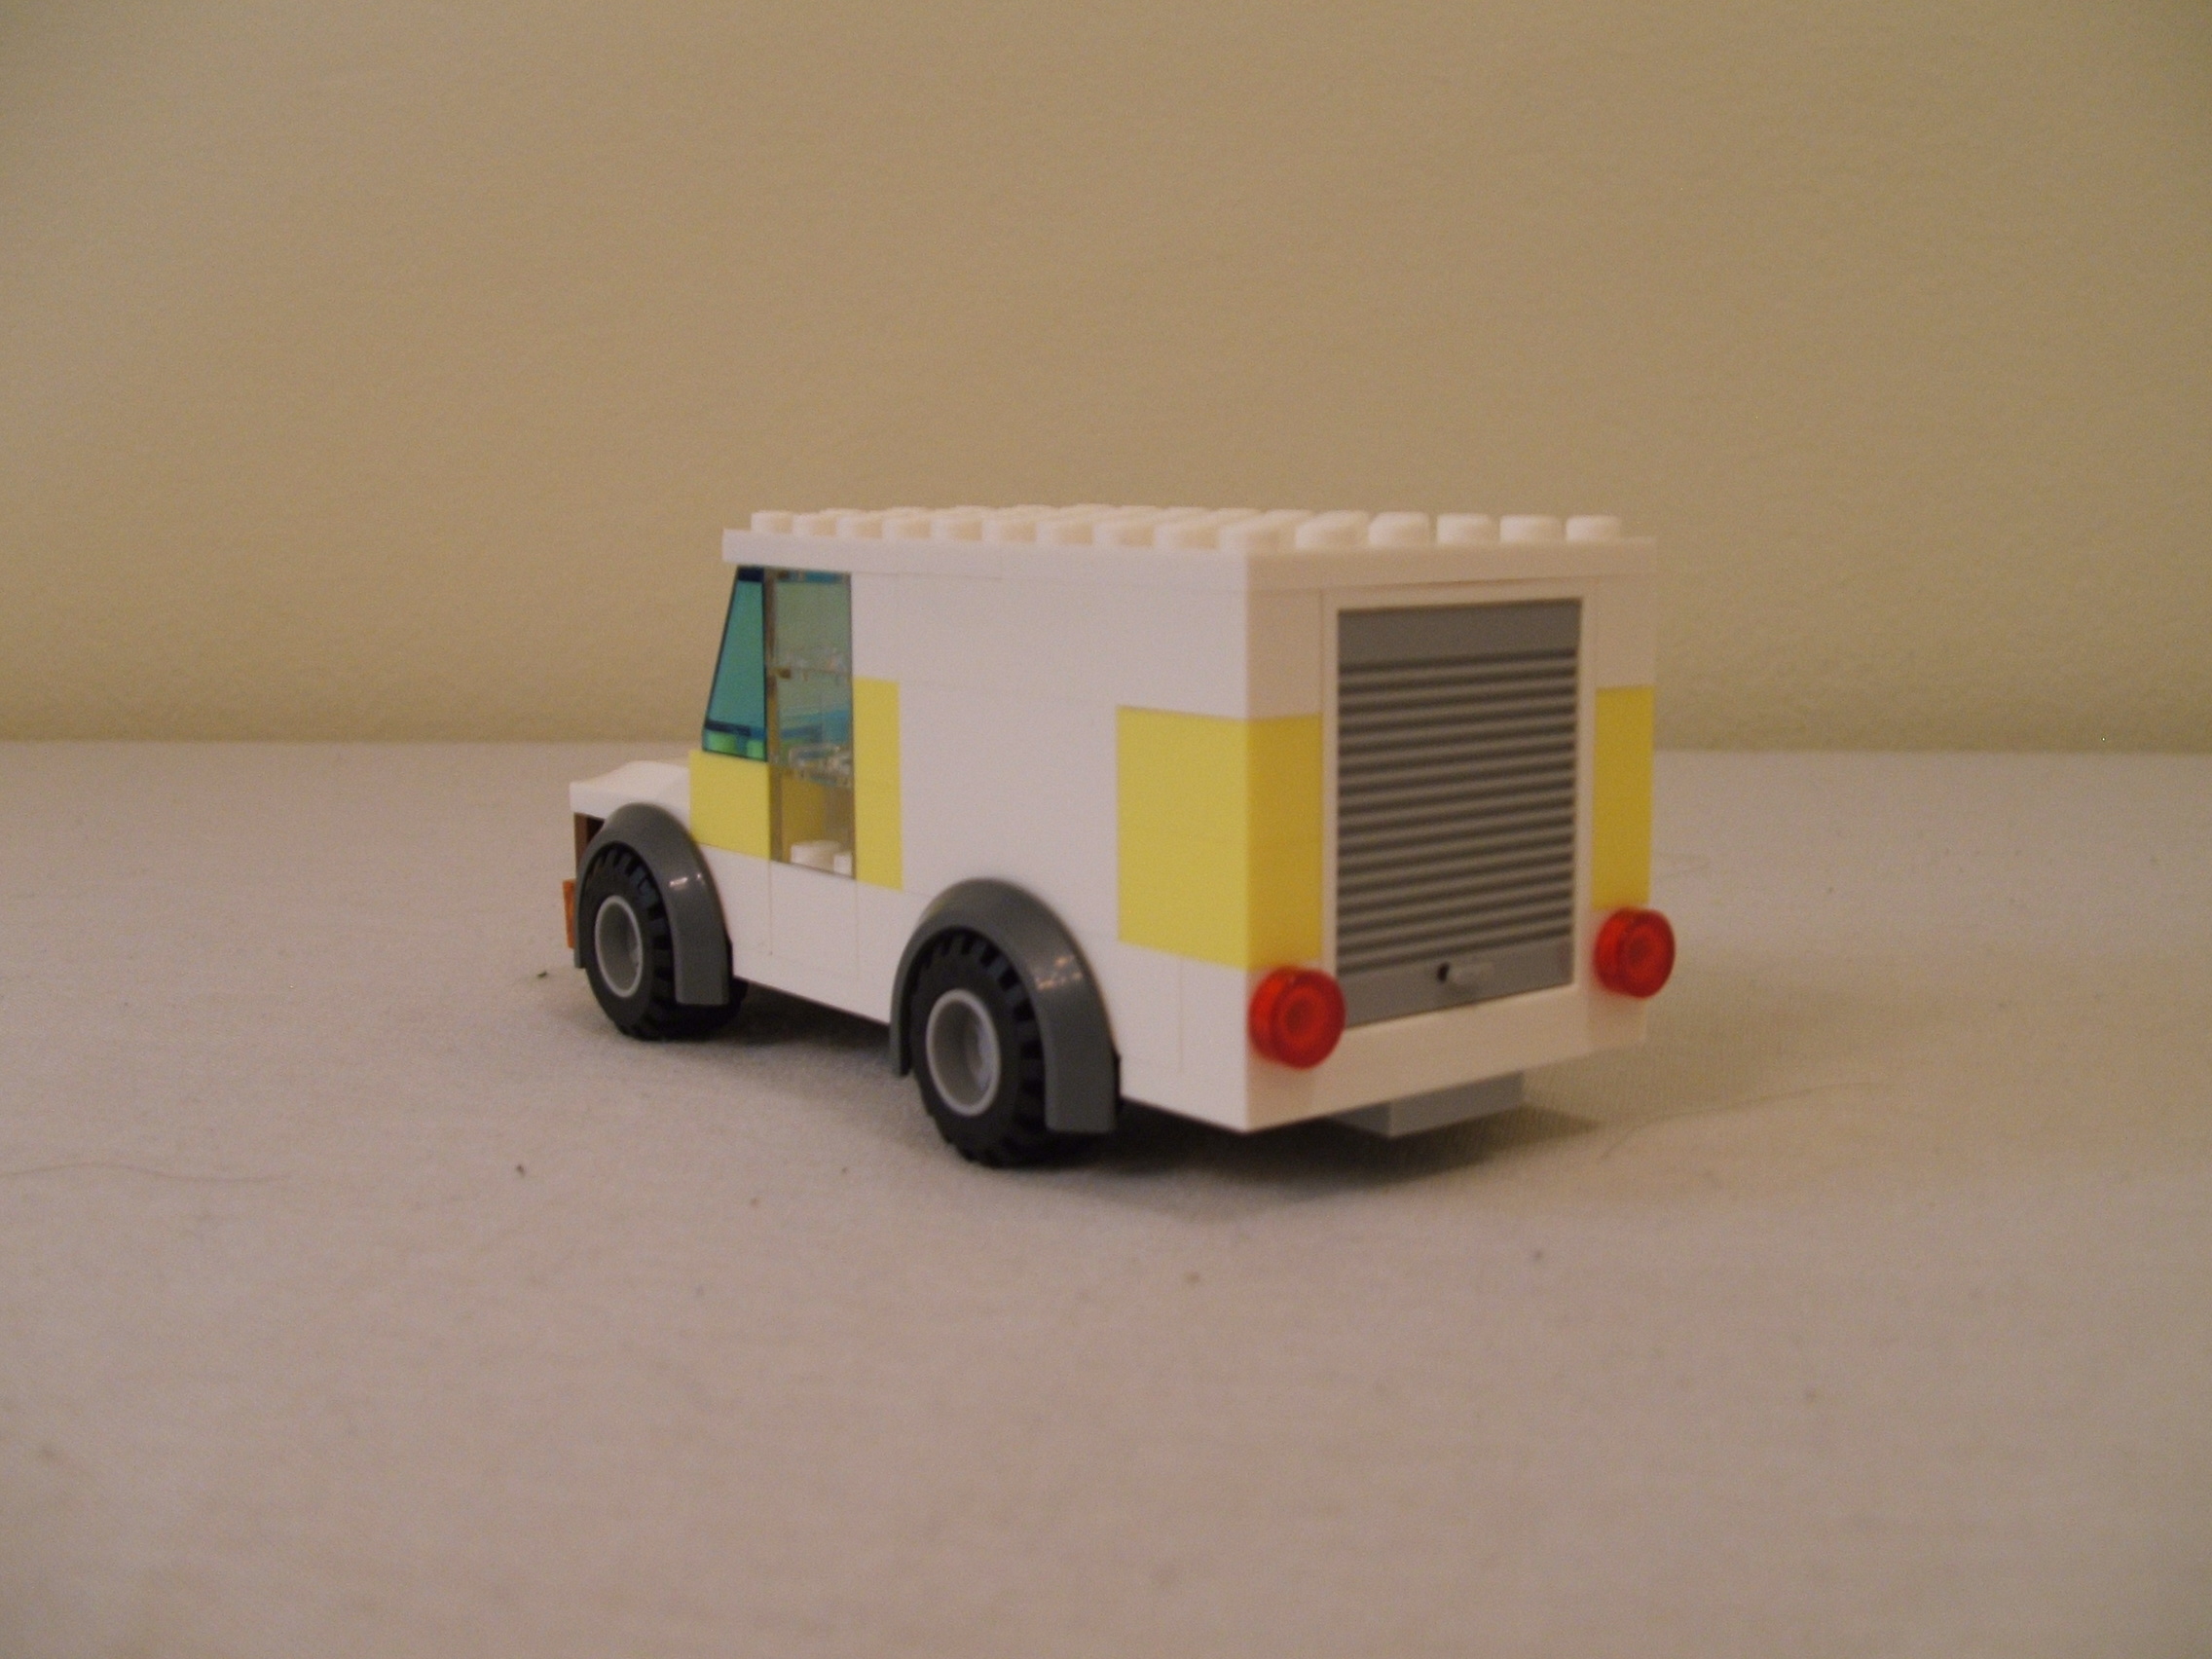
Terrys Lego Generi-van
What started out as a mail
truck build resulted in a
vehicle that could serve
many functions. So I named
it my Generi-van (generic
panel truck).
Meant to be all white (ran
out of white pieces), this
can be almost anything.
When I learn how to do my
own custom stickers, I can
create some for the side
panel (wall unit) piece and
simply swap that piece to
change the purpose of the
vehicle.
For right now, this is setup
as a mail delivery vehicle.
Note the open left side door
(the side letter carriers use)
and no door on the right (the
side facing traffic).
Rear view.
I like the flip open style
door. Will probably get a
few more of these for other
builds I have in mind.
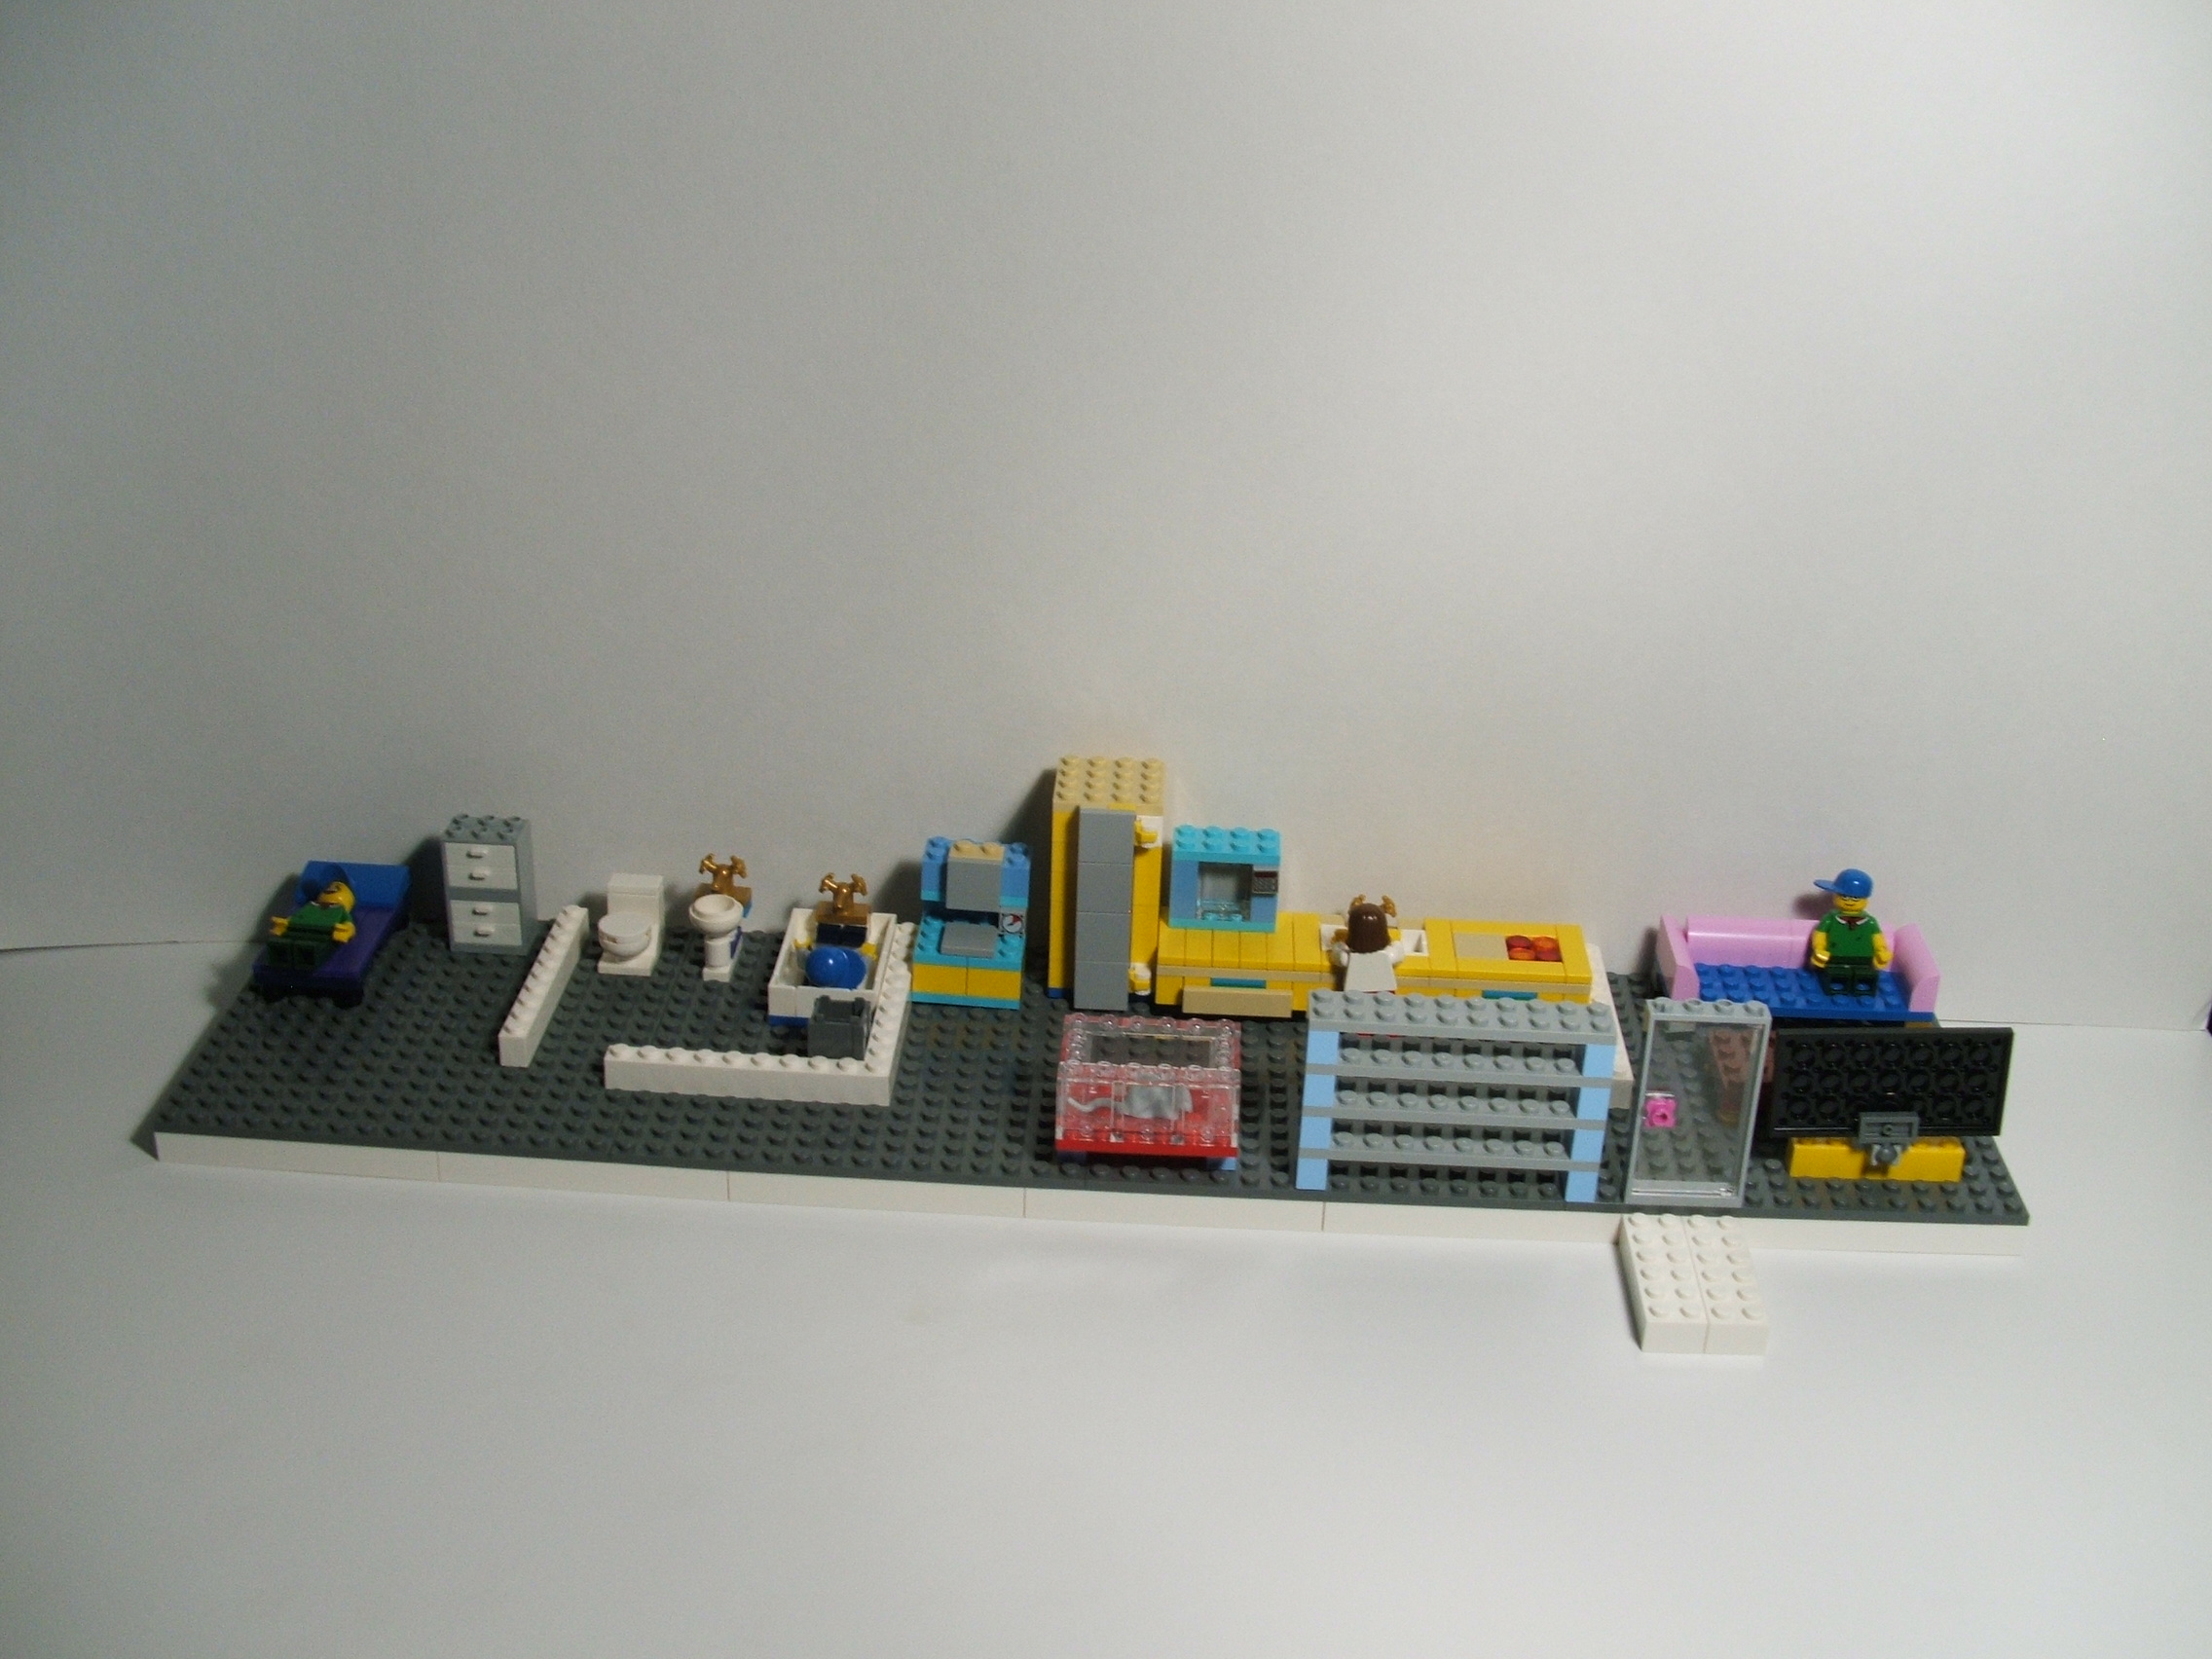
Terrys Lego furniture
I now have an assortment of
furniture. Here it is laid
out in mobile home fashion.
Since this was taken I have
added more items and built
a tall house, which I will
add here later.
Items left to right are:
bed, dresser, toilet, sink
bathtub, washer/dryer,
refridgerator, aquarium
with a mouse, bookcase or
shelving, countertop with
sink and stovetop and a
microwave on it, couch,
coffee table (which is
mostly hidden), and a TV.
Have since added a cedar chest
for the bedroom, a few lamps,
furnace and water heater for
the basement, workbench with
sink, and a fireplace.
Currently working on a pool
table and swimming pool.
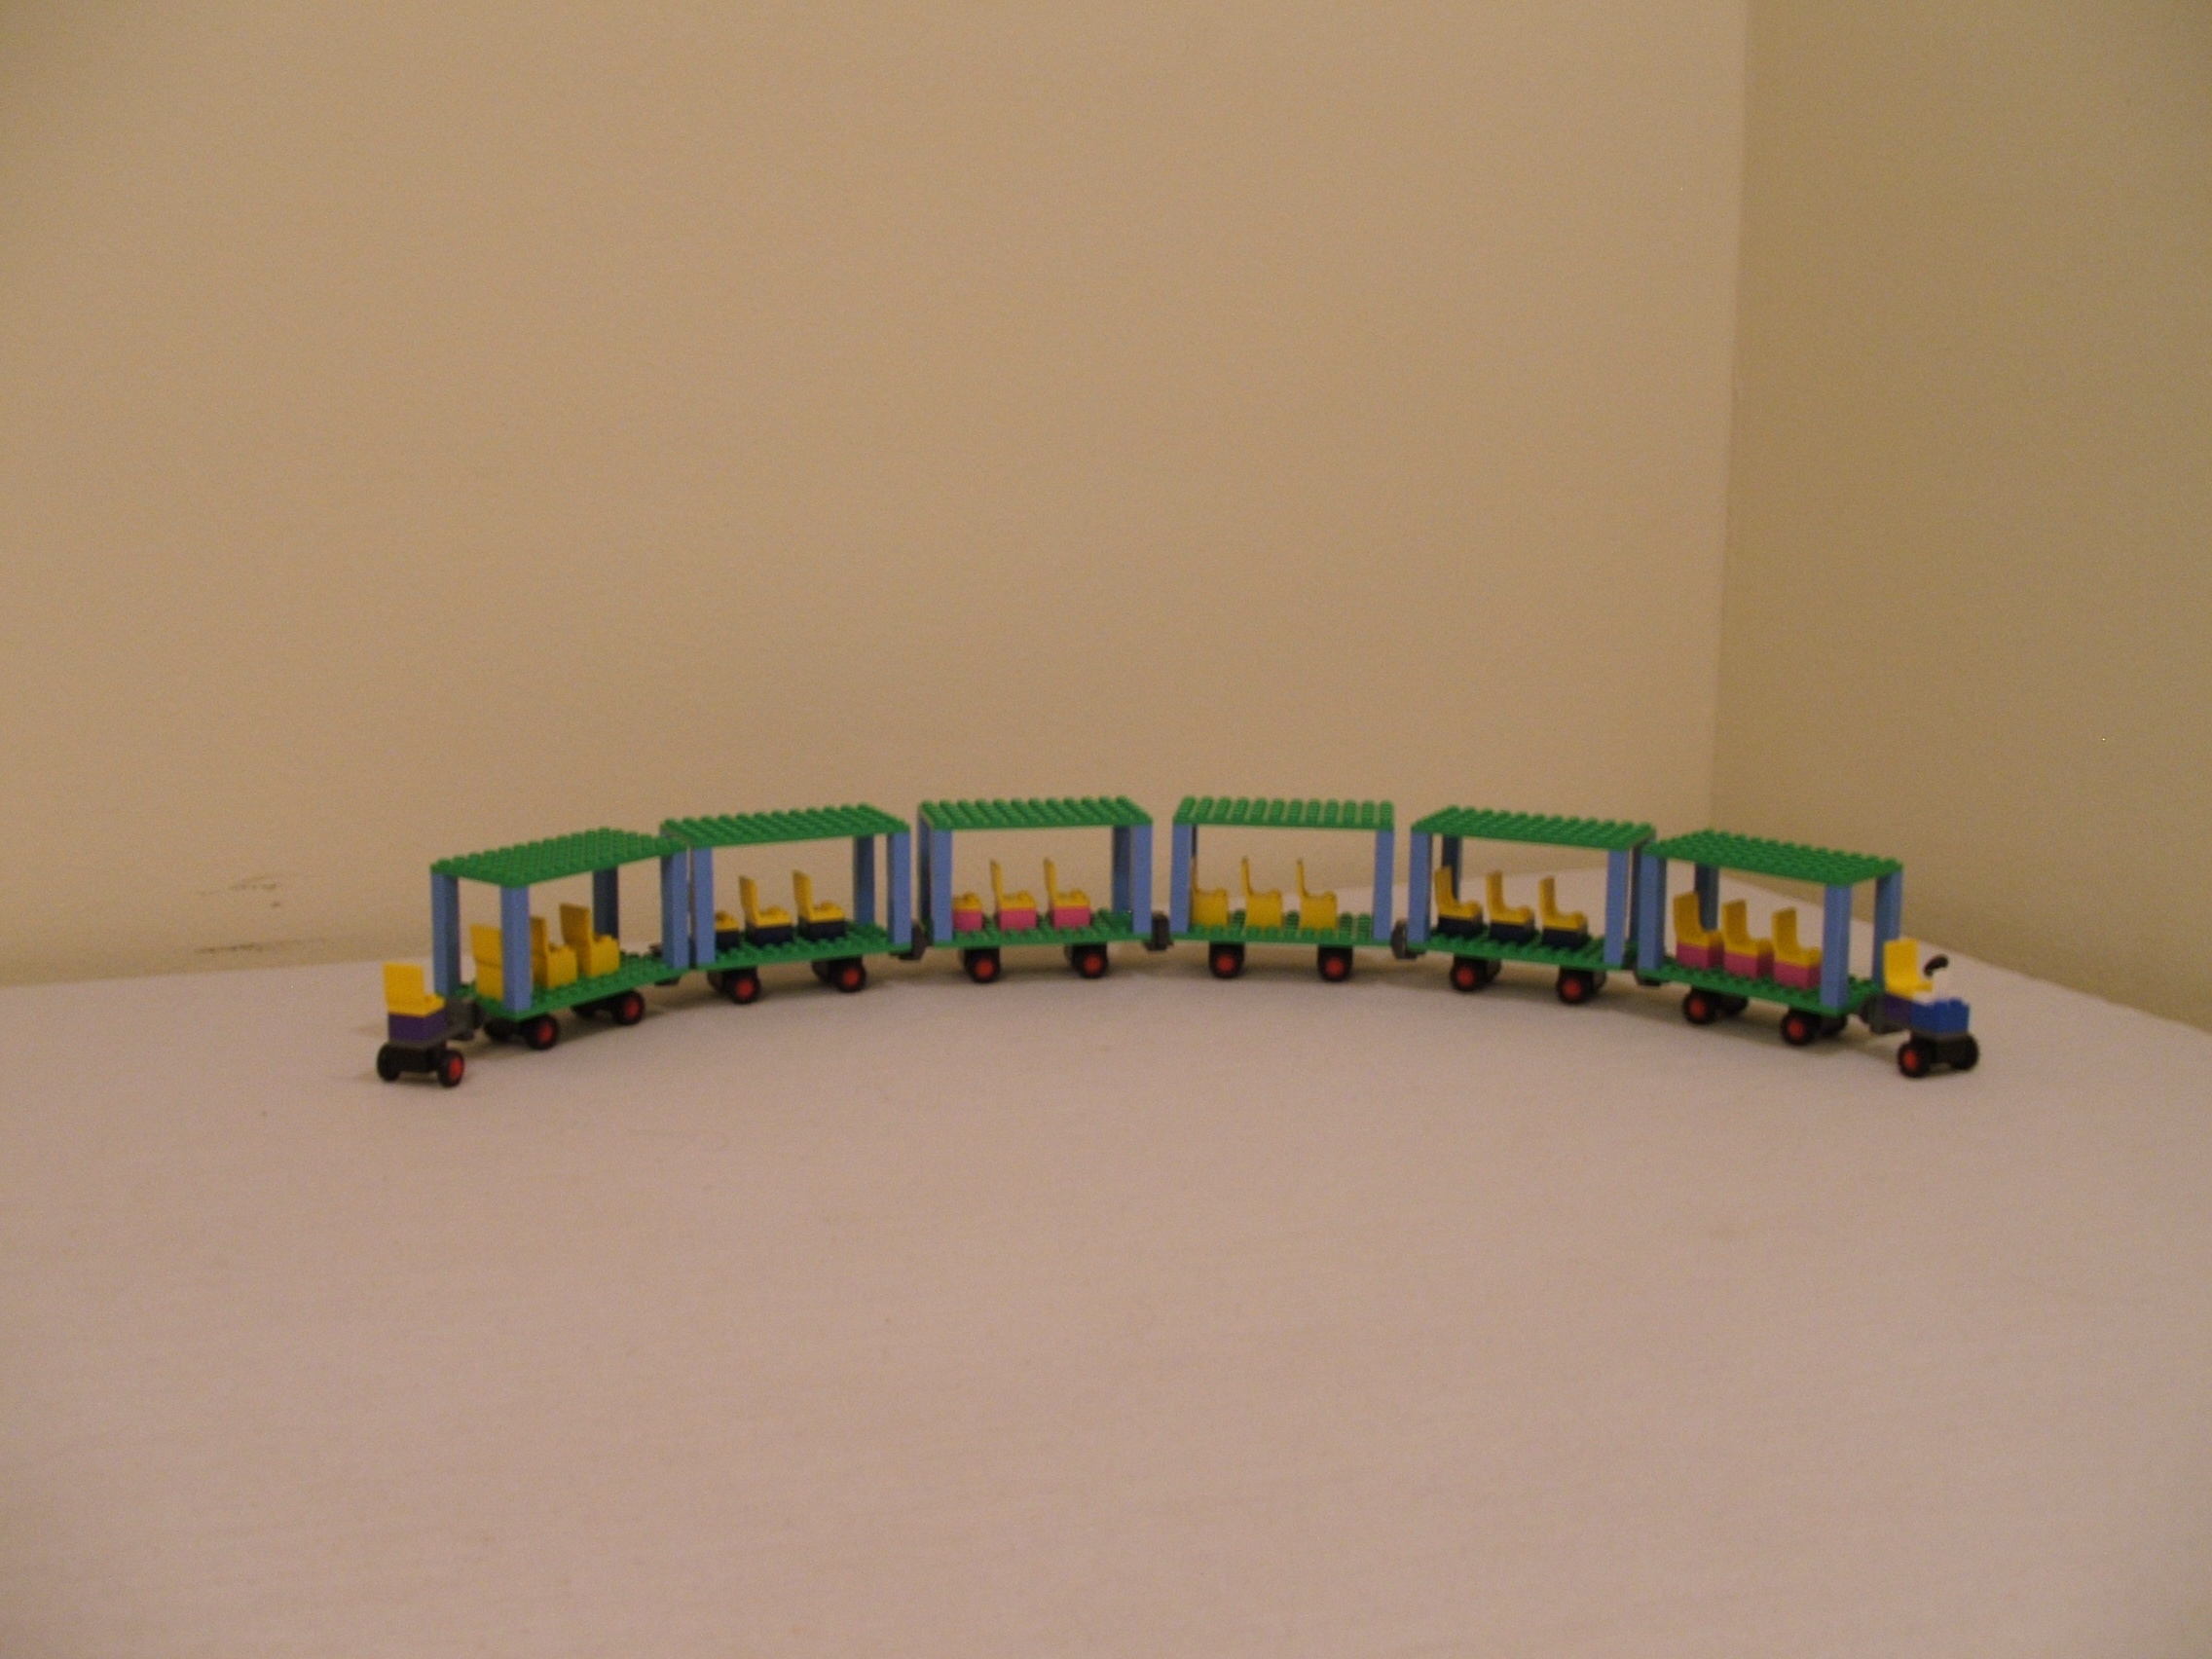
Terrys Lego Tram
This simple tram is made
from a minimal number of
pieces. It features six
cars (18 seats), a drivers
cab, and a rear seat for
a conductor or tour guide.
The cars are joined
together with the
Lego hinge plates
(Elements 4265486 and
4264952). You can use
any size plates for the
floors or any type of
wheels.
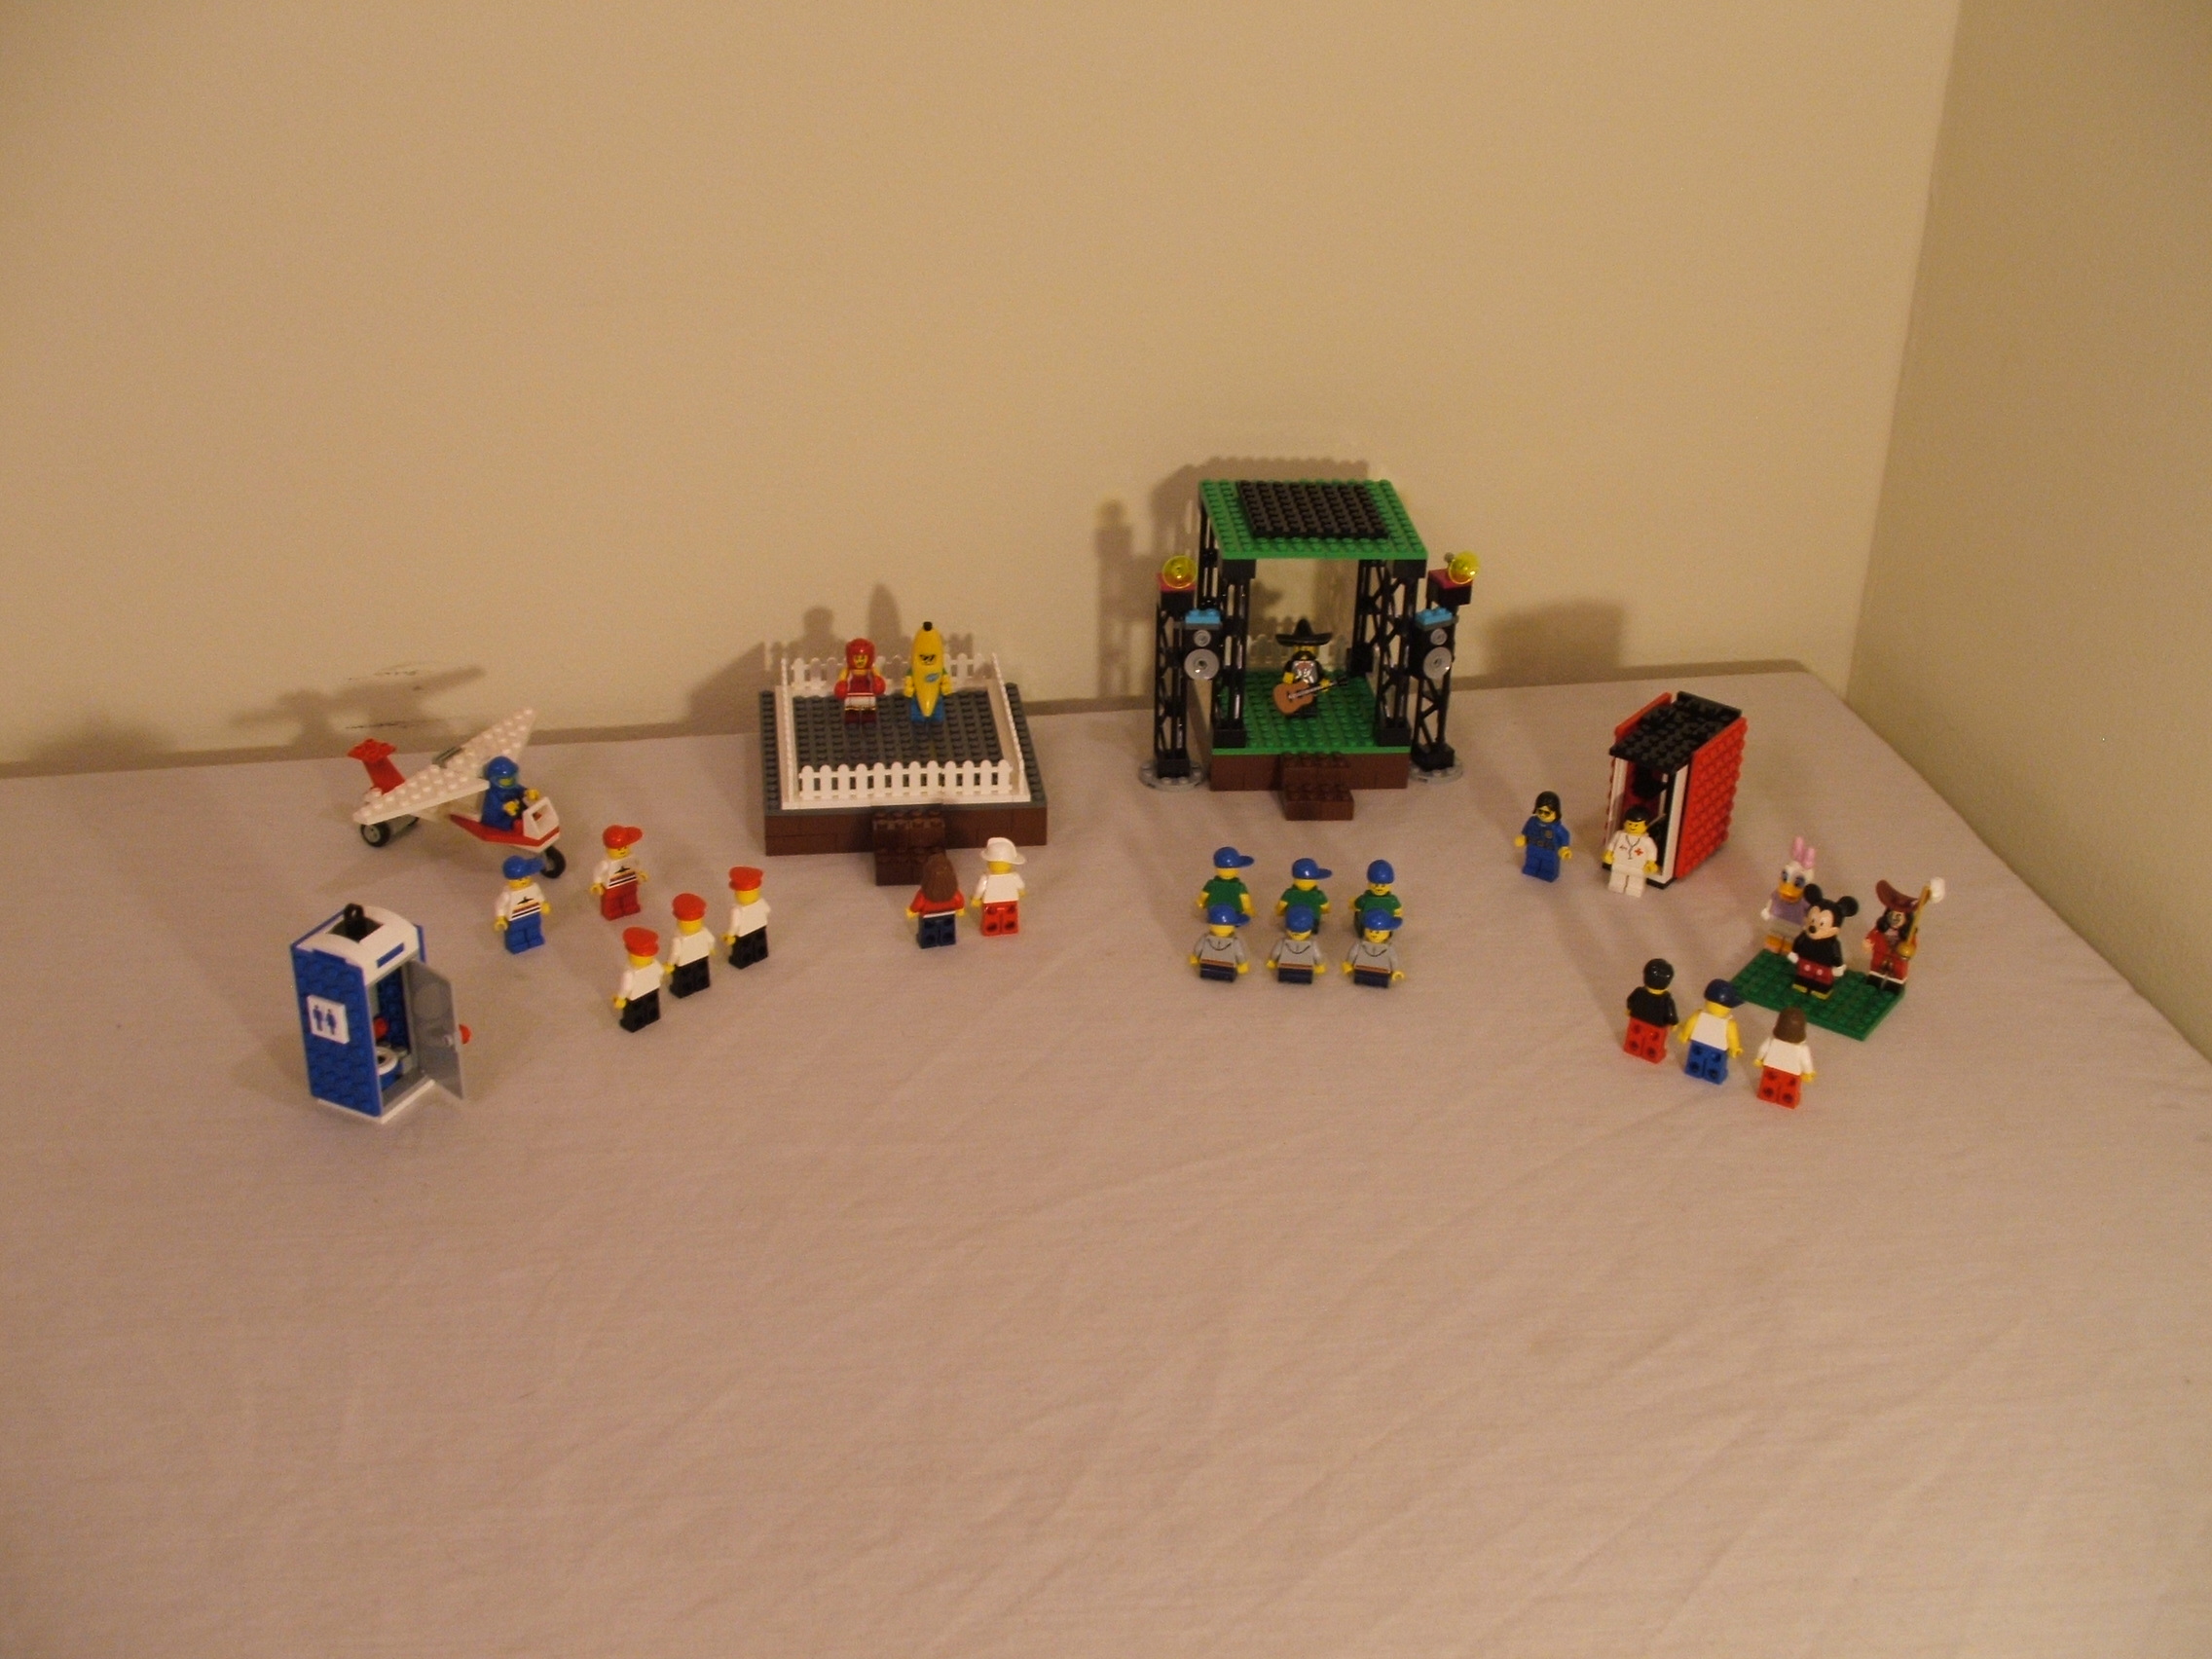
Terrys Lego Gazebo
There is a gazebo in the
city park which is often
used for social events.
On this day all sorts of
folks attended a charity
event and concert.
The concert was held in
the gazebo. Other events
included a box the
banana for the save
our fruit charity,
meet with the builders of
an experimental glider,
and meet some Disney
characters.
There was a medical booth
and restroom available on
site as well as security.
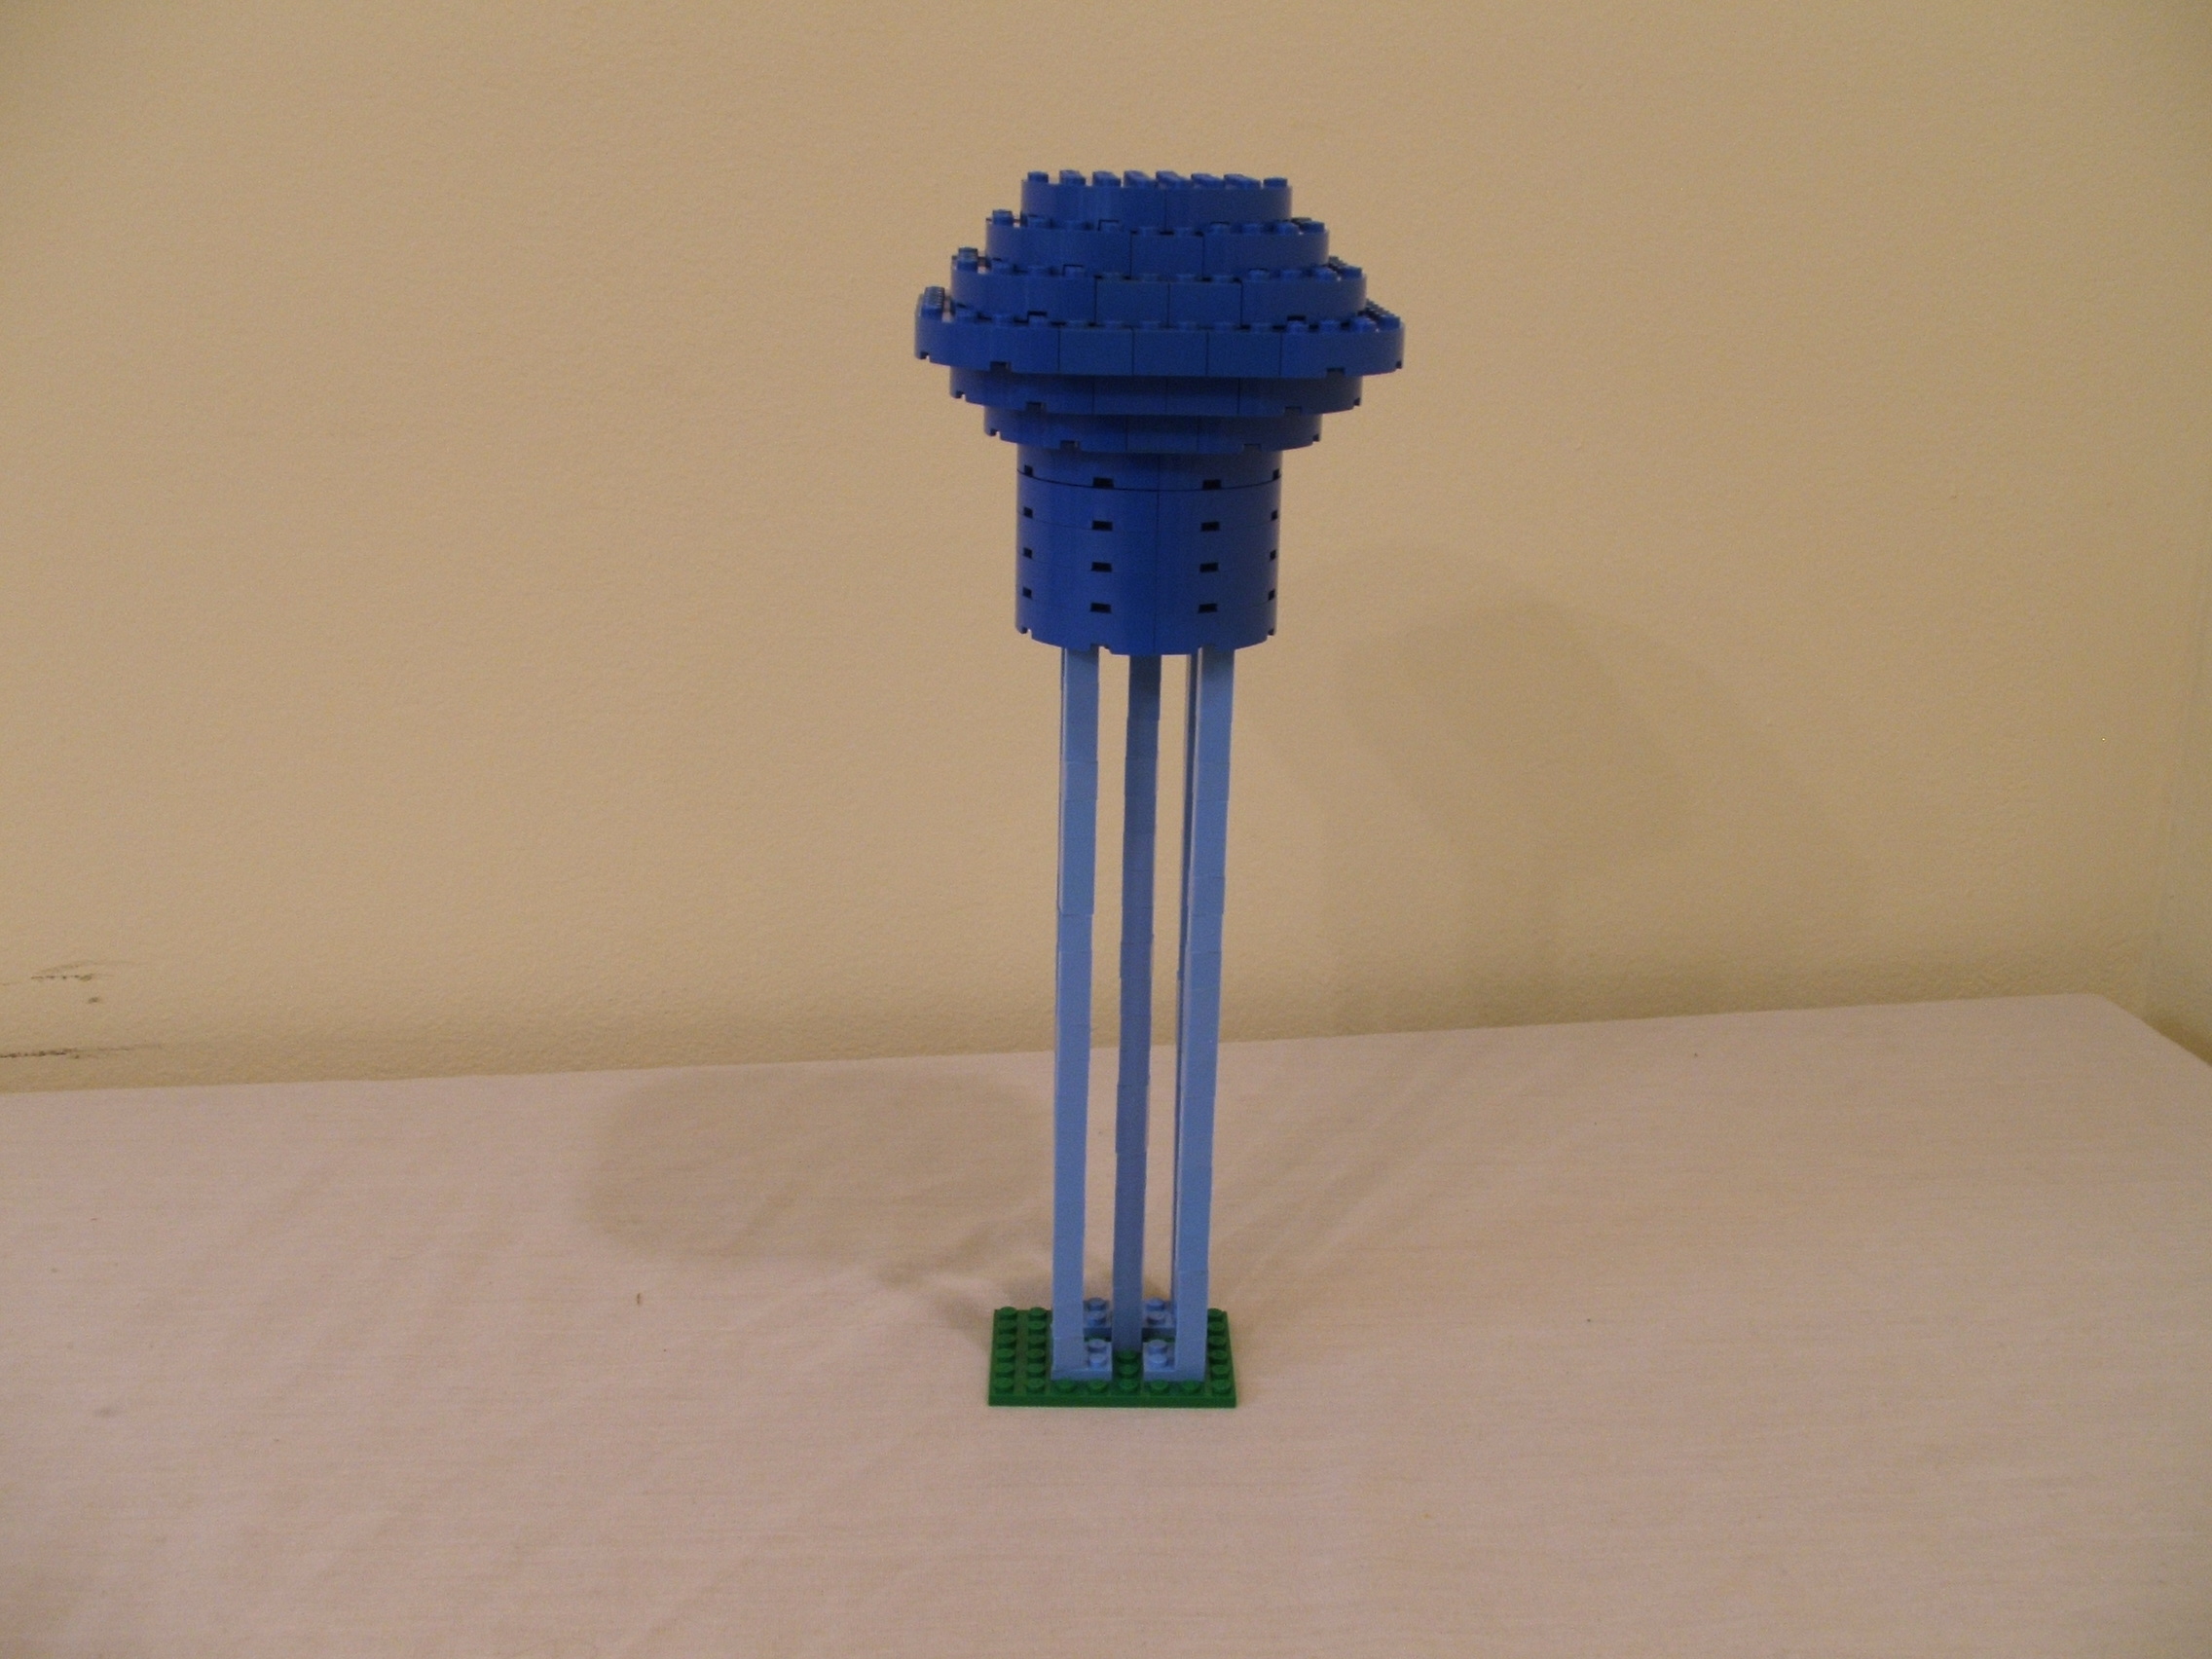
Terrys Lego Watertower
A watertower made from old
1/4 circle bricks and 1x1
bricks for legs. Using the
1/4 circle and other blue
bricks a variety of styles
could be built.
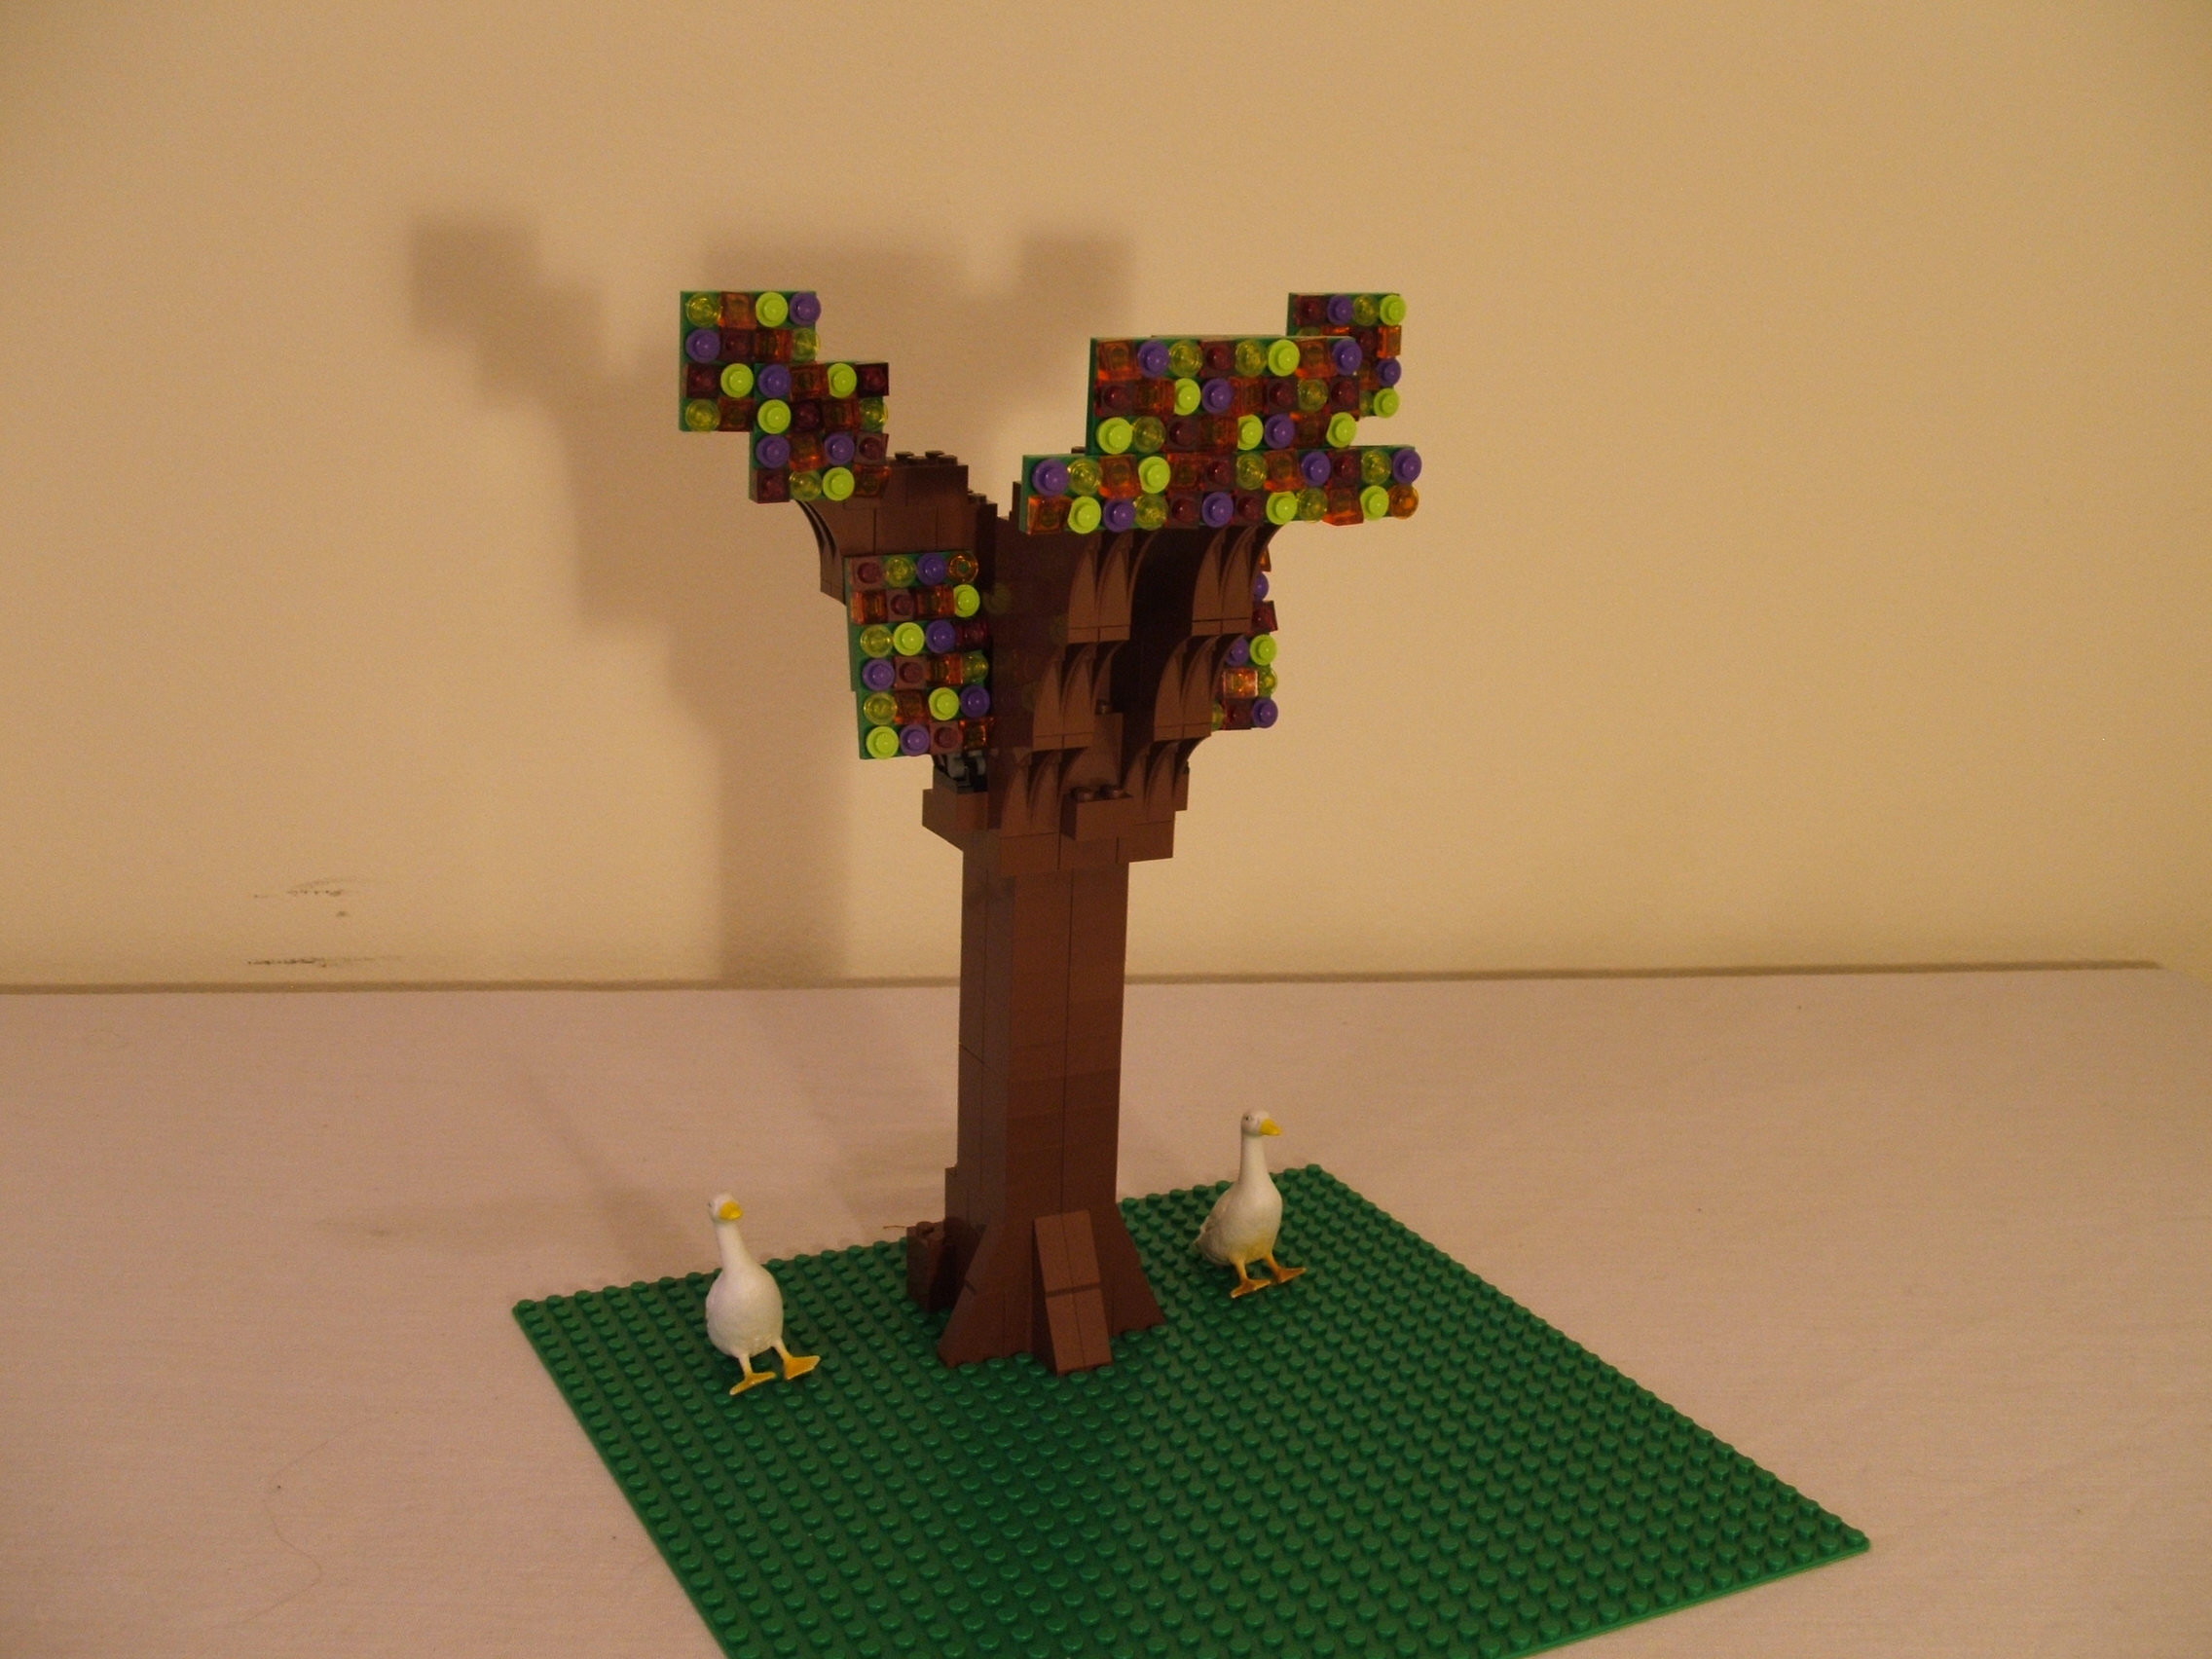
Terrys Lego Tree tribute
My tribute to the wonderful
colors provided by the
trees during fall. A job
well done by nature!
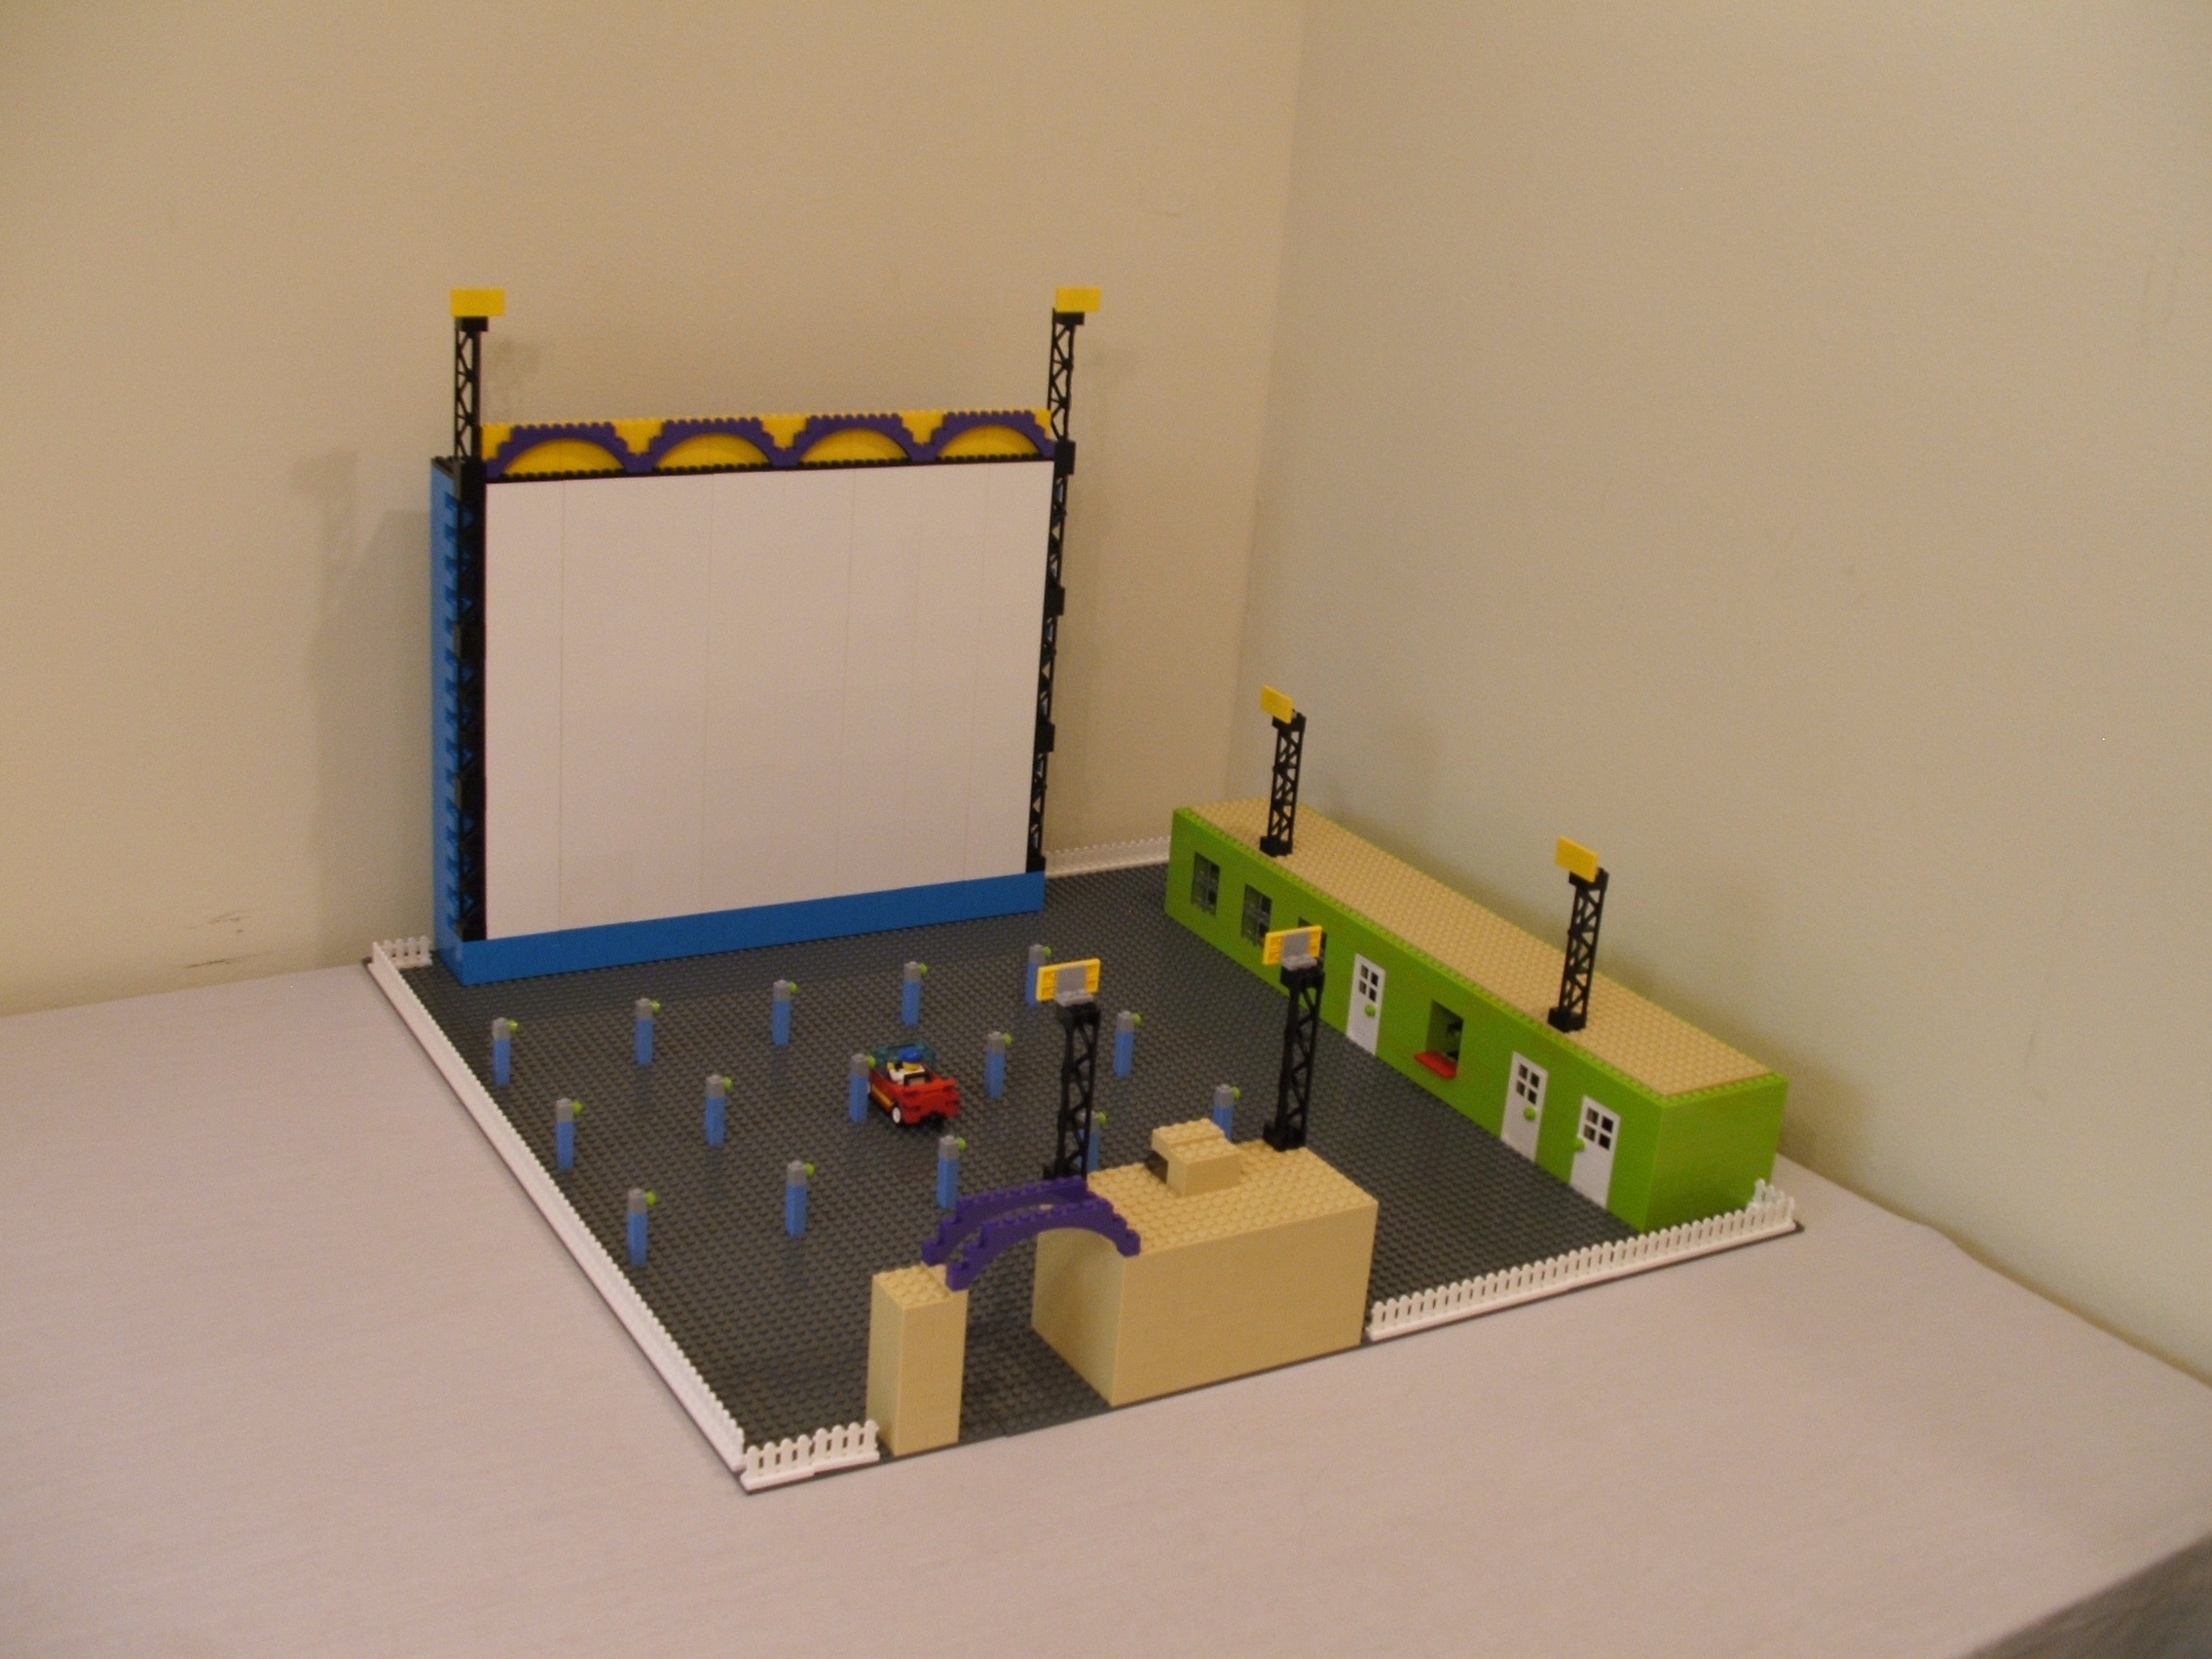
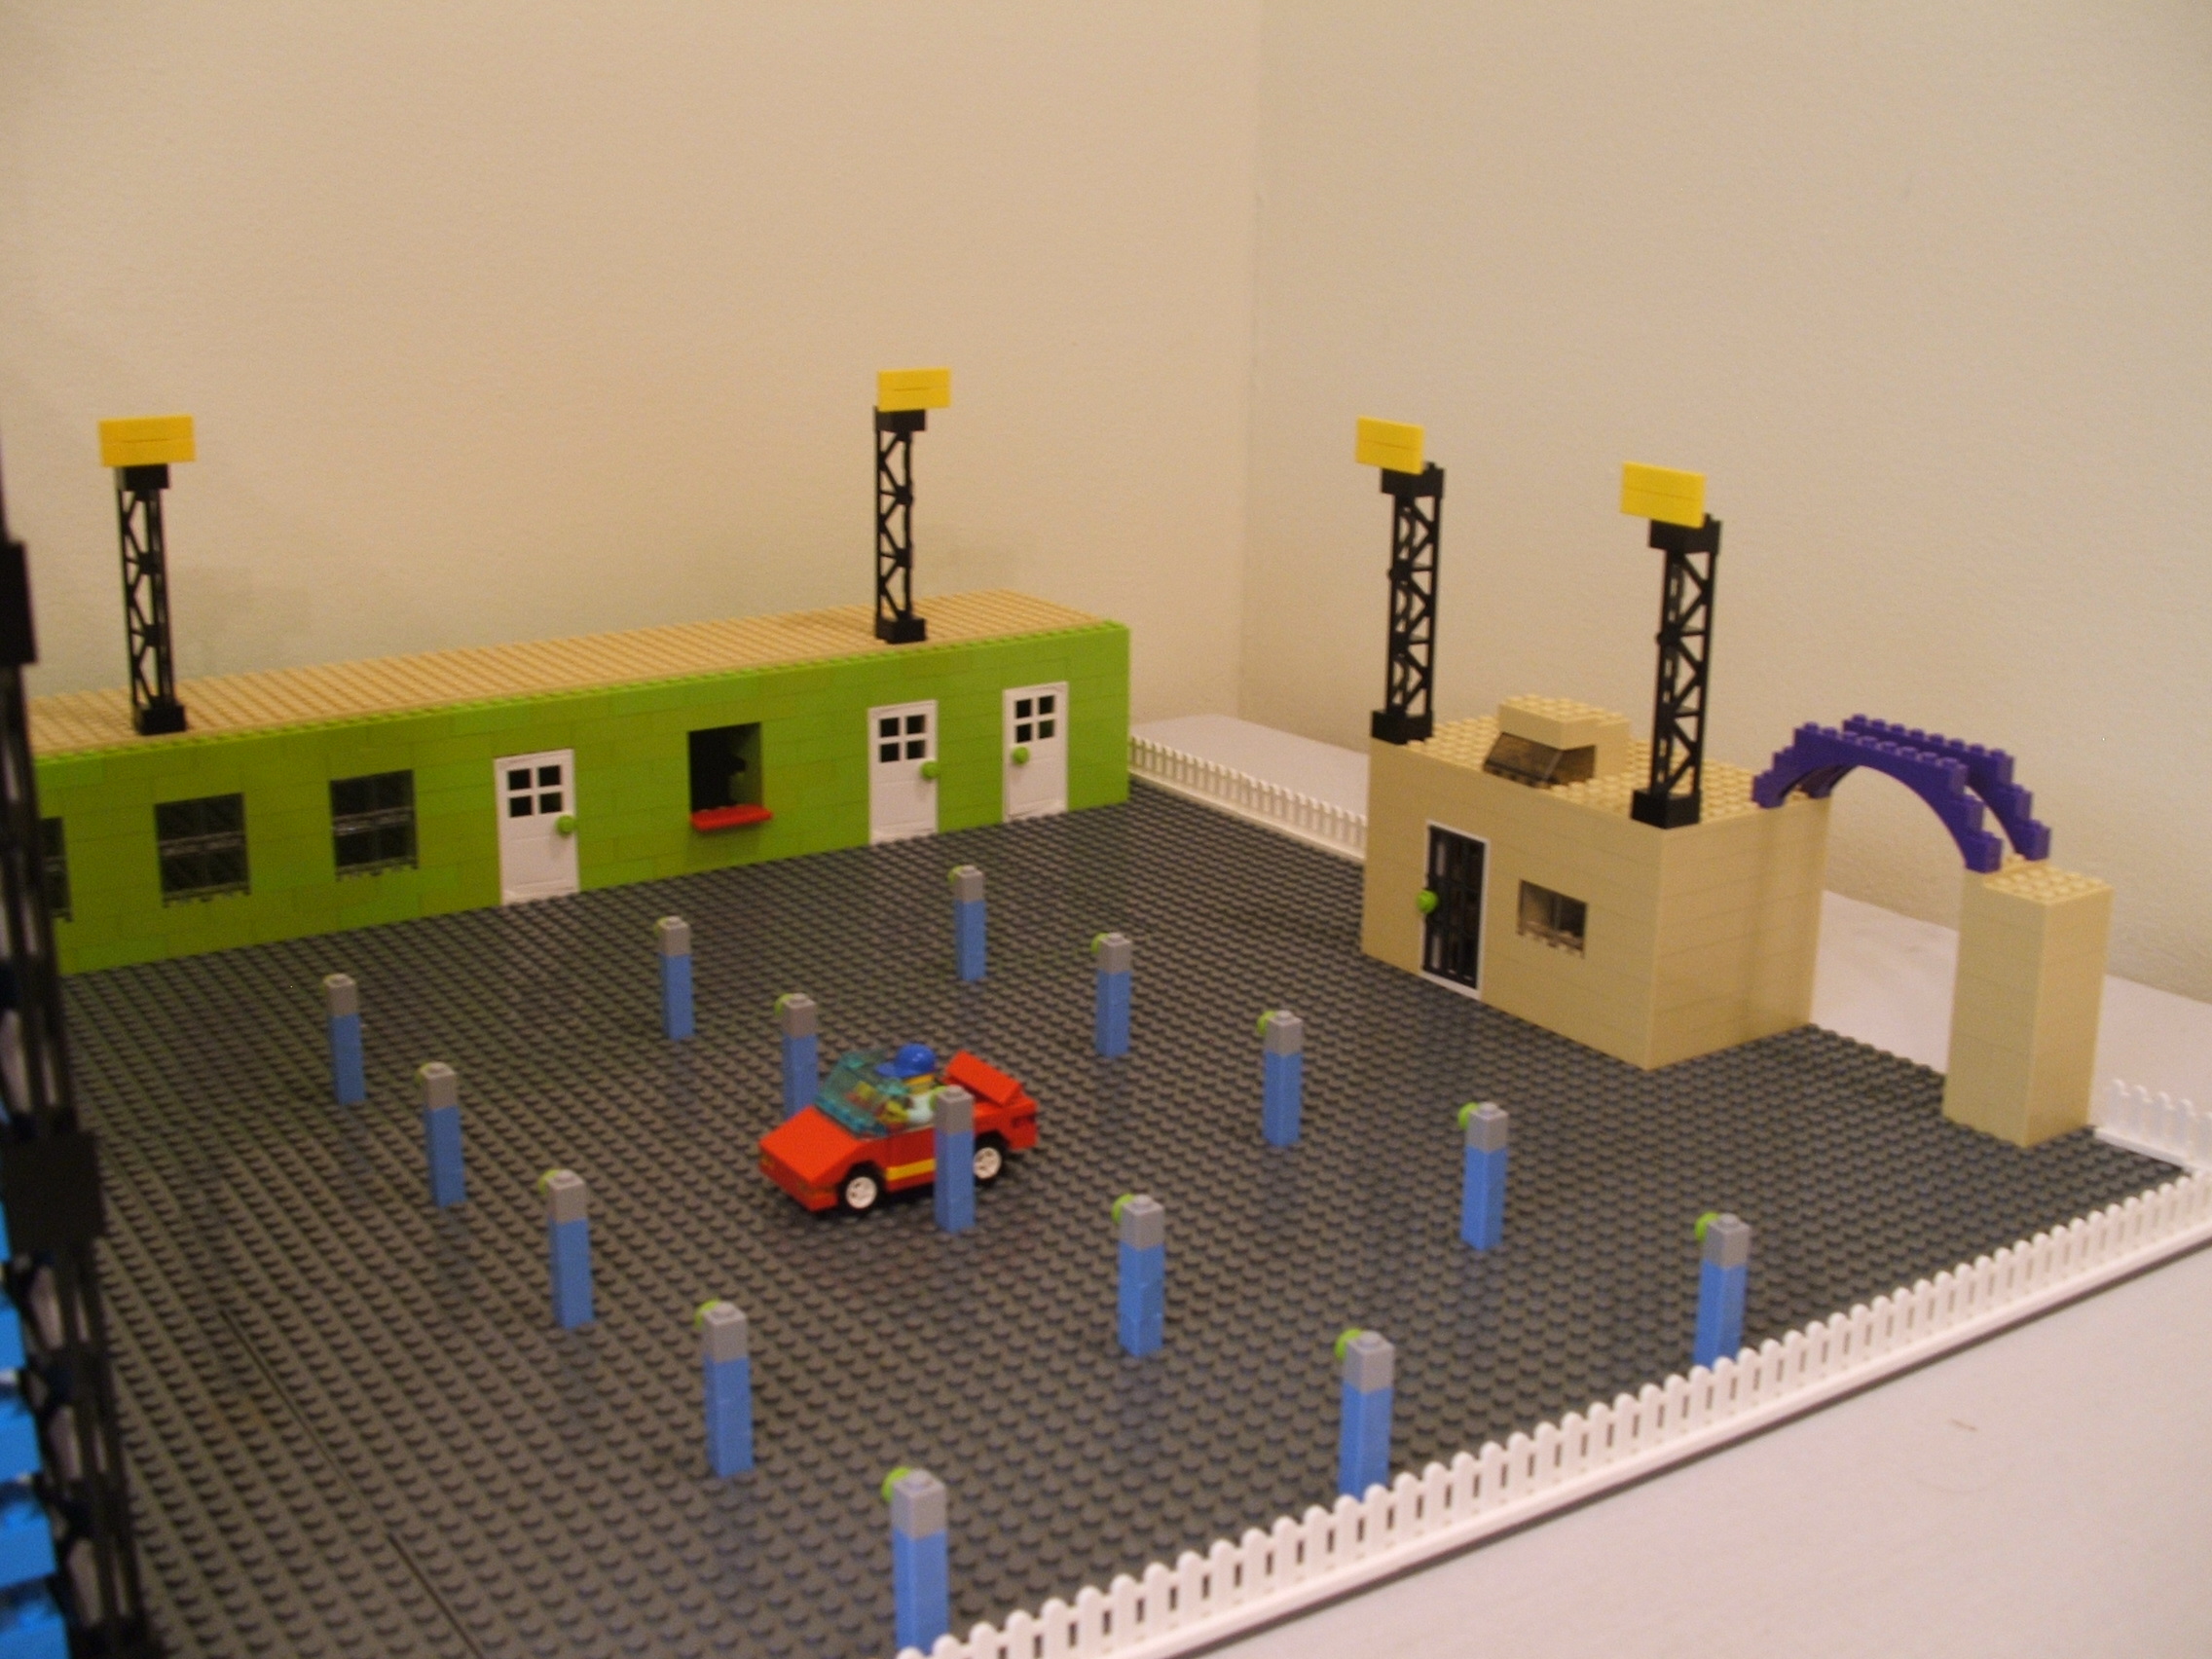
Terrys Lego Drive In Theater
Summertime at the outdoor drive in movie
theater used to be a common thing to do.
Pull up, turn on the speaker, and enjoy.
Screen measures 15 inches wide by
11 inches tall. Drive in measures
25x25 inches.
This drive in has many features from
the past. A big screen, speaker pole
for each car, concession stand (inside
area, carry out window, and restrooms),
movie projector building, and parking
lot lights.
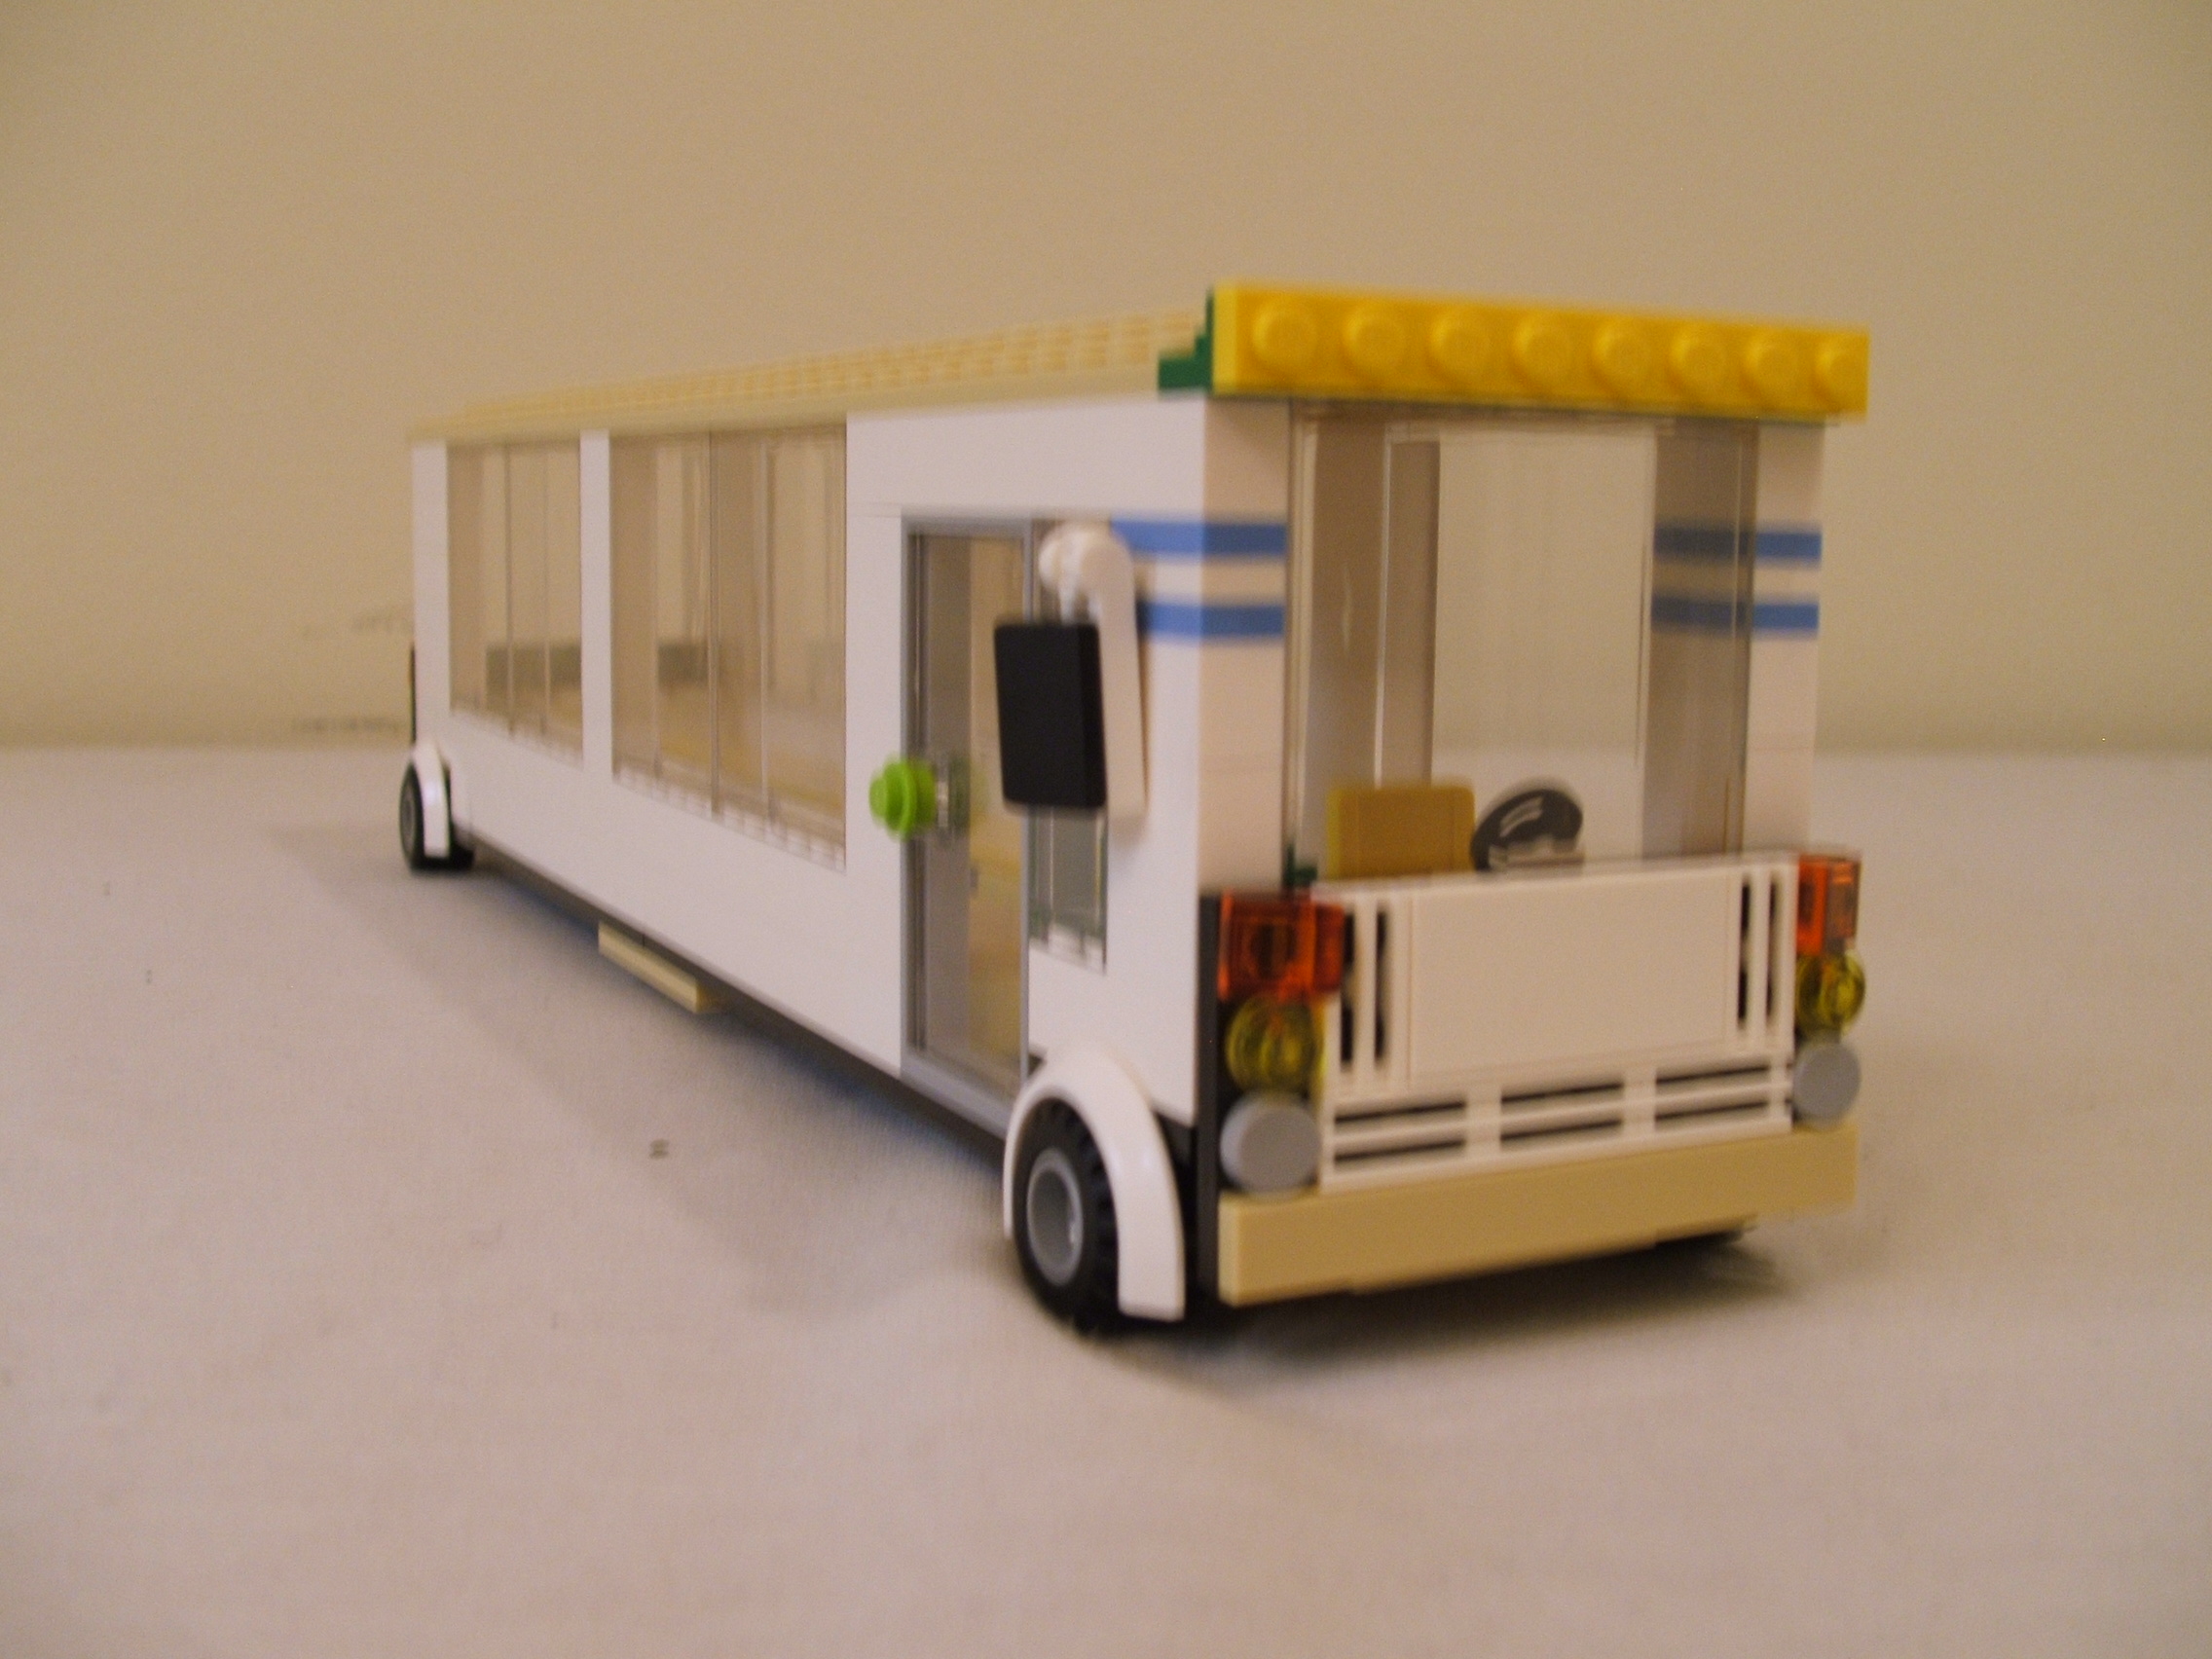
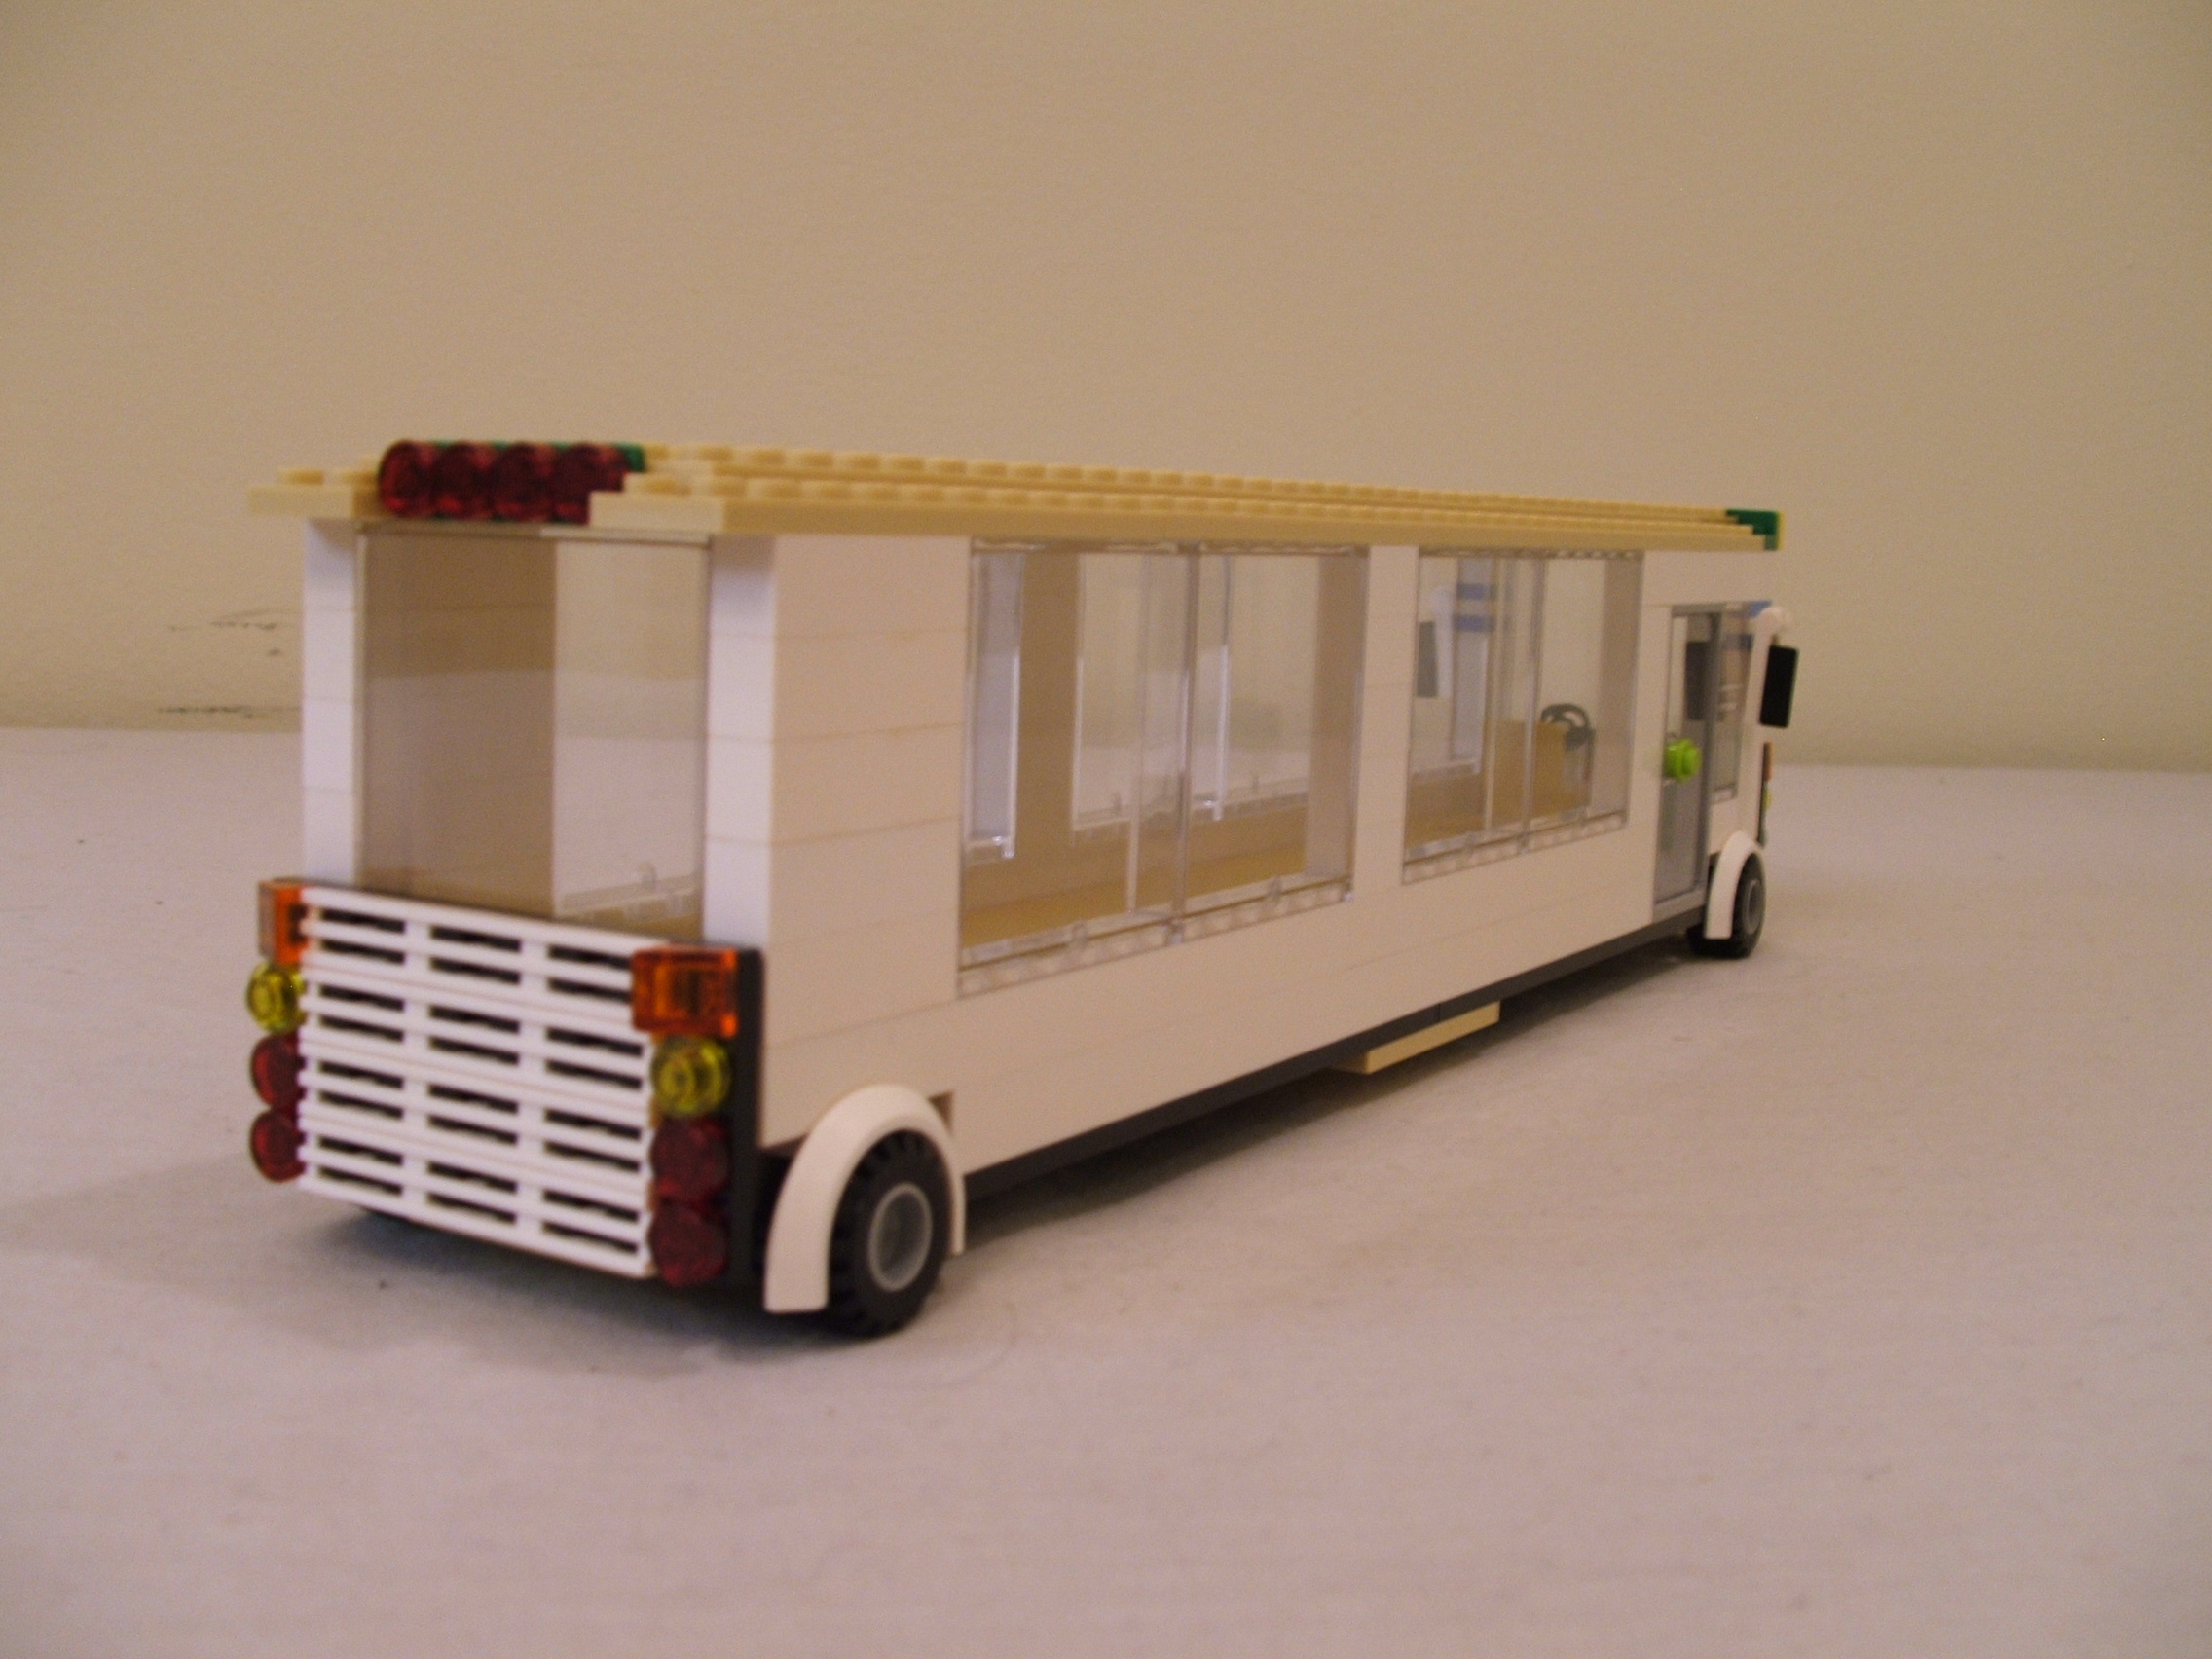
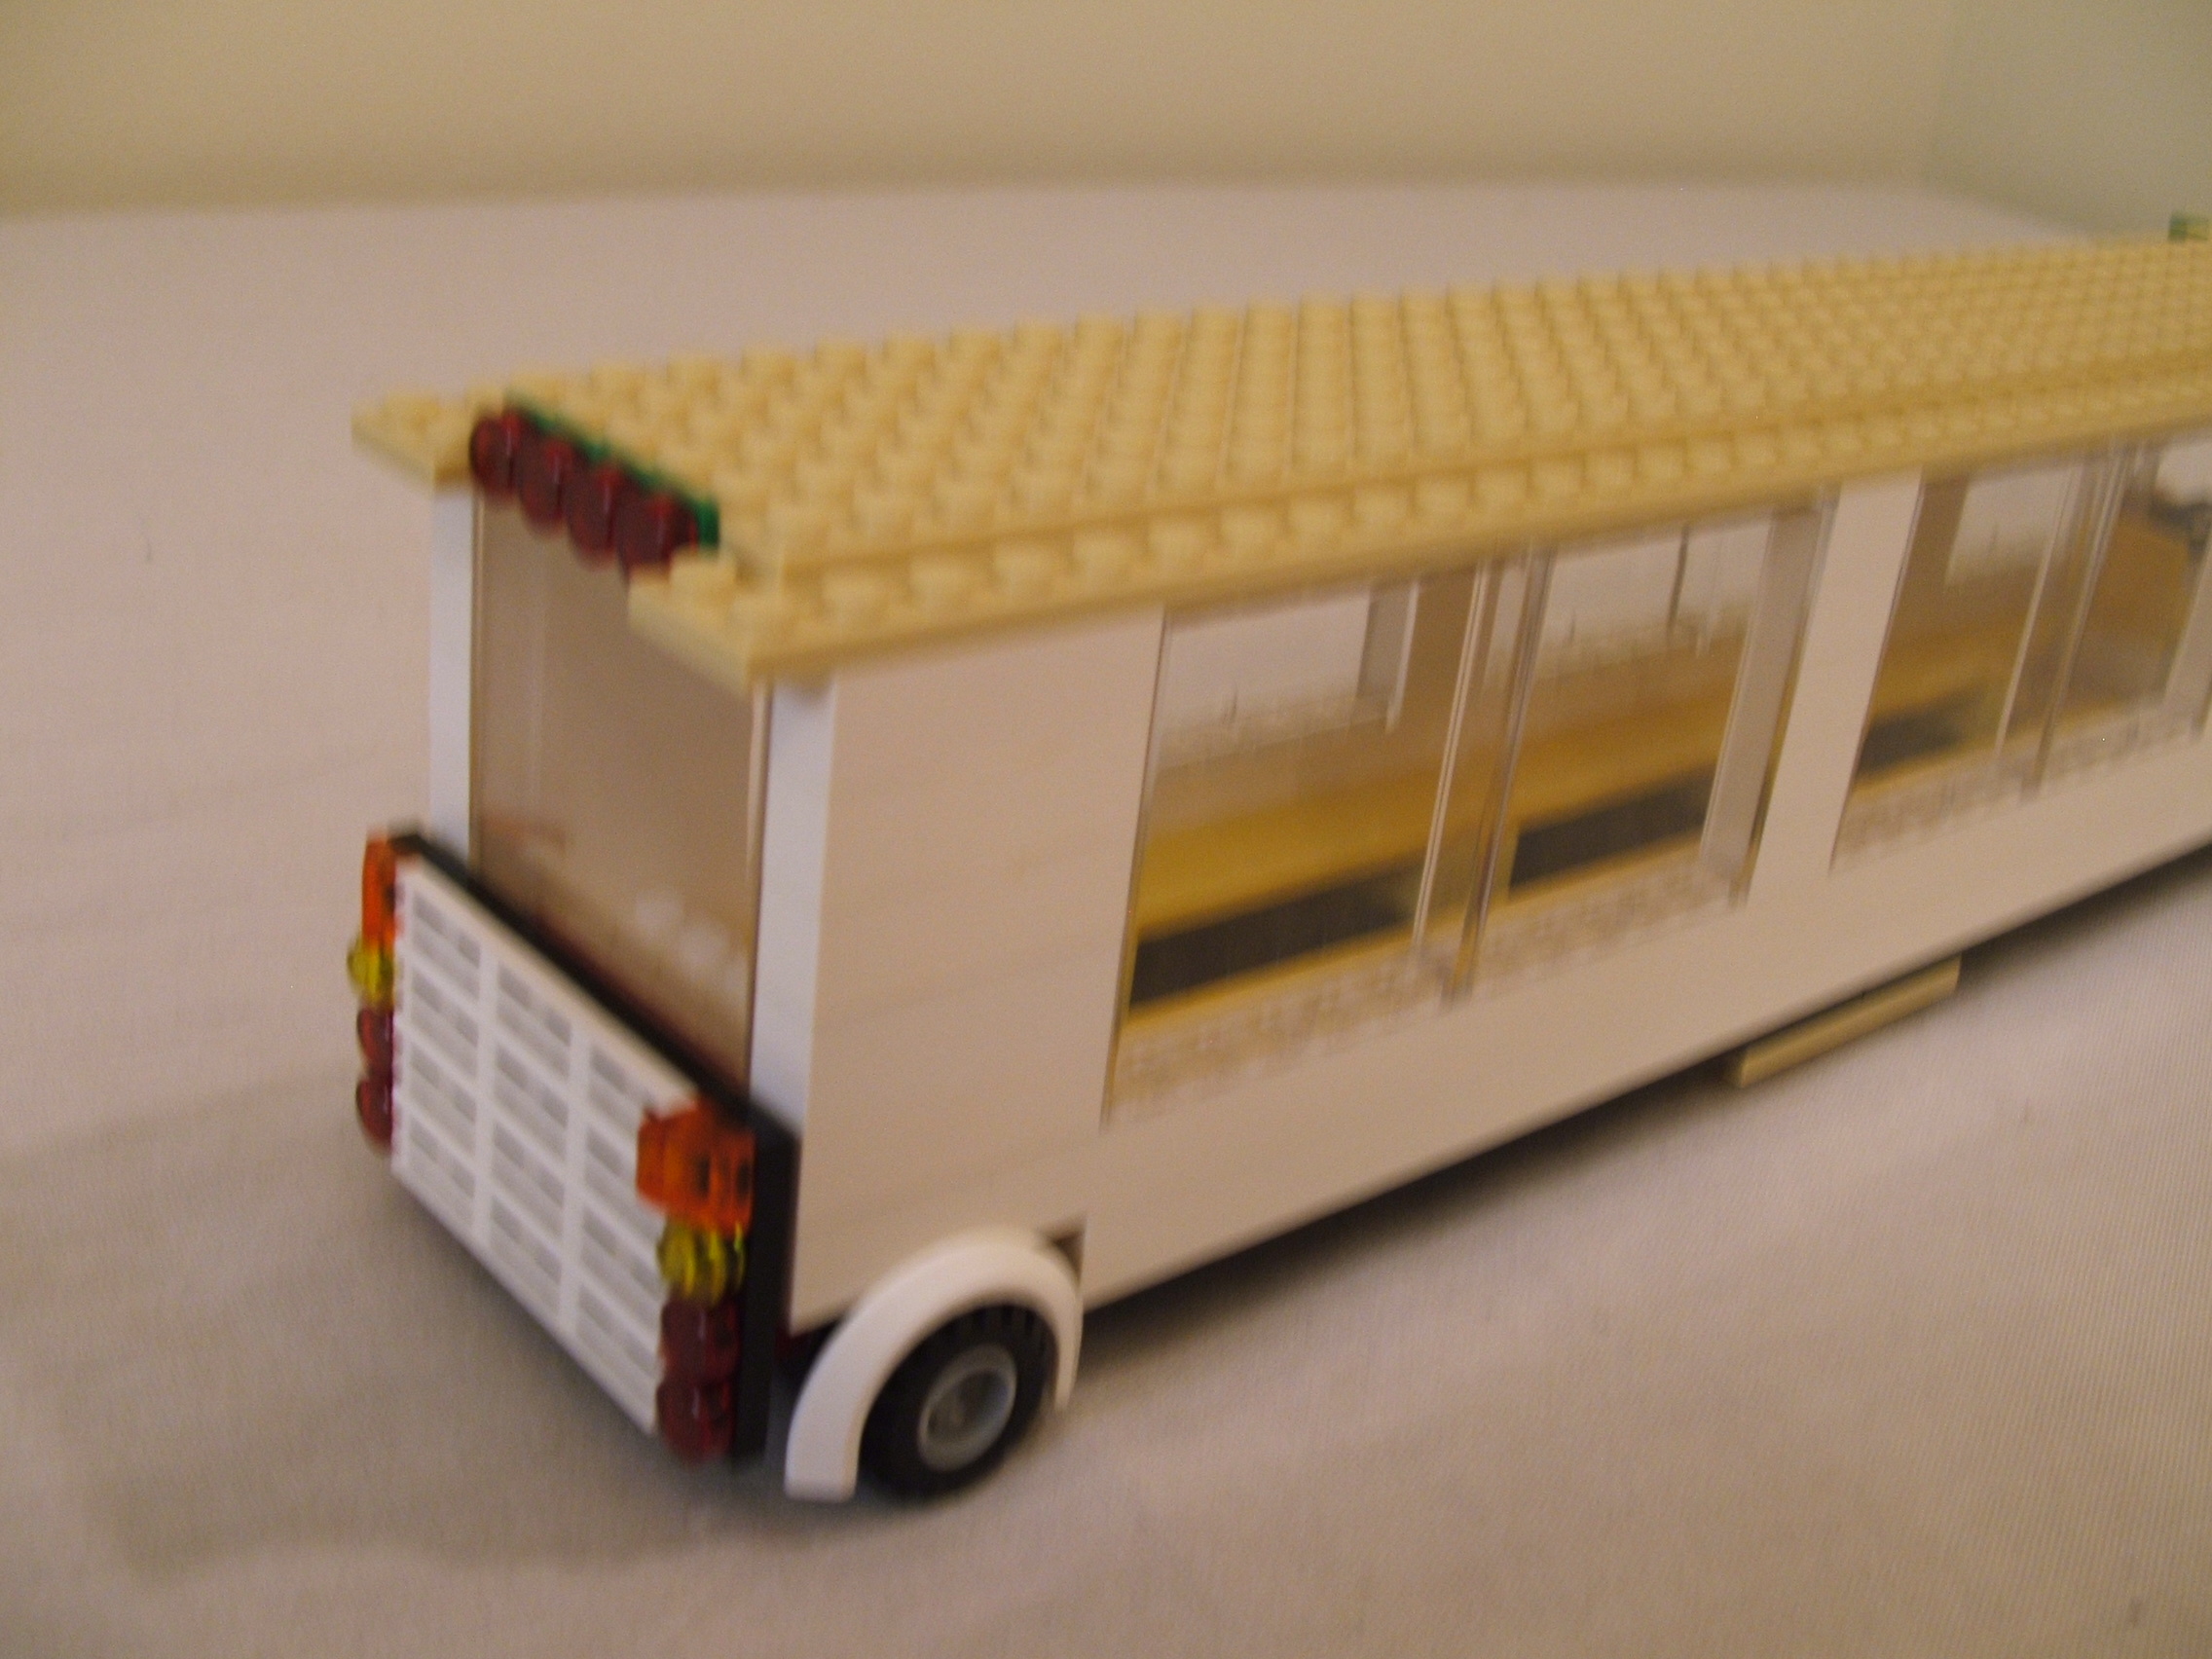
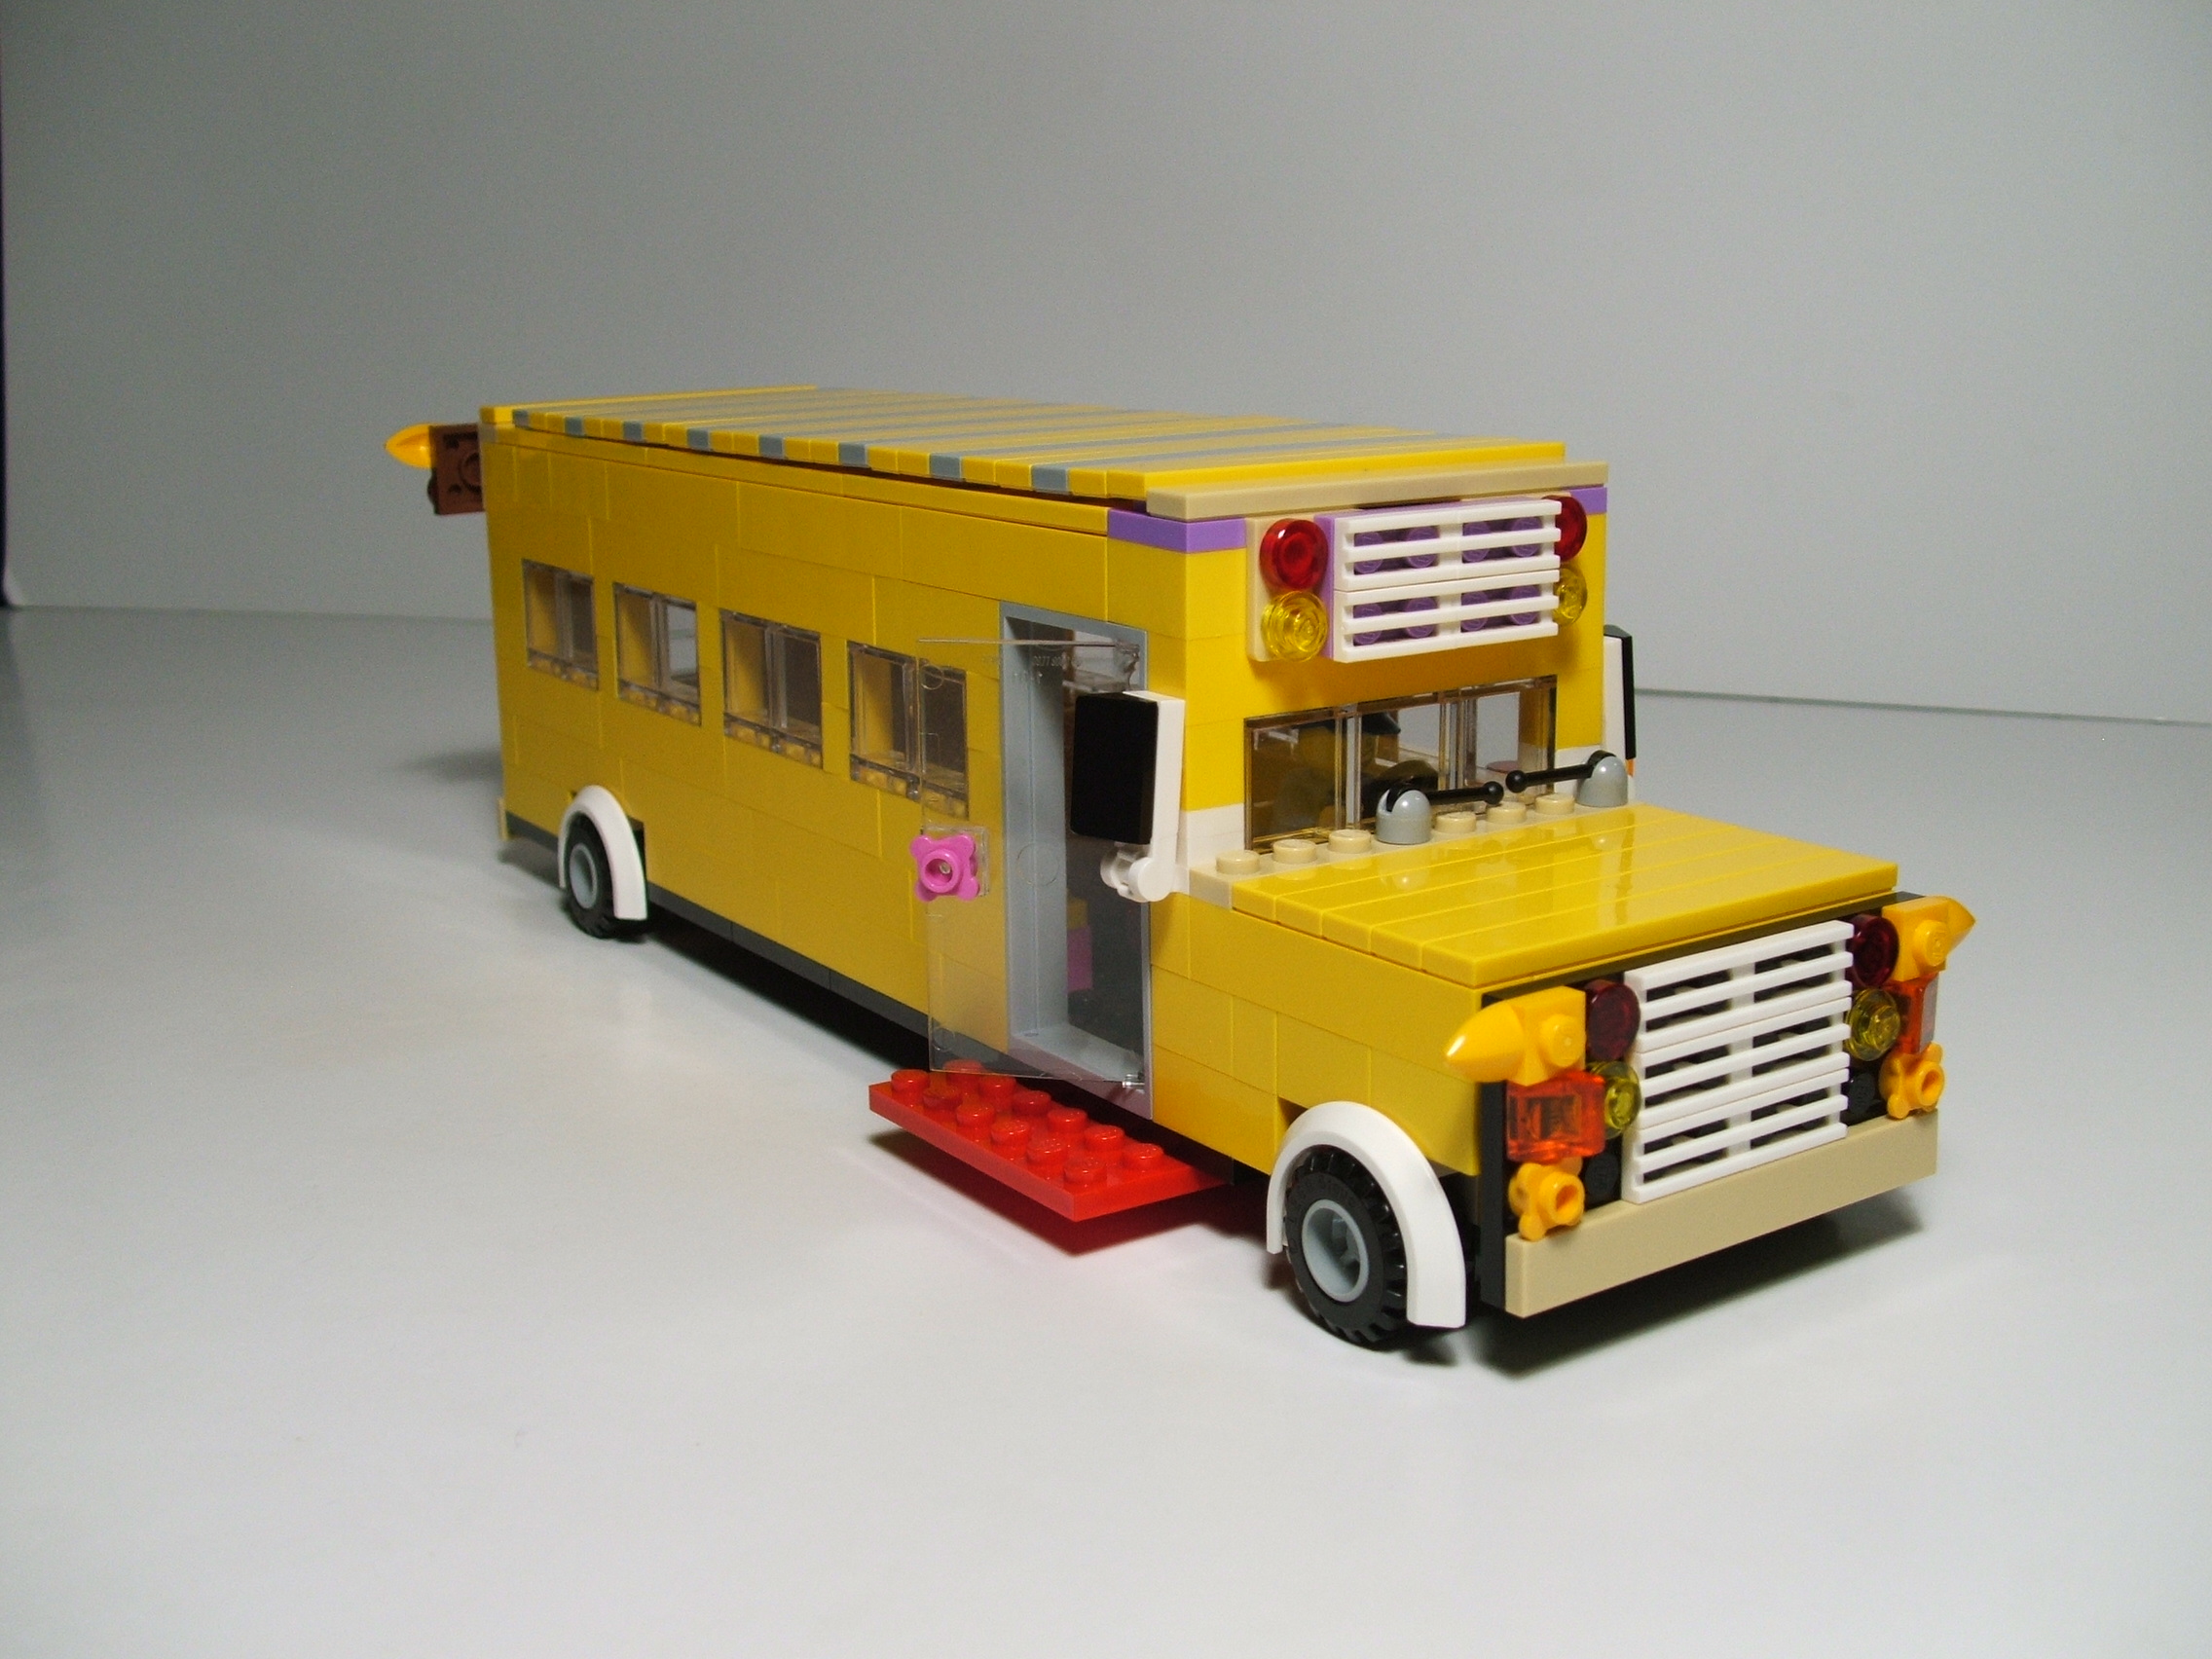
Terrys Lego School Bus
I tried many versions of a school bus
but this one I created from scratch
and really like it. The passenger
area is large enough to actually have
minifigures move around and be seated.
The bus is fairly accurate in scale
for the engine area and passenger area
although as with most Lego models will
not truly hold the same capacity of
people (minifigs) as the real thing.
This bus has a LOT of features. Lots
of signal and warning lights, large
rear view mirrors, windshield wipers,
a movable stop panel to prevent
passing traffic, entry door and
emergency exit window which really work,
wide entry step for students, passenger
seats, driver area, and a hinged (ball
and cup) roof for easy inside access.
School bus measures 11x3x3 inches.
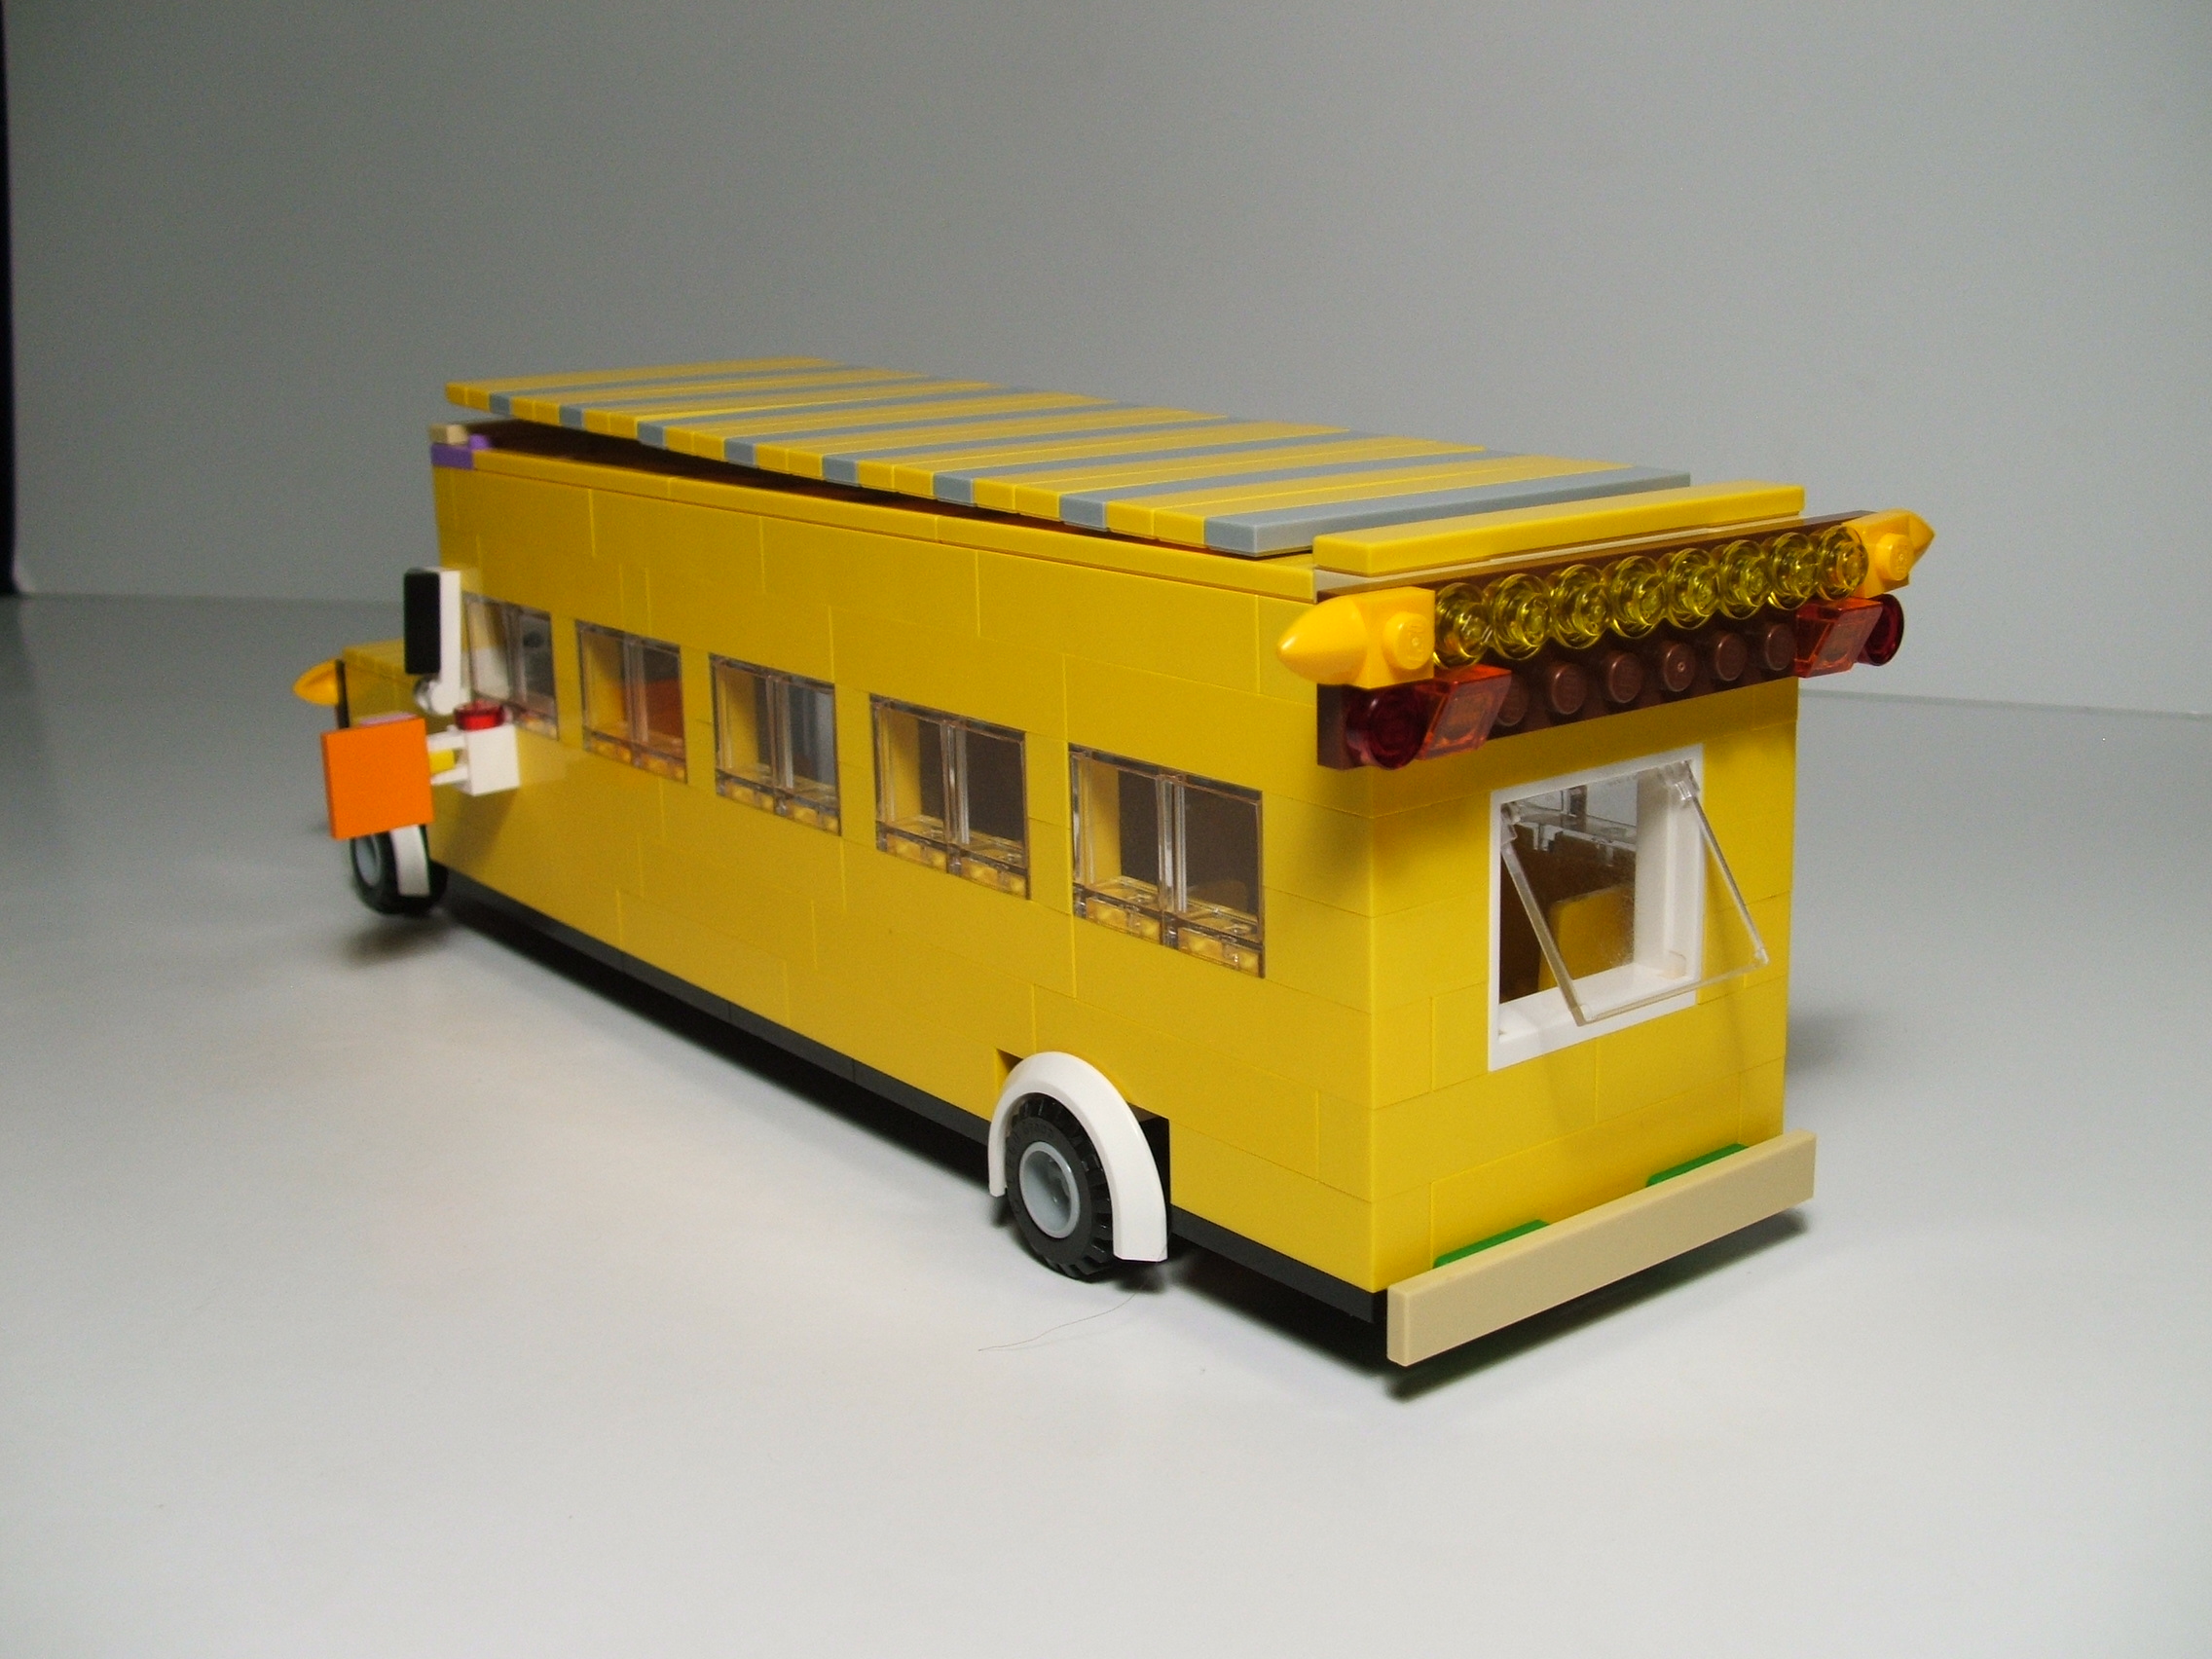
The back and drivers side view shows
the rear lights and signals, emergency
exit window (shown partially open here),
and hinged stop sign panel (shown open
here) on the side by the driver area.
The roof opens (as shown here) to allow
complete access to the inside. There
are ten student seats (five per side)
and a drivers seat with steering wheel.
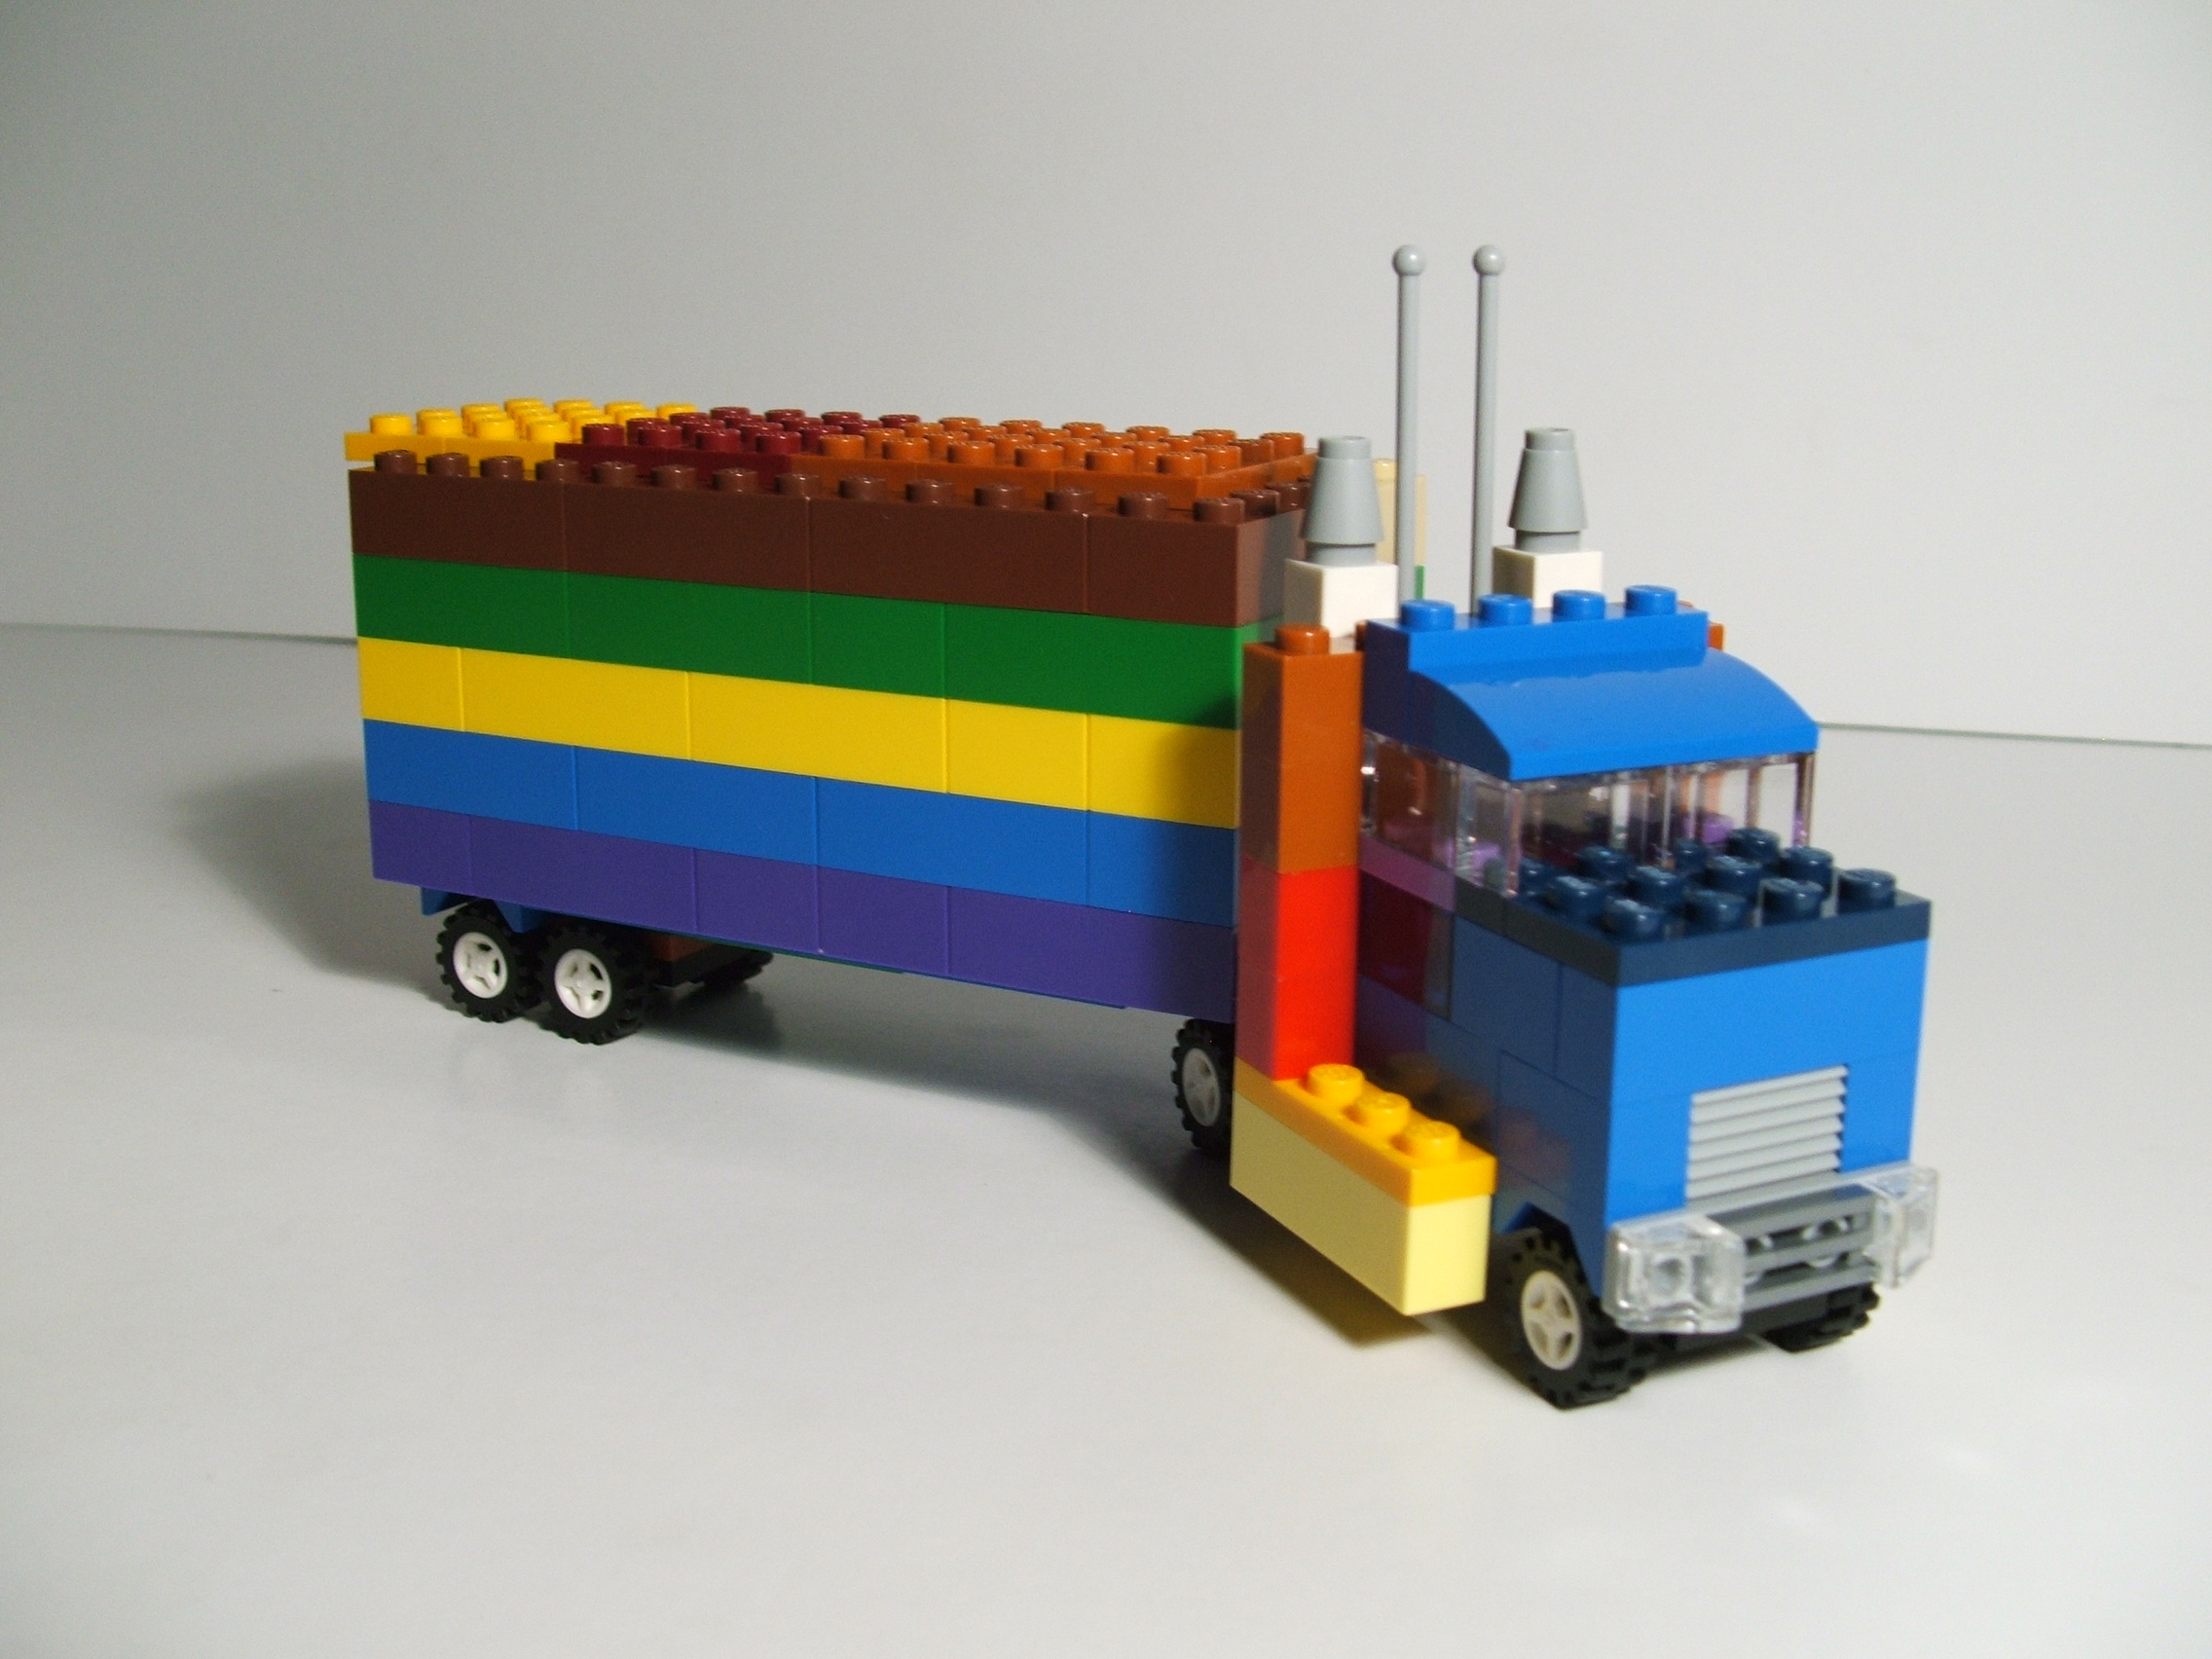
Terrys Lego Truck
This mini truck is a modification of plans
I found in a Lego Ideas book. Mine has
CB antennas and a the cab is a bit more
roomy inside (smaller engine area). The
cargo connects to the cab with a 2x2 swivel
piece as in the original plans. This model
was built out of spare pieces, so it turned
out to be very colorful. I will likely
build a larger truck in the future.
Mini truck measures 8x3x3 inches.
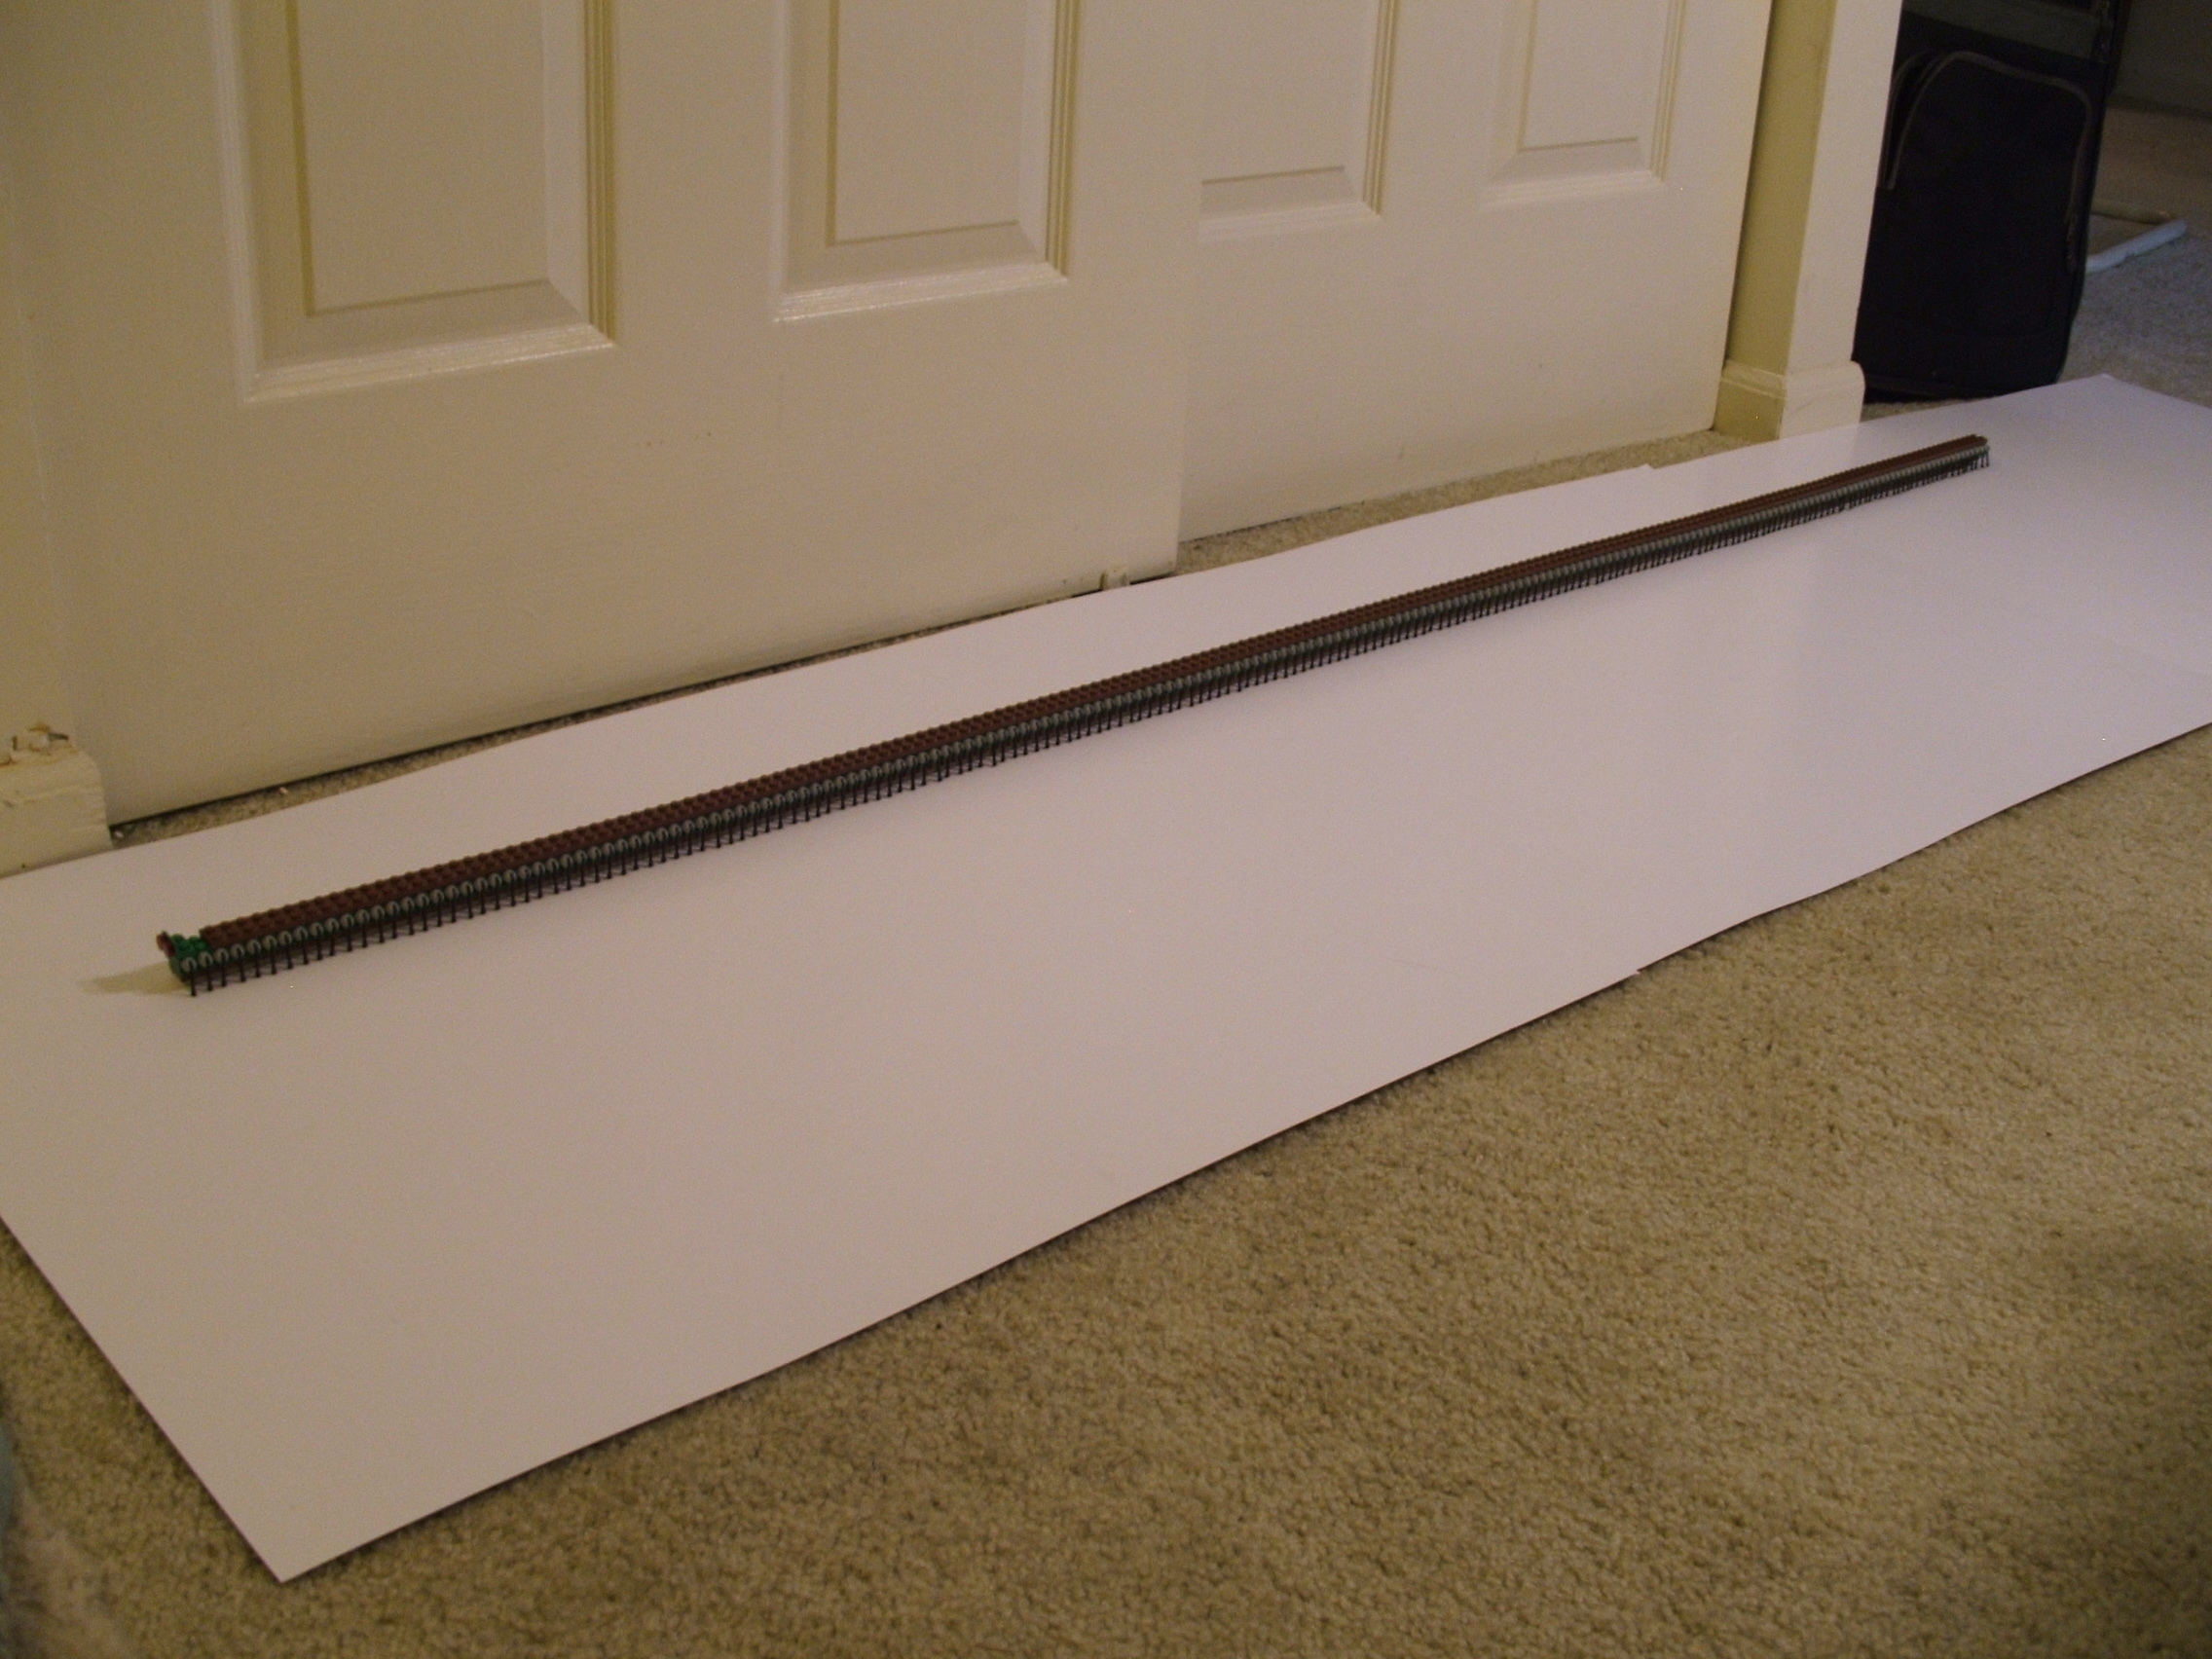
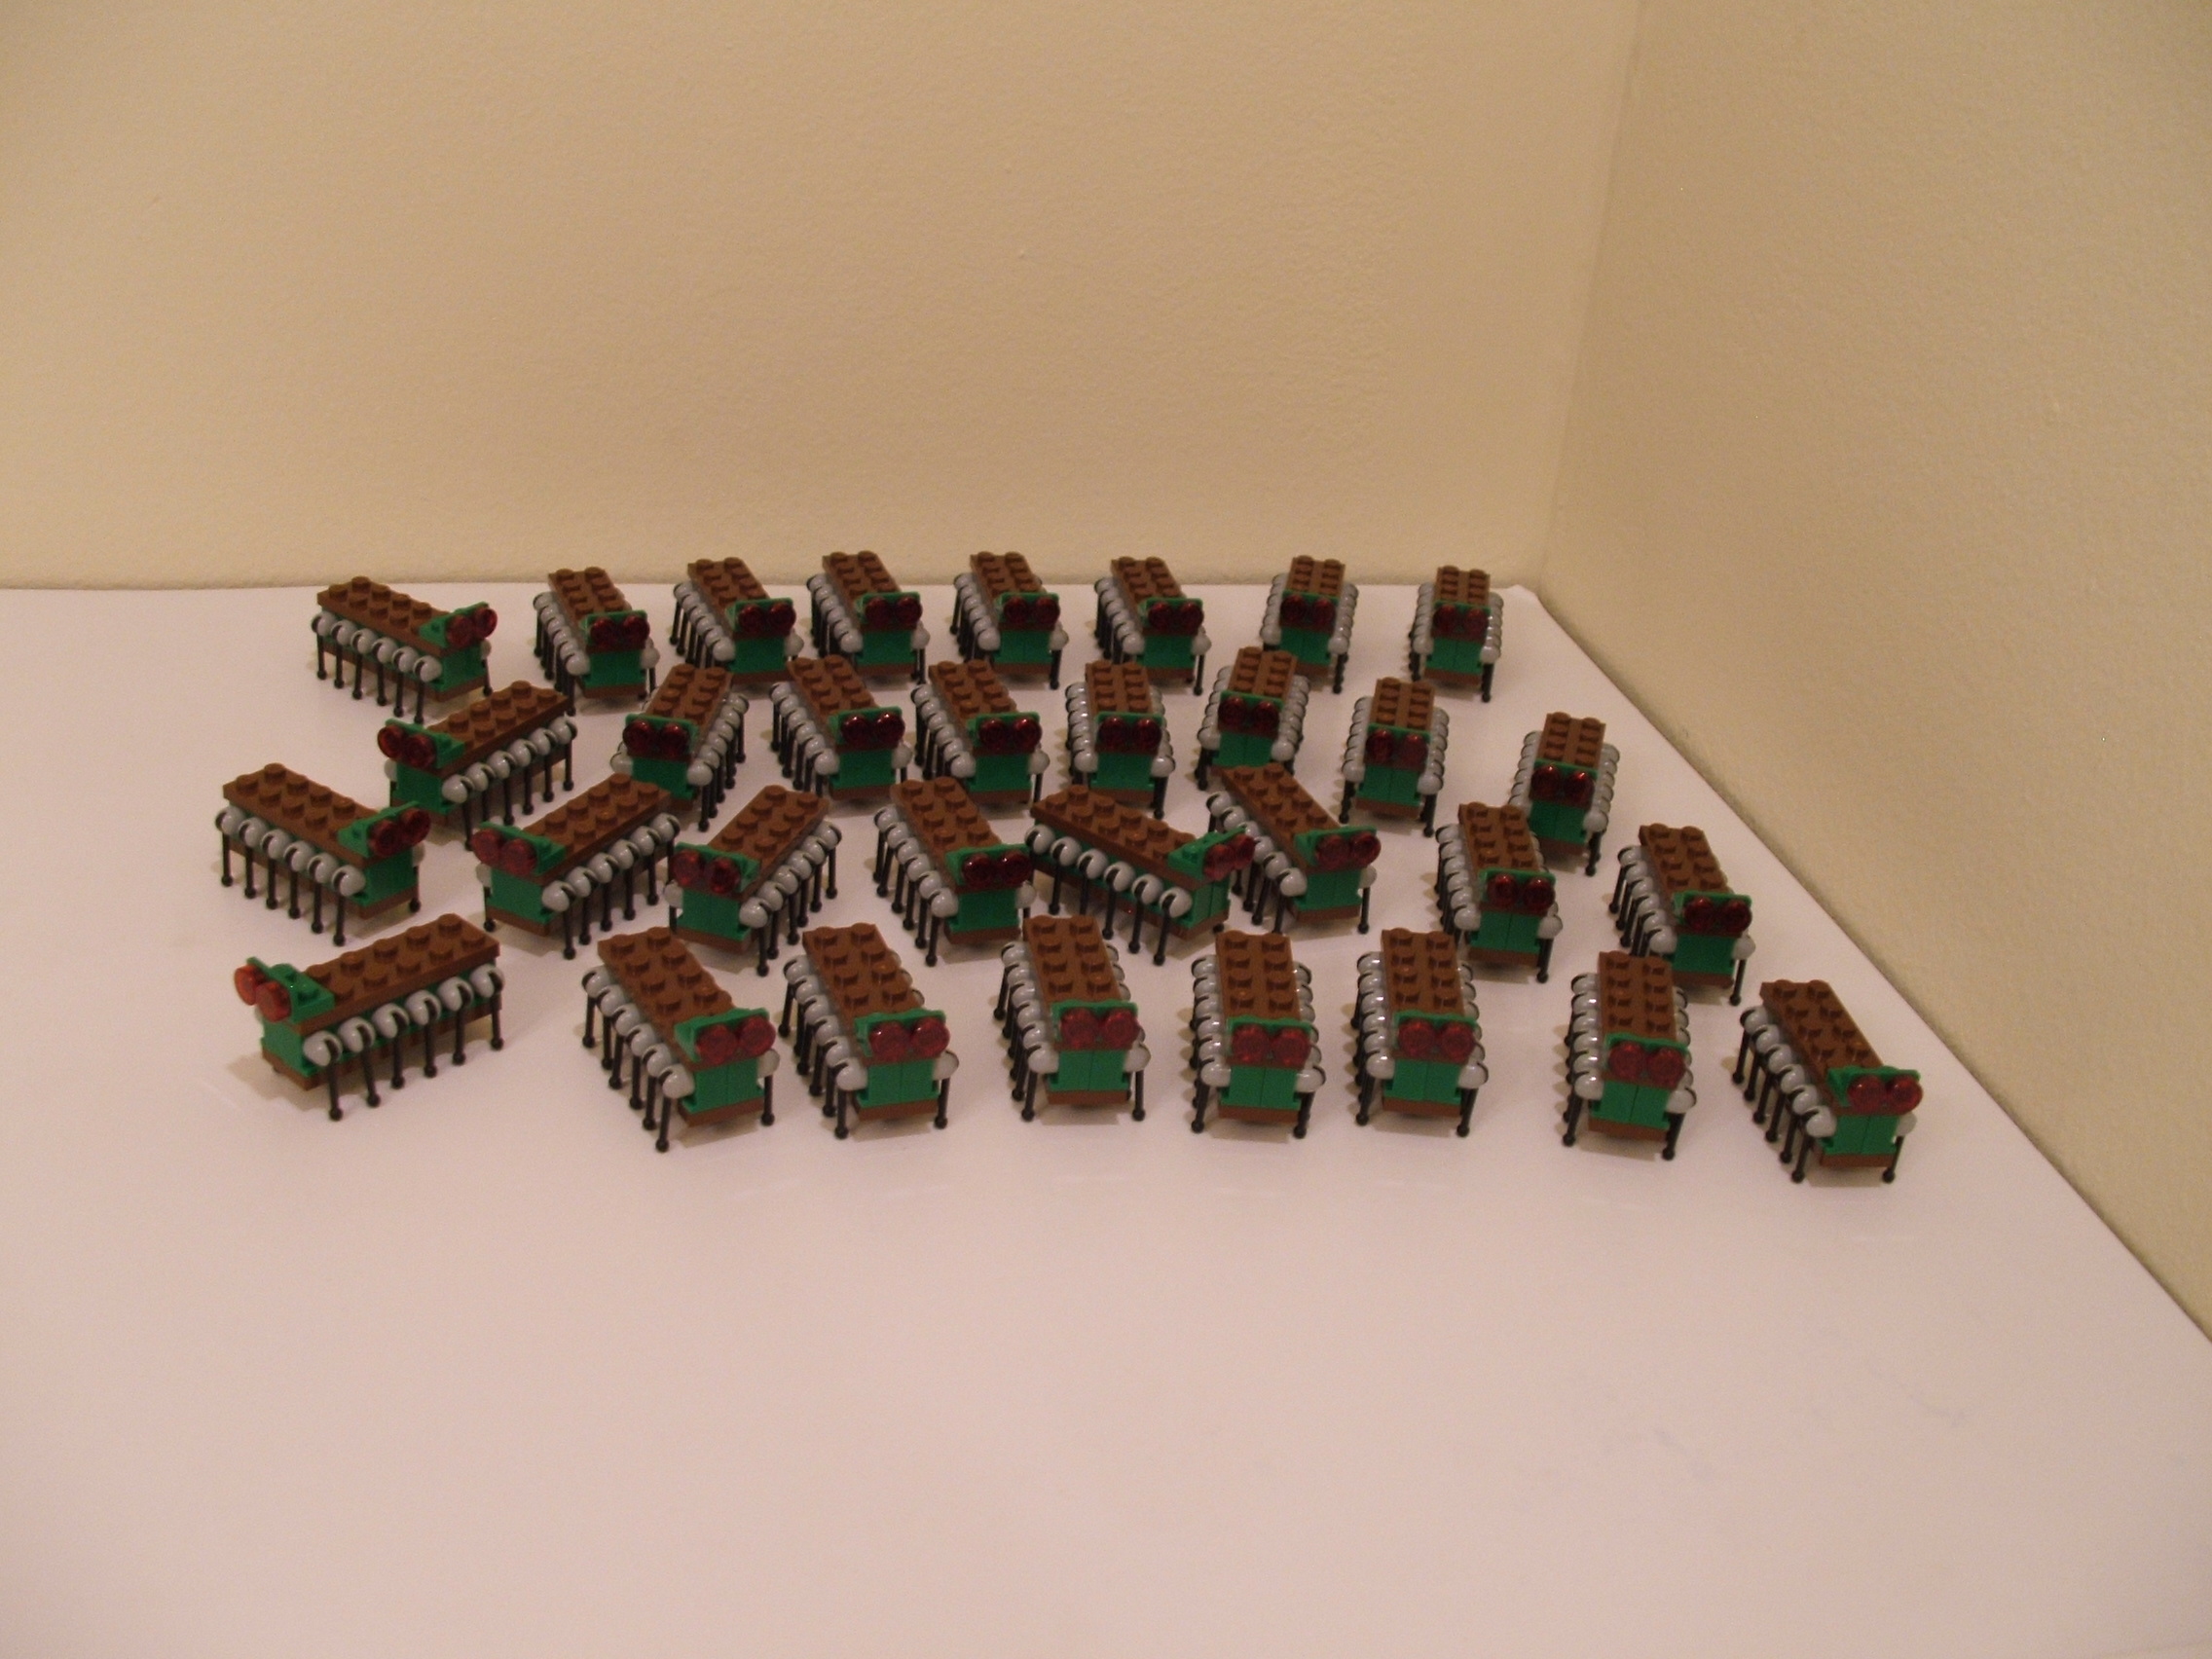
Terrys Lego Centipede
Millie the Centipede has 388 legs and was
found crawling around my house.
Centipede measures 61x1x1 inches.
Millie had a litter of 32 offspring.
Each Millie liter weights about 1/30
of an ounce (we are educational too!).
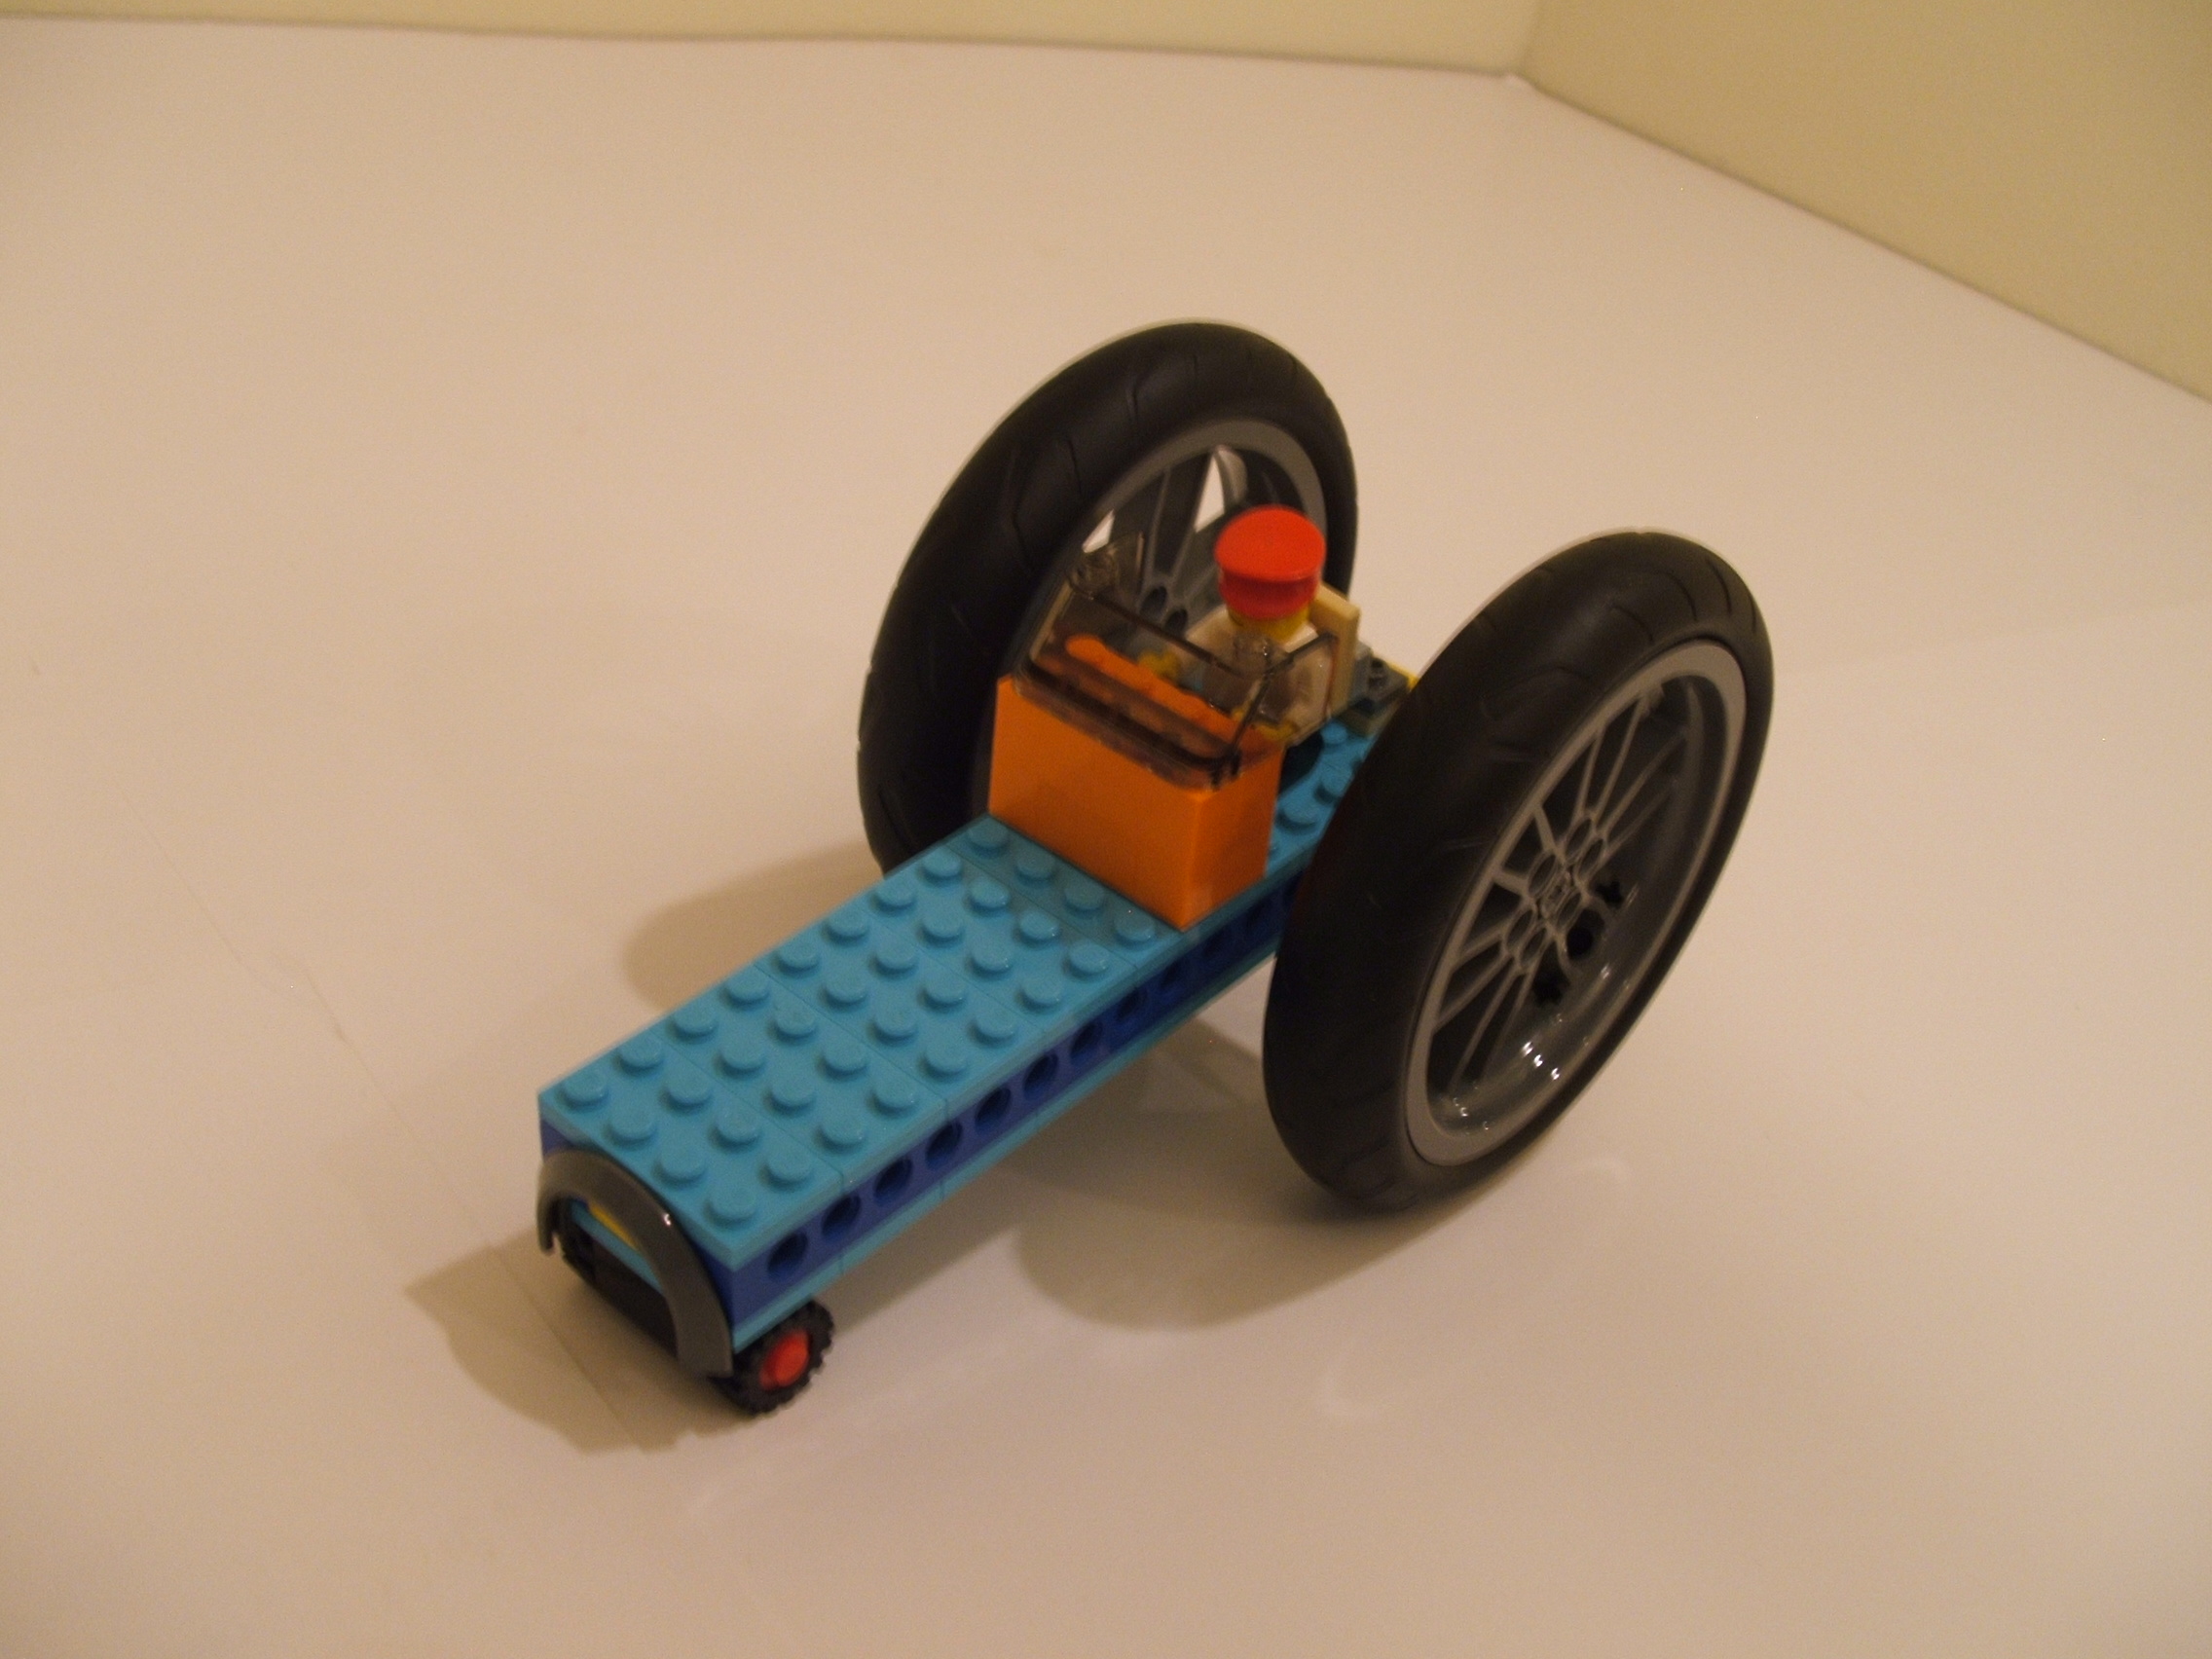
Terrys Lego Mini dragster
This mini dragster is not as long as
most but can still do the job. A
pull back motor could be added with
a very small modification on the
back.
Measures 6x4x4 inches.
Terrys Lego Playground
My playground features a Merry Go Round, Teeter totter,
Slide, Monkey Bars, Swings, seating area, and pathway.
All of the items that are supposed to move operate as
they would in real life.
Playground:
The playground items are easy to create and
require just a few parts.
Merry Go Round:
Use a large plate as a base. I used a
16x16, but a standard baseplate will
also work.
I mounted a 2x2 turntable at the center
of the plate with a single 2x2 brick on
top for a little height.
I put an 8x8 circle piece (Lego #4625582)
on top. Then 2 2x2 bricks on the circle.
I used 4 1x4 plates to make the rails.
Teeter totter:
I used 4 2x4 bricks as a base. Note that
the height of the base will need to be
adjusted if you change the length of the
platform or want to get a different
maximum height for the raised end.
A ball and clamp (Lego #6039479 and #6043656)
combination make a perfect rocker assembly as
it holds place firmly yet allows smooth move
action. A hinge could be used if need be but
would make the movement not as realistic.
I made a 4x30 platform using 6 2x10 plates.
I connected them (underneath) using 2 2x10
plates. You could use a narrower platform
such as a 2x30 if you like. The length of
the platform can also be adjusted. The
shorter the platform length, the higher the
maximum height of the raised end. You should
use a base height and platform length that
is appropriate for your needs.
Mount the center of the platform onto the
ball/clamp assembly at a 90* angle to allow
for proper connection and movements.
Slide:
The actual slide is made from 4 4x6 plates
forming a 6x16 assembly. I put 8 1x8 tiles
on this running the length on the four rows
of posts in the center. I used 1x4 bricks
to make the sides.
I used another 4x6 plate and 4 1x3 tiles
to make the landing with 1x4 bricks as
sides. I intentionally left the last row
of posts empty as a way to pose mini
figures on if desired.
I used 2 2x2 ball and clamp (Lego #6039479
and #6043656) assemblies to mount the slide.
These allow for movement at any angle so
it is not necessary to use exact calculation
for the mount. Hinge pieces could also be
used. One connects the landing to the slide
and another connect the slide to the platform.
The ball/clamp which attaches the landing is
what gives it the height off the ground also,
so if you use a hinge you will also need a
brick to lift that landing.
The platform is supported by two columns of
11 2x2 bricks stacked. Note that if you
change the length of the slide or the angle
of slide, you will need to change the height
of the platform to accomodate. Experimenting
(like I did) is the best way to design you
own model. Optionally you can use a more
elaborate (sturdy) base.
The platform itself is 5 4x6 plates with a
few other plates as anchor and support. There
are also 1x4 bricks as walls.
I used 2 7x4x6 staircases (Lego #4277751) as
stairs to the platform, supported by a column
of 5 2x2 bricks stacked.
Monkey bars:
The top platform has 2 1x10 plates for each
side, anchored underneath by another 1x10
plate. 5 1x6 plates are used as the bars.
The 2x6 plate (far end) looks out of place,
but is needed to provide stability.
The ends are 2 1x8 plates stood upright and
connected with 3 1x10 plates. 1x6 plates
could replace the 1x10, but I did not have
enough 1x6 at the time of the build to do
this.
2 2x2 plate with side knobs connect each
side to the top platform. Note that using
a 2x2 adds stability over a 1x1
While plates work well for the side steps,
Technic cross axles might be better for
the top bars as would look more realistic.
These could easily be mounted along two
parallel Technic beams.
Swingset:
The swingset is entirely Technic pieces.
The side supports I used is an inverted
T shape instead of the common
inverted V. Either will do the
job, but I like the more open feel of
the single upright pole.
For each side I used a 15 hole Technic
beam as base. This length provides for
a no tip (front/back) result, though a
shorter beam could be used if desired.
A 3x3 T beam connects a 9 hole
beam upright to the base. There is a
small amount of wiggle since the upright
pole has only two snap connectors, but
it is still secure.
The top support is two 6mm cross axle
rods connected with a cross connector
as the center point. This connector
also serves as a spacer between the
two swings. You could add more axle
and connector segments to allow for
more swings if you like, but this may
require more support for the extra
weight.
Each swing is made up of a 5 hole beam,
2 6mm cross axle rods with cap, and 2
Technic cross connector with 90* hole.
The cross rods go through the last holes
on each end of the 5 hole beam with the
cap at the bottom to hold the beam (which
serves as the swing seat). These connect
to the connector.
Once the swing unit is built, it installs
on the top support by sliding the support
rod through the connector hole(s) until
it is flush with the top support center
connector. Use a cross axle spacer (cap)
to hold the end (away from the center
connector) from sliding back off, but
make sure it allows the swing to move
freely.
Once the swings are in place, the top
support rod goes through the top hole in
each side support and a cross cap holds
it in place.
To me this design seems to be very close
to the actual ratio of a playground swing.
You can adjust the swing height by either
using a different length of cross rod for
swing arms OR using different length of
side support upright beam. Note that if
you use an inverted V for side
support you will need longer beams to get
the same height as using the single pole
method.
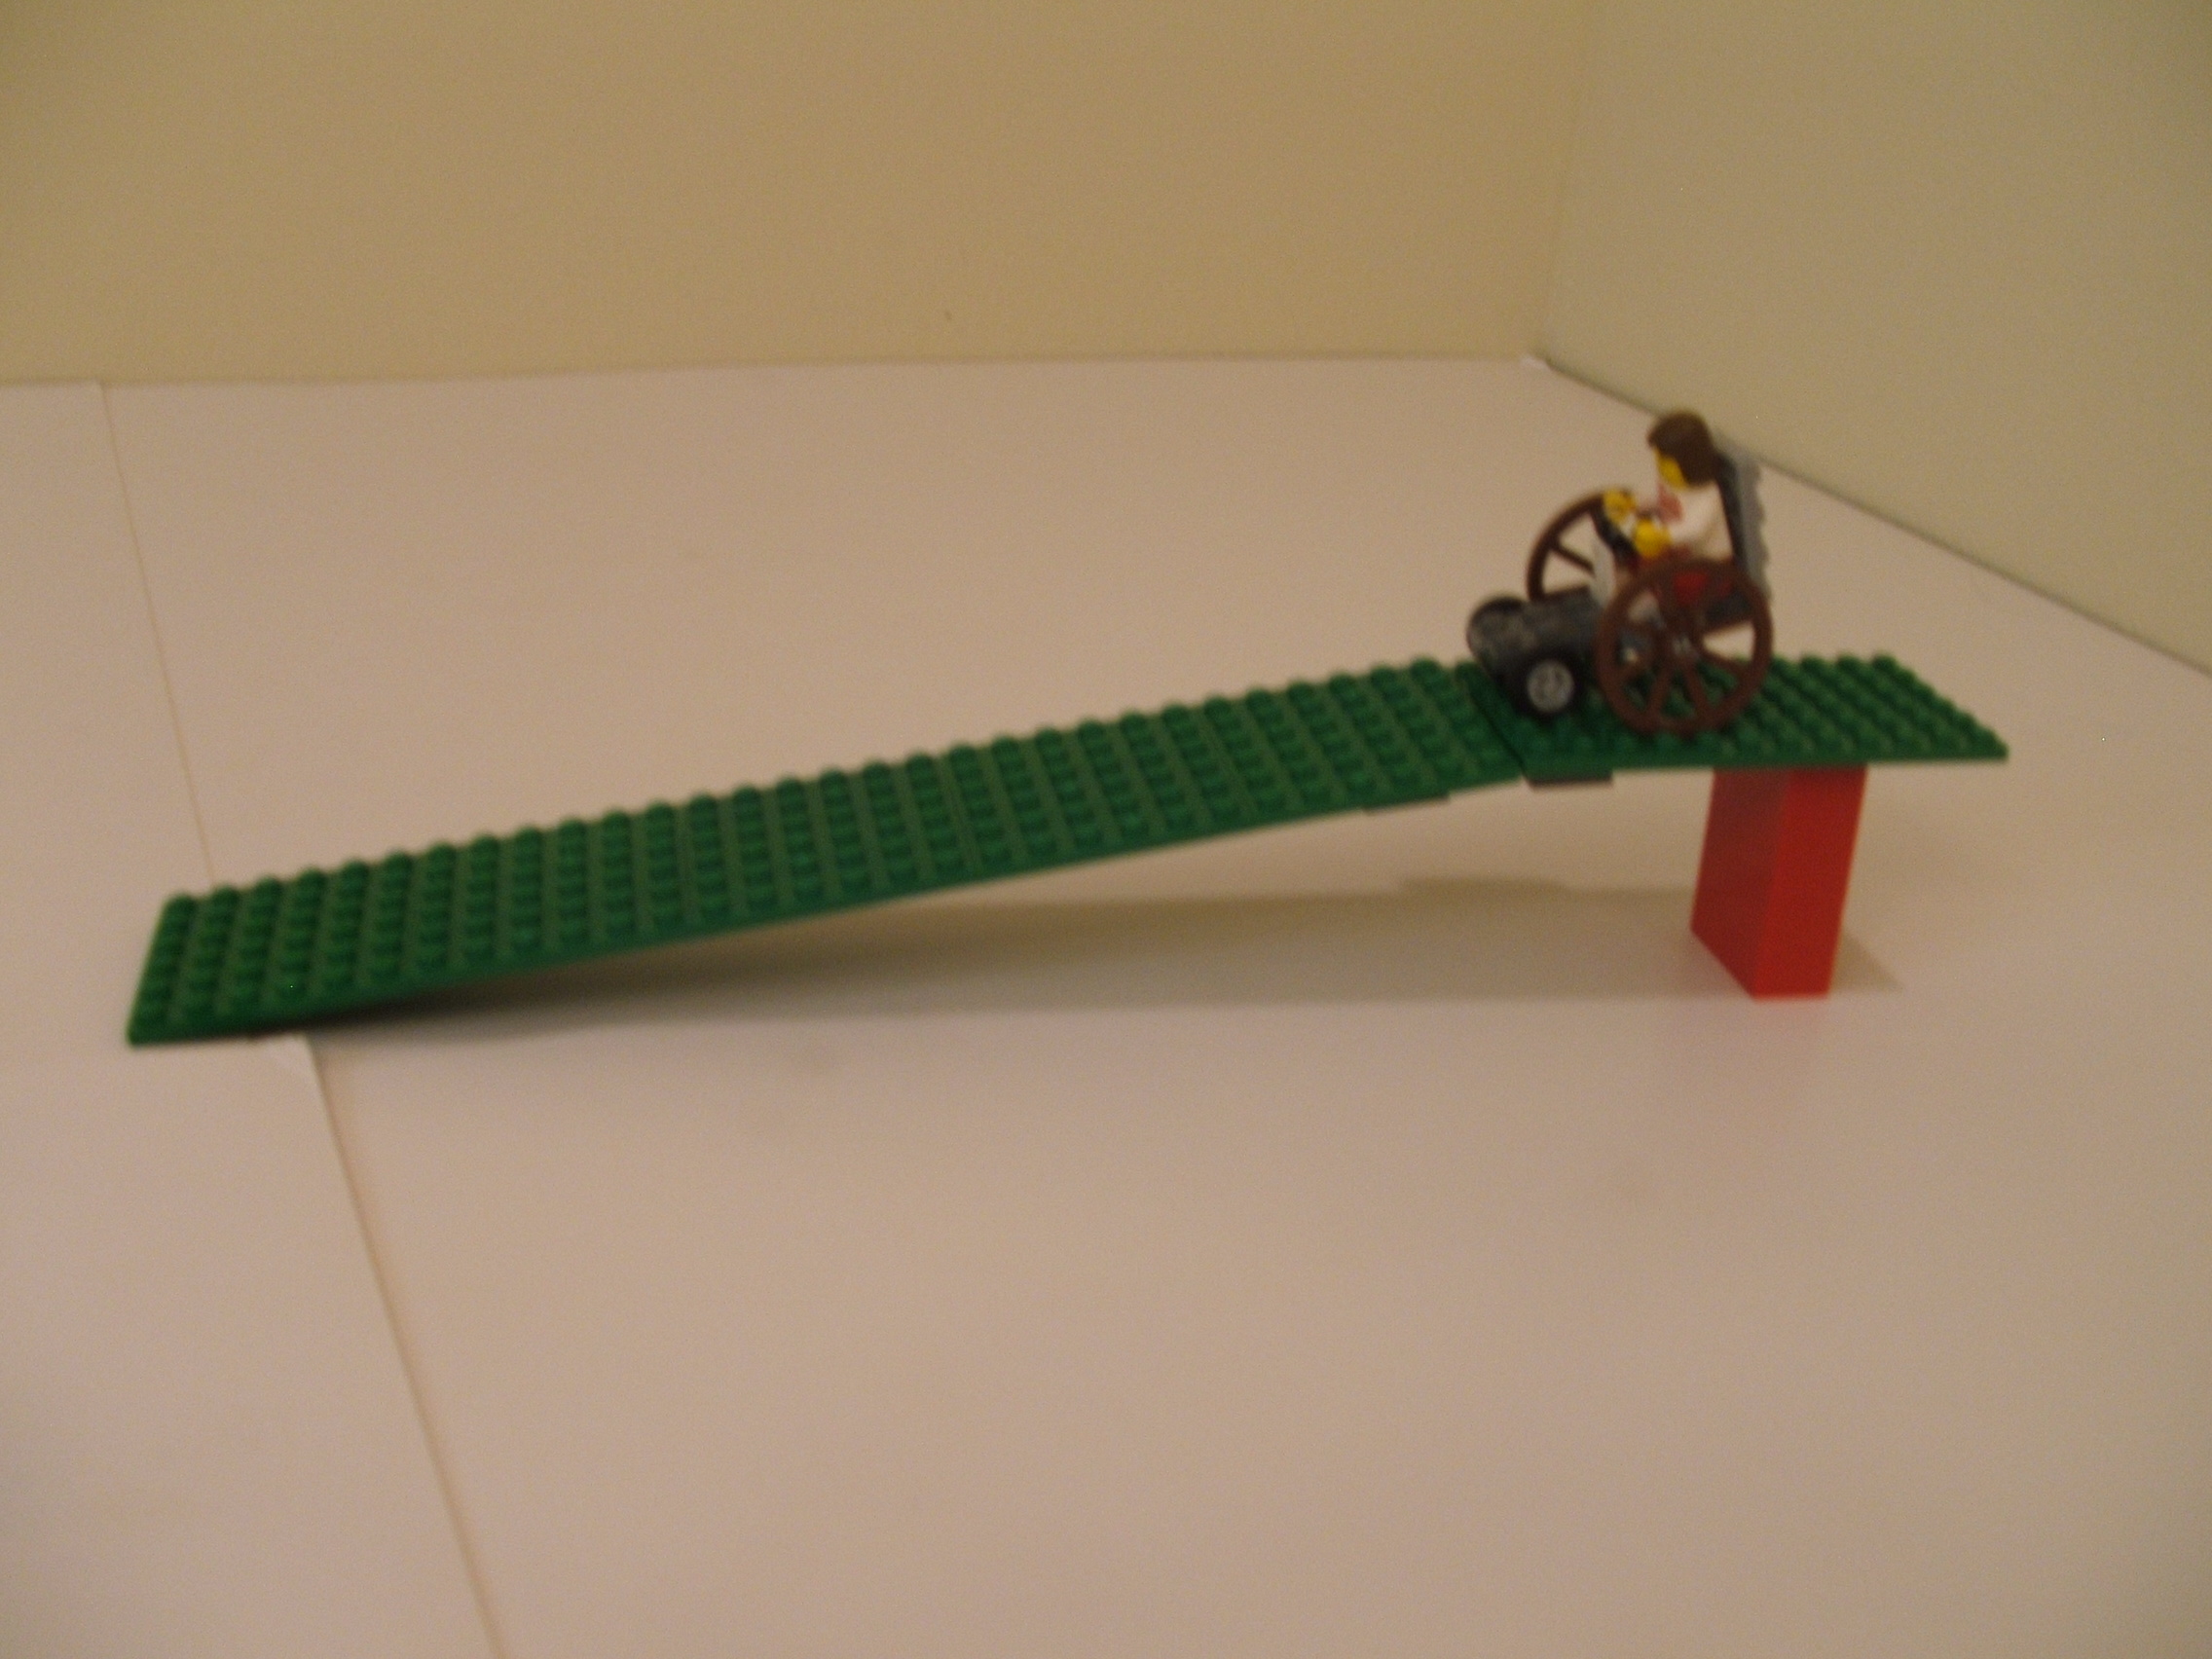
Terrys Lego Wheelchair ramp
I created a wheelchair and ramp so I
could use them in projects.
This ramp is constructed from plates
anchored together to form a long run
plate. The joint (ramp meets landing)
is a ball/cup piece, although hinges
could also be used. The ball/cup
joint allows the ramp to float at ANY
angle simply by adjusting the height
of the landing. Additional ramp
sections can easily be added by using
another ball/cup (or hinges) at the
joint between the landing and the next
section.
ADA specifies ramp rise of 1:12 ratio
(12 inch length for each 1 inch rise)
and a 60 inch landing. In terms of
Legos that would be a run of 14.4 posts
for each brick of rise (4.8 posts for
each plate of rise). If you choose to
render accurate results use this guide.
Since many models are not built to an
exact scale though you have some
flexibility in design.
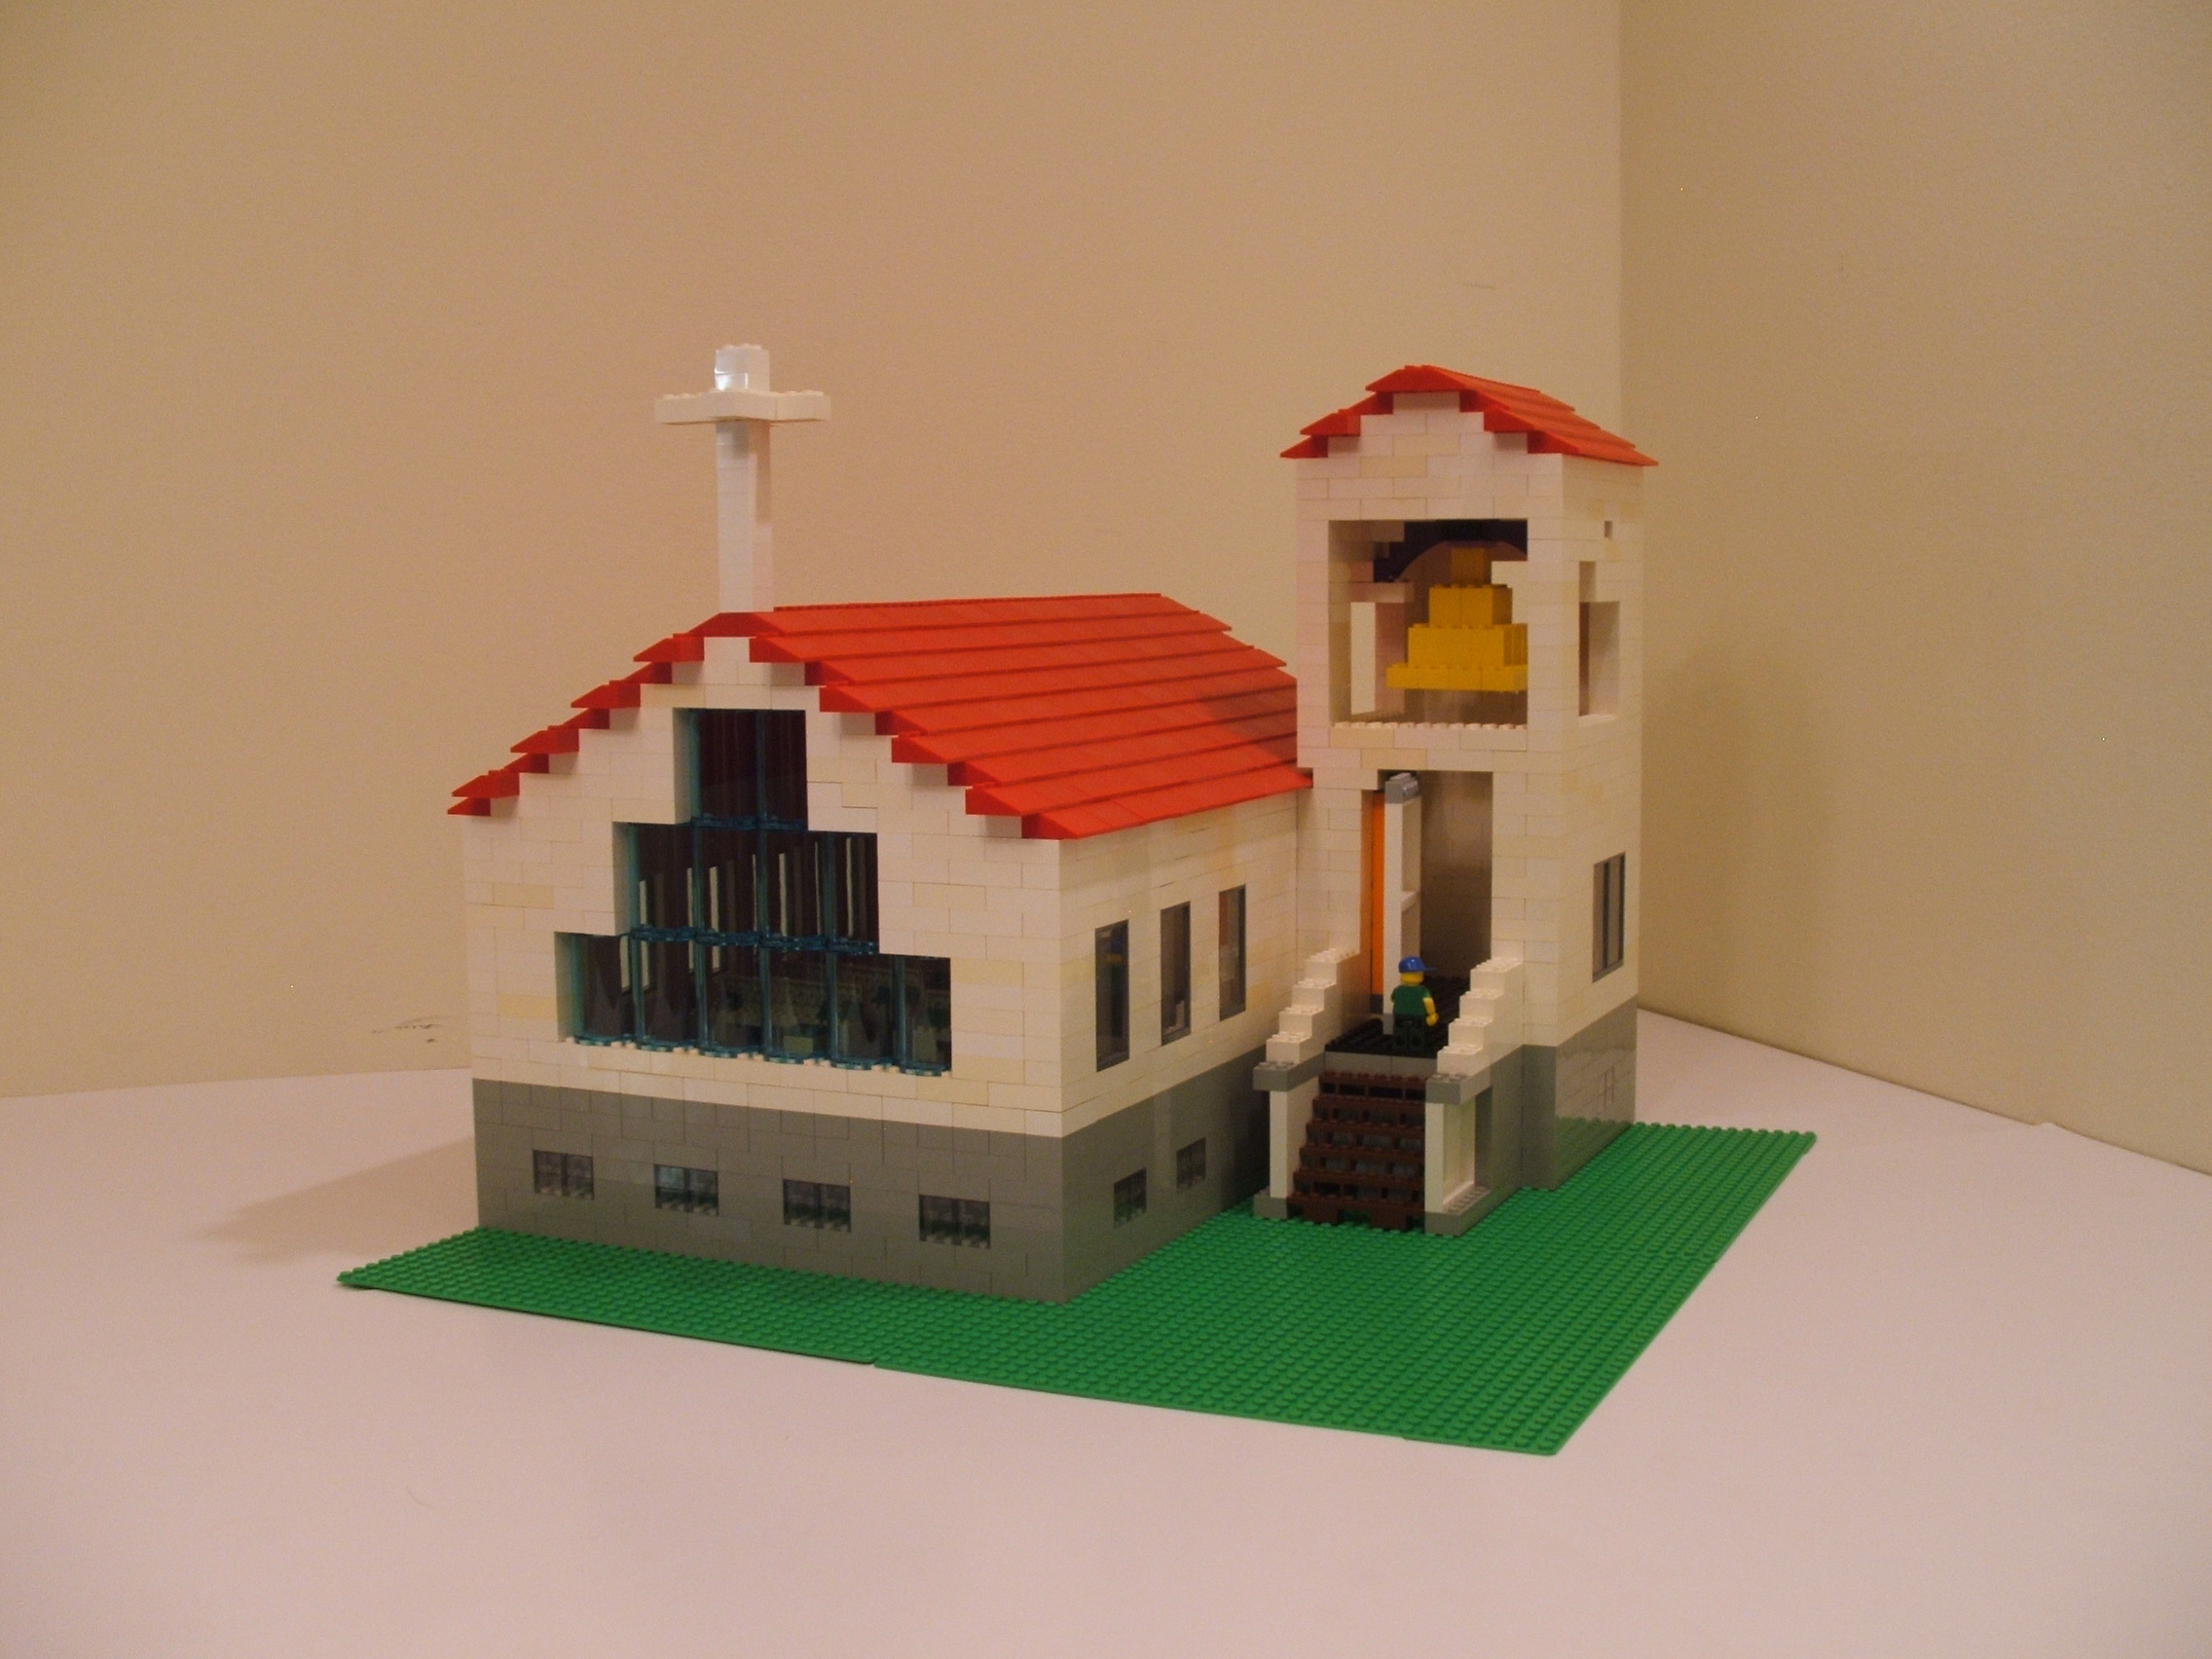
Terrys Lego Church
The little lego church in the valley. This design
is somewhat based upon the church I used to attend
as a youth. Features include a basement for
Sunday school classes, foyer entry, old timey bell
in the bell tower, steeple cross, and large windows.
The sanctuary features pews and a pulpit.
Church measures 16x16x15 inches.
The sanctuary has pews and a pulpit.
Terrys garden and greenhouse
Enjoy the beautiful garden. This
garden features many flowers, two
exotic trees, a fountain and pond,
benches, lights for evening visits,
2 water hose faucets, and a greenhouse.
The greenhouse features several
work tables for growing plants, a
water hose faucet, roof vents for
climate control, and solar panels
on rooftop to provide electricity
for the lights.
The greenhouse roof easily detaches
(as shown here) for inside access.
Garden measures 10x30 inches.
Greenhouse measures 9x8x6.5 inches.
Terrys Lego lighthouse 2
A version of a lighthouse which I like.
Features include a small island with
lighthouse and stairway to water for
boat access and path to shore.
Lighthouse features 360* light window,
Ground level windows for view from
inside, and fog horn for audio alert.
There is a hinged access door (on side
not shown in photo) to allow access to
turn battery pack on and off.
I used the crocodile and boat from
another set to add content to this
picture.
I used a rechargeable battery box, a
M motor, a light set, and IR receiver.
Using the IR receiver makes it
possible to use the remote control to
turn the light on/off/brighter and
control motor speed or start/stop it.
Island measured 13x13x24 inches.
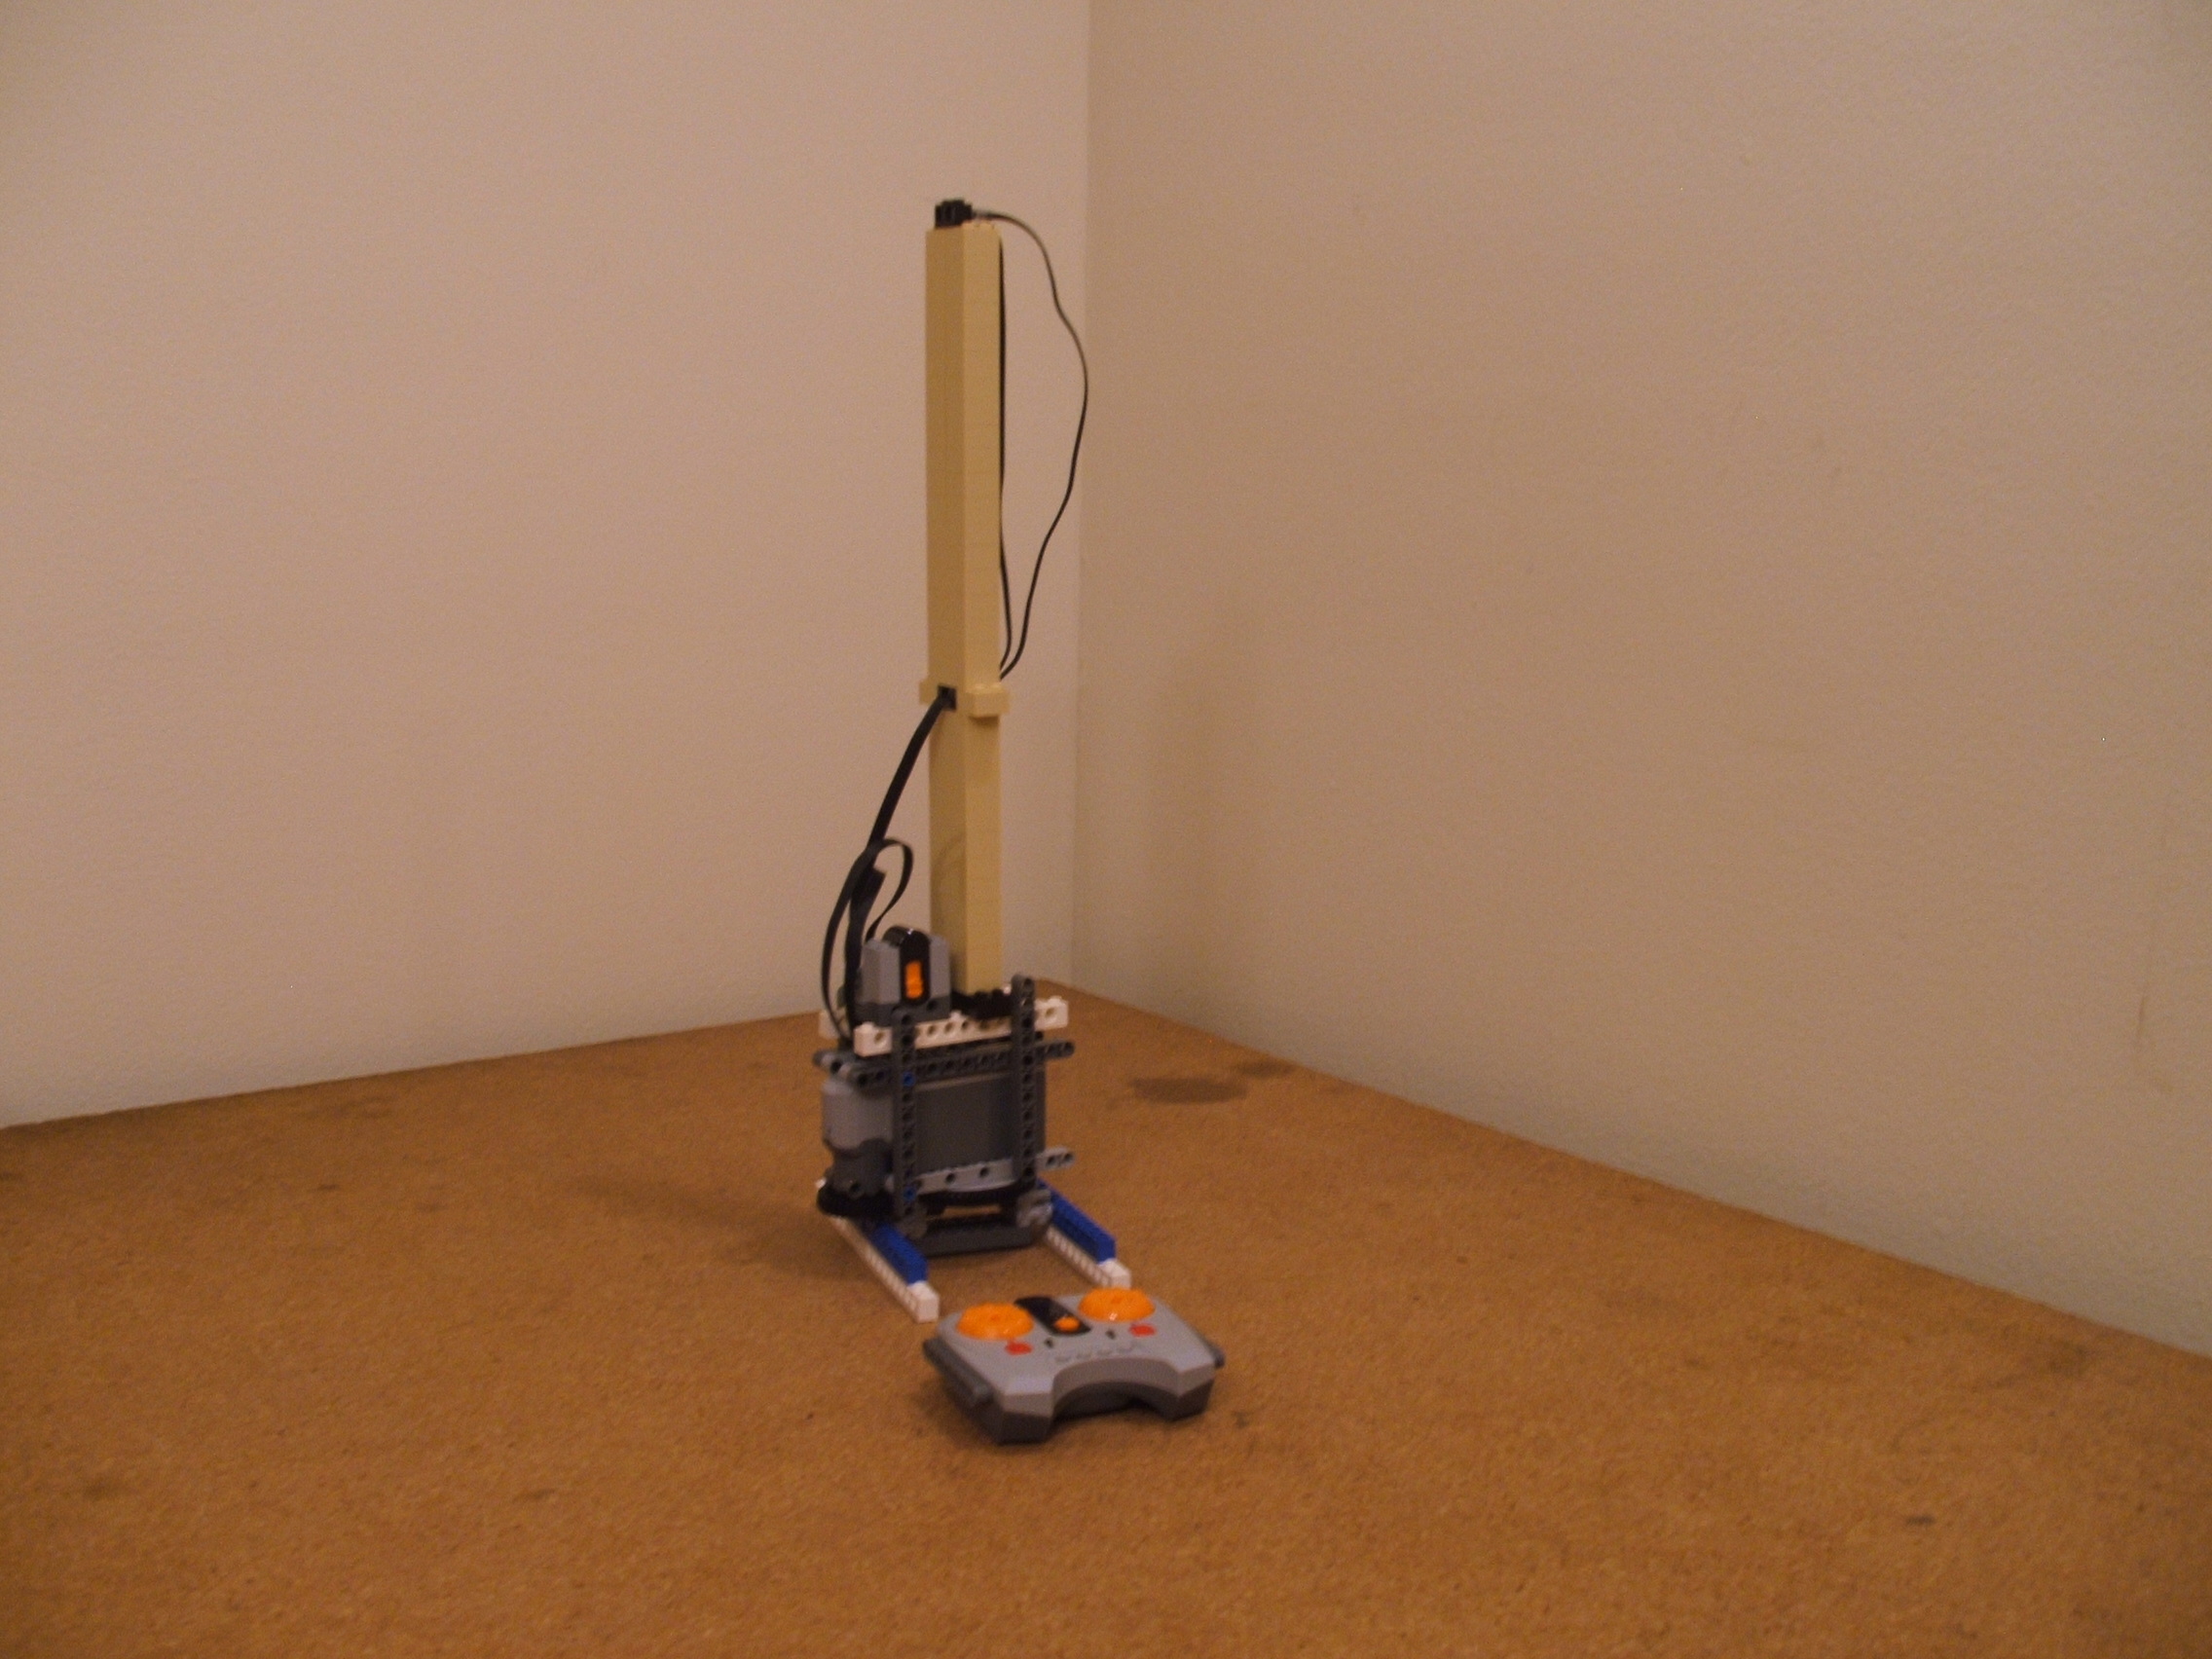
The mechanicals of the lighthouse. This
was slightly modified to make the light
support column more sturdy as the fact
the turntable wobbles slightly
during movement with the weight. Note
that there is a battery pack, motor, and
IR receiver mounted together. This
allows for remote control of light and
motor operations.
Video of lighthouse in action.
In the video, the access door is open
to show the mechanical movement. The
battery pack can be accessed through
this door to turn the power on and off.
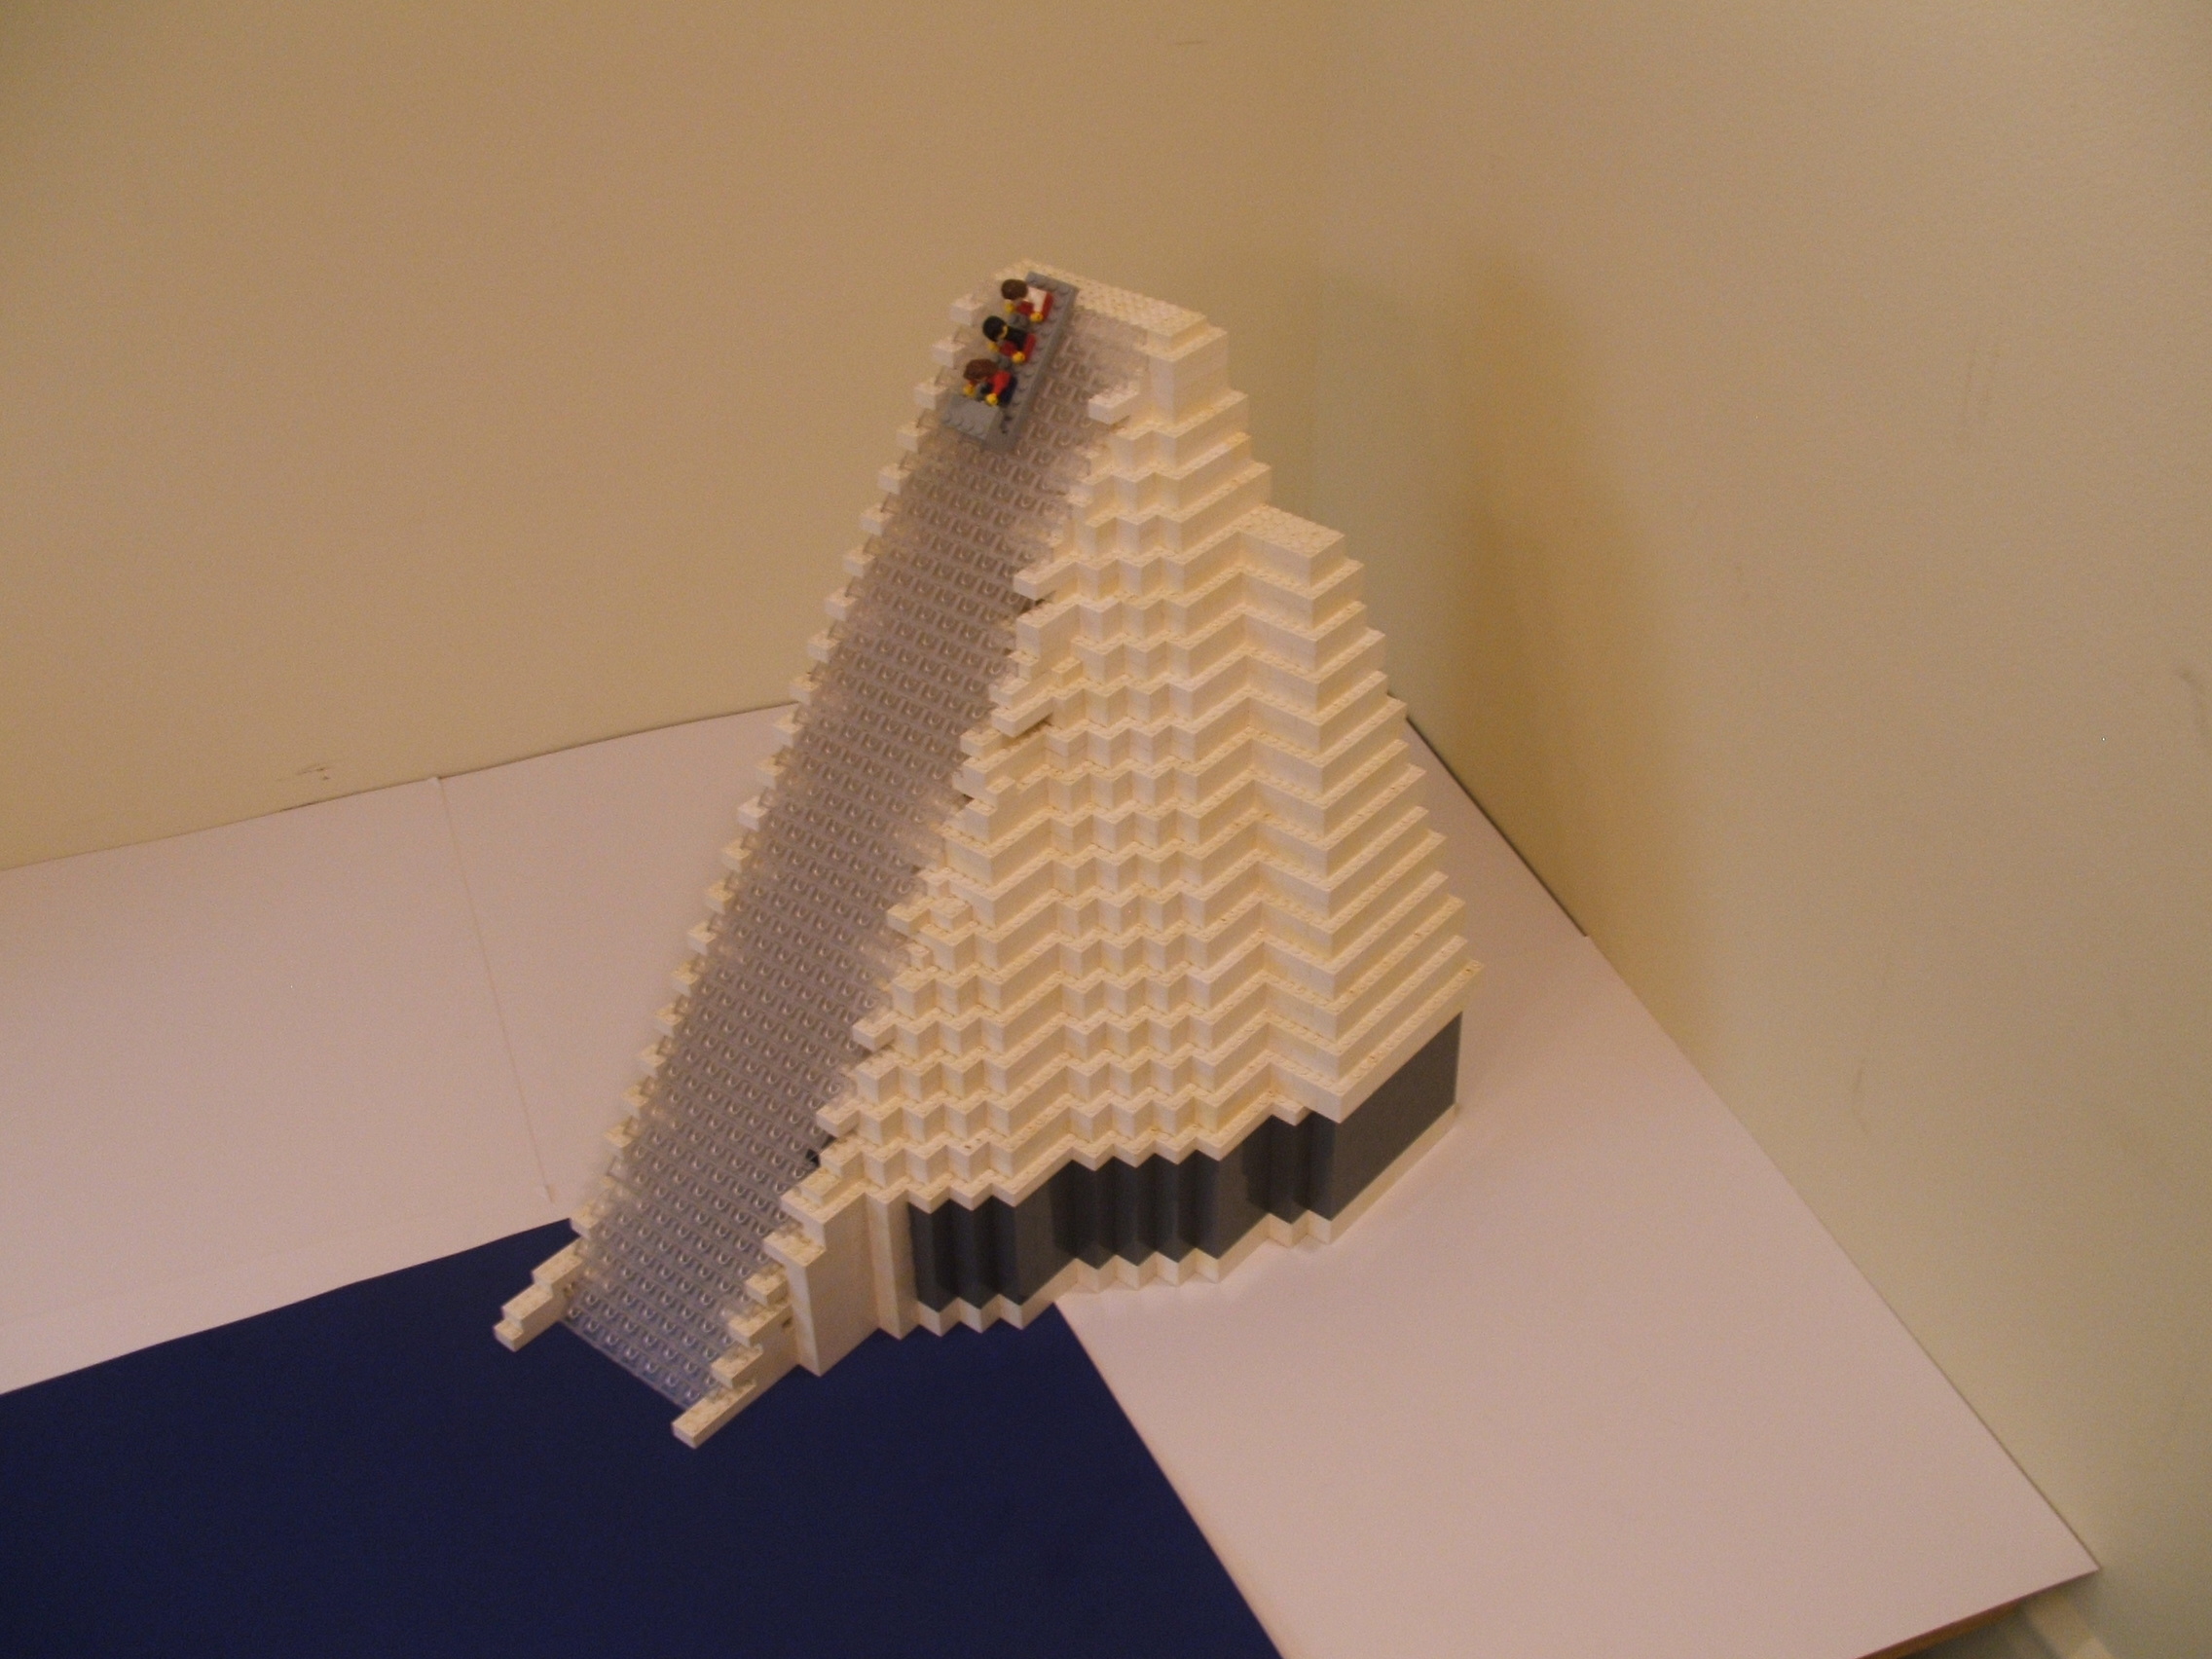
Terrys Lego toboggan fun
Winter is so much more fun when
you spend the day tobogganing at
Terryboggan Hill! Measured
12x18x19 inches.
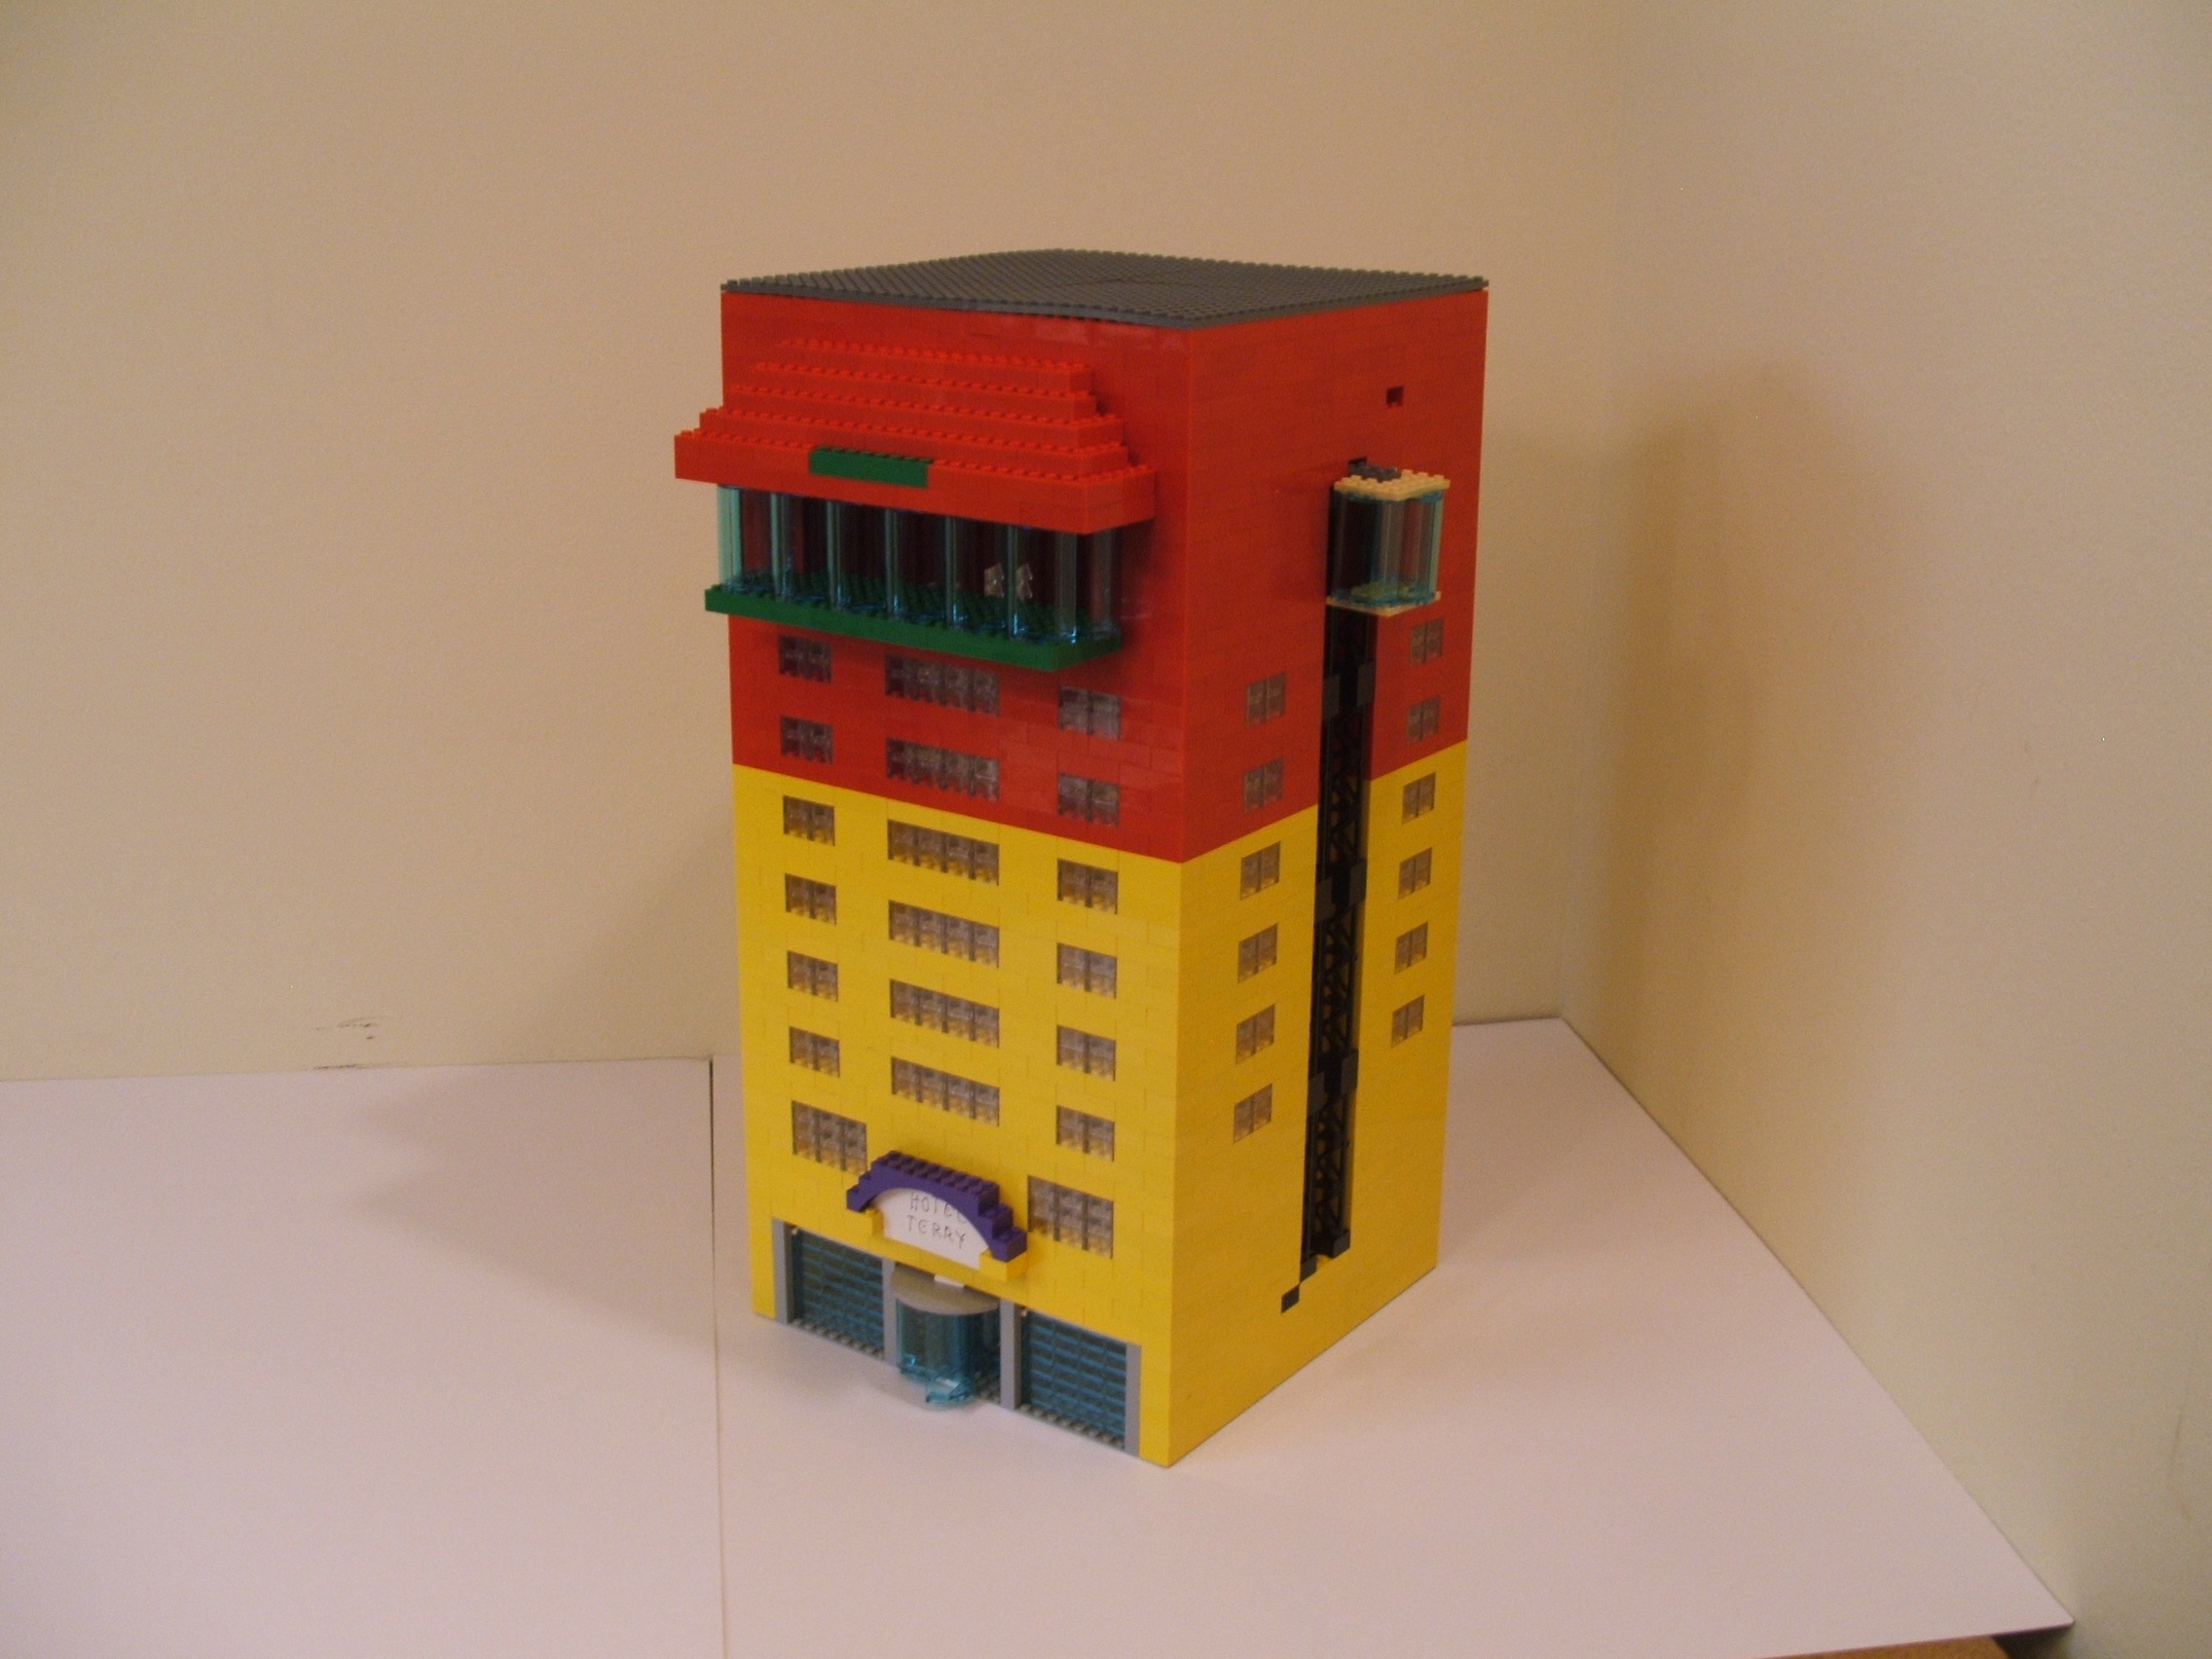
Terrys Lego hotel
A small hotel with 30 rooms, 4 suites,
and a huge penthouse (no interior
structure). Features a working
elevator and revolving door entry.
Since doing this build I got the rest
of the windows I ordered so I can
create larger structures in the future.
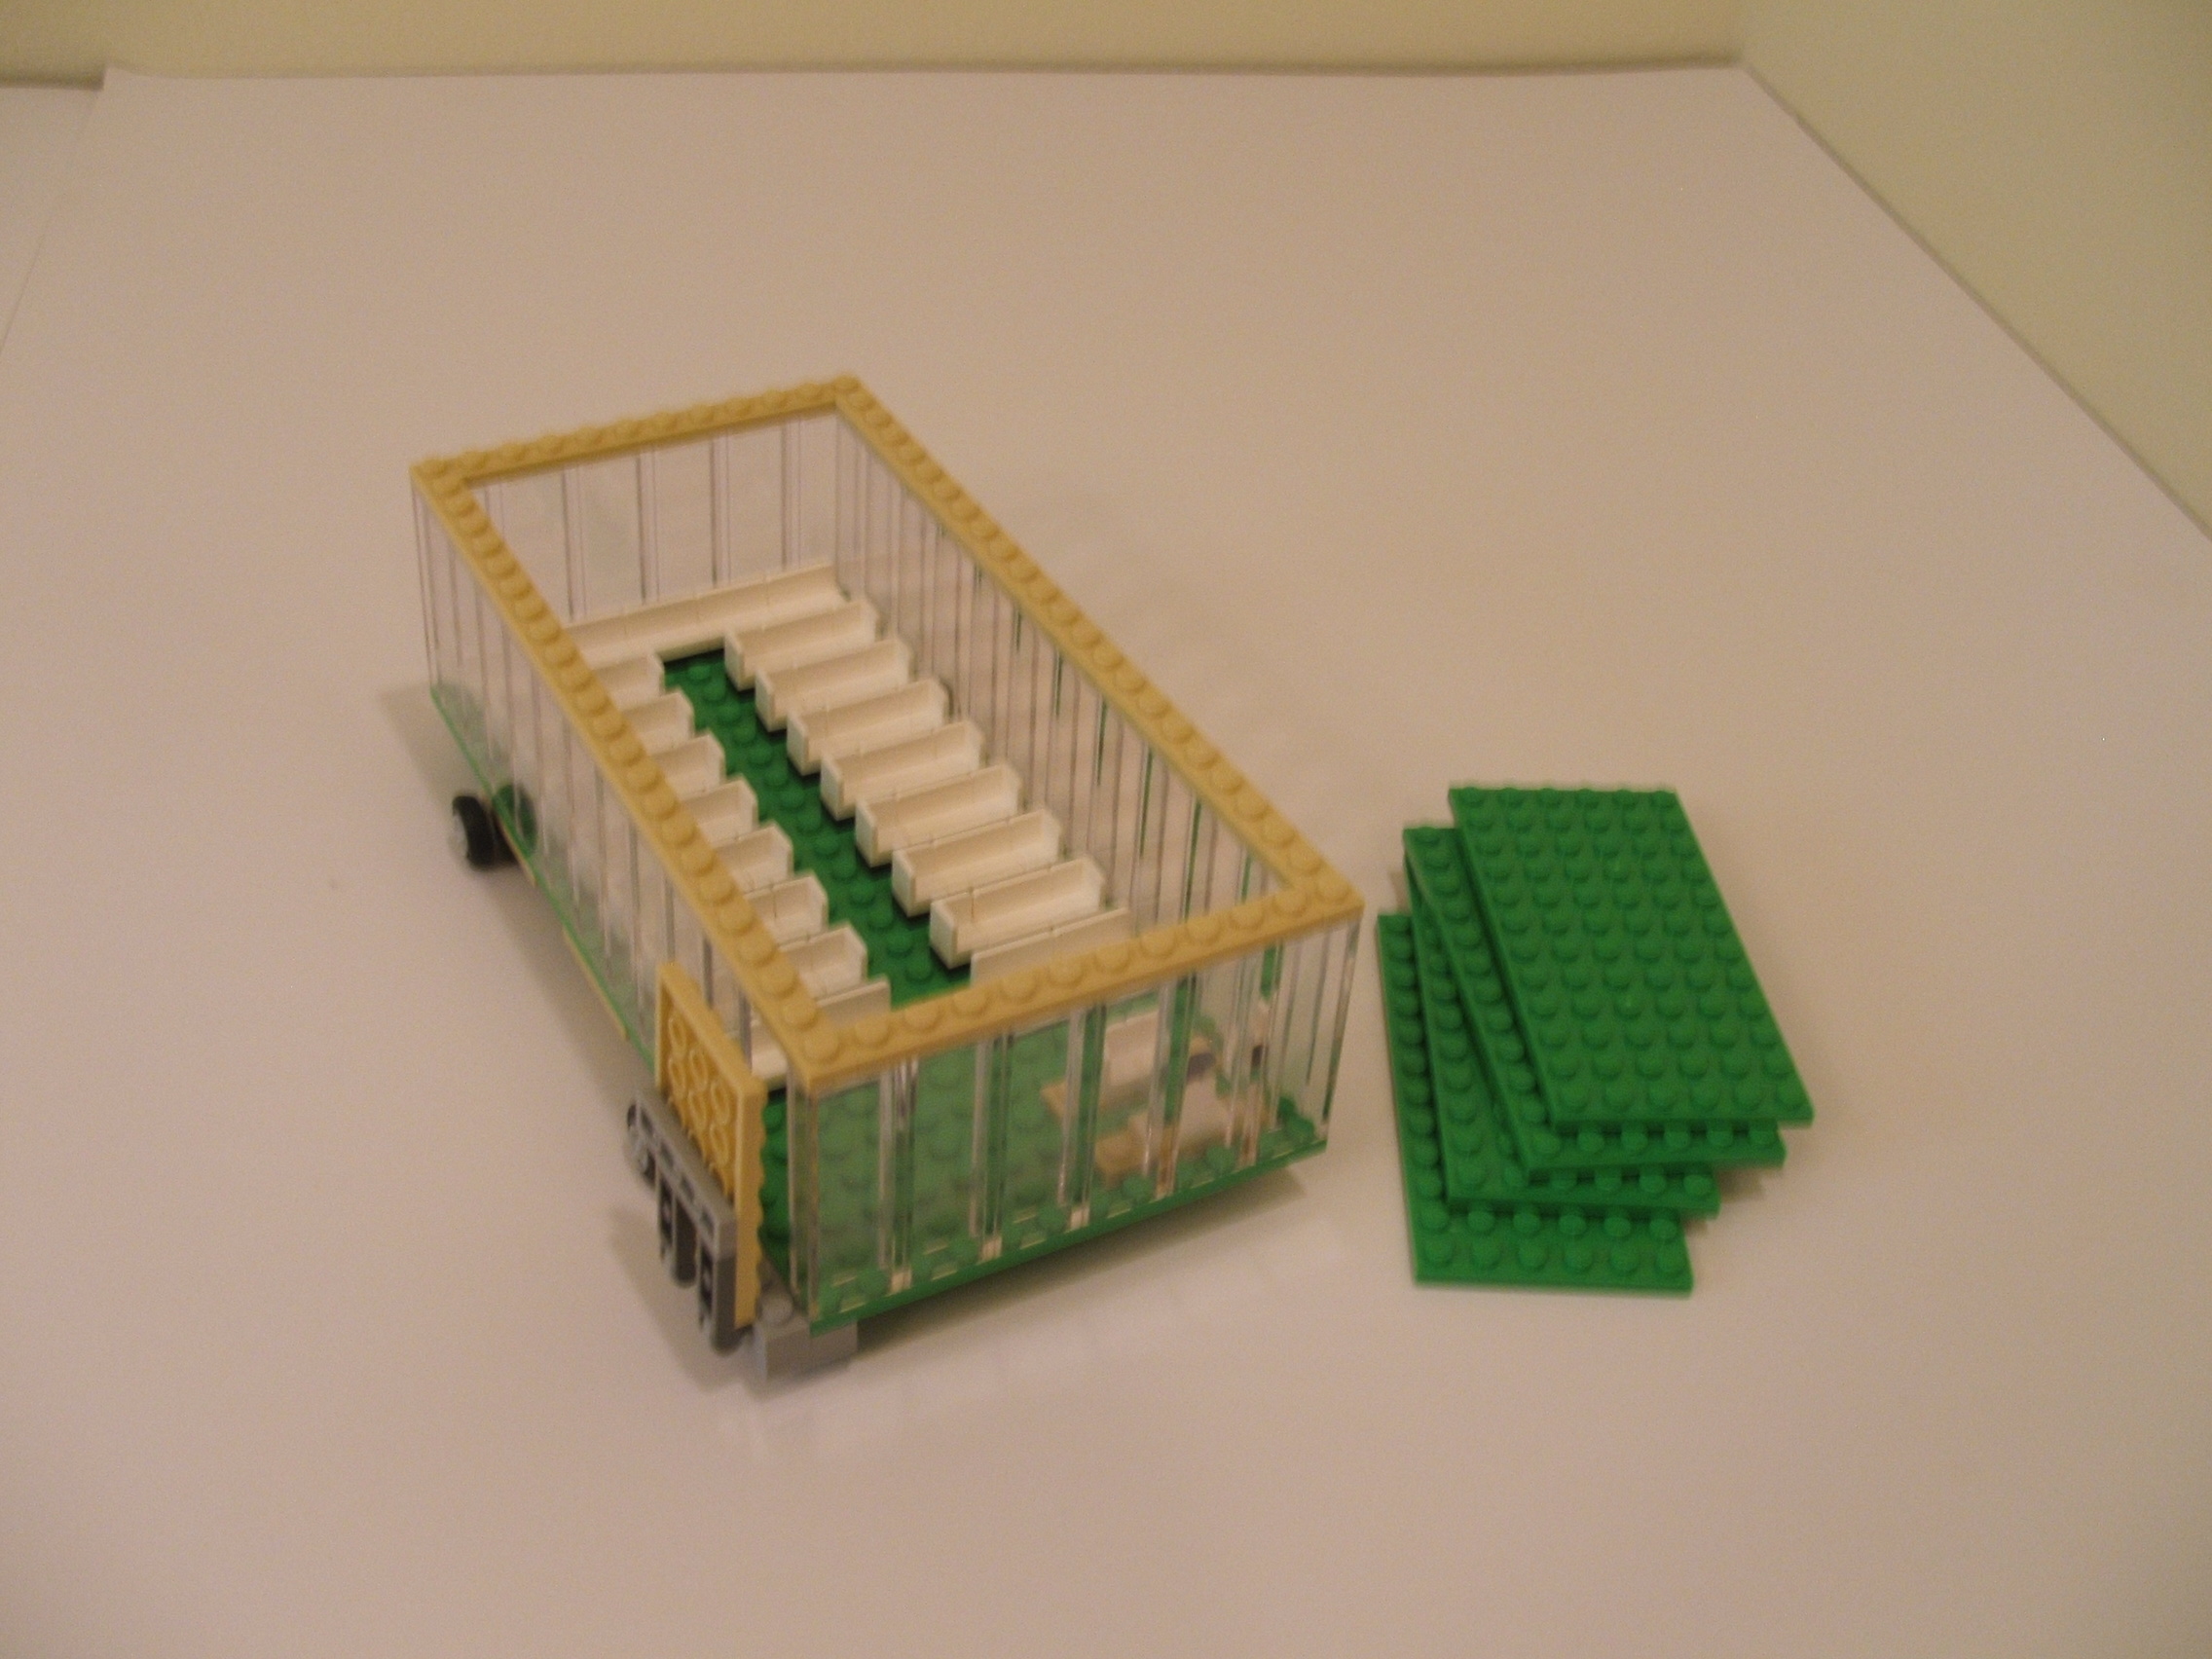
Terrys Lego sightseeing bus
My sightseeing bus holds 74 people
and offers 360* view for passengers.
Door opens downward to make ramp for
wheelchair access. Shown here with
roof removed to show inside detail.
Sightseeing bus:
Parts:
8 6x12 green plate (4541414)
7 4x6 tan plate (4114001)
32 1x2x5 clear brick (4624313)
2 1x10 tan plate
4 1x12 tan plate
2 1x2 to 2x1 gray hinge set
2 1x4 gray plate
1 2x4 gray plate
2 1x4 tan plate
1 1x2 steering wheel (9551)
1 1x10 black plate
16 1x4 black plate
23 1x2 white bench (486501)
30 1x2 white corner (623101)
4 single wheel with axle and plate assembled
Instructions:
Lay out four of the 6x12 green
plates to form a 12x24 base.
Connect these on the bottom with
six of the 4x6 tan plates, which
fit two across at each seam.
Position the base so that one end
of the base with twelve posts is
facing toward you (will be front
of bus) and the twenty four post
sides are traveling away from you.
Place five of the 1x2 benches
(Lego wall elements) in a line
on top of the 1x10 black plate
with the raised parts all facing
the same way. Place this assembly
across the second row of posts
from the back, leaving one post
on each end empty. Insure the
raised parts are toward the back.
This forms the back row of seats
on the bus.
Build fourteen seat units. Use
one 1x4 black plate with one 1x1
corner, one 1x2 bench, and one 1x1
corner on each plate with the
raised parts aligned forming half
of a rectangle shape. This forms
one seat unit, so do this fourteen
times.
Place the fourteen seat units on
the base in two columns and seven
rows. Each row has two seat units
and is placed two posts in front
of the seats behind it. Each
column has two seat units, placed
so there are two empty posts between
them and one empty post on each side.
Insure the raised part is toward the
back of the bus for each seat unit.
Build two seat units. Use one 1x4
black plate with two 1x2 benches
on each plate with the raised parts
facing the same way. This forms
one seat unit, so do this two times.
Place the two seat units on the base
in two columns and one row. The row
is placed two posts in front of the
seats behind it. The column has two
seat units, placed so there are two
empty posts between them and one empty
post on each side. Insure the raised
part is toward the back of the bus
for each seat unit.
Use one 1x4 tan plate and two 1x1
corners to form the drivers seat.
Place the two corners on the center
posts, leaving the end posts empty,
and insure the raised parts are
aligned to form half of a square shape.
Place the drivers seat assembly on the
base on the fourth row of posts from
the front of the bus. Place this on
the right side, leaving the rightmost
post empty, and insure the raised part
is toward the back of the bus. If
everything is positioned correctly, the
drivers seat should be three posts in
front of the most forward set of
passenger seats on the right column.
Use one 1x4 tan plate and one 1x2
steering wheel to form the steering
assembly. Place the steering wheel
on the center posts, leaving the end
posts empty.
Place the steering assembly on the
base on the second row of posts from
the front of the bus. Place this on
the right side, leaving one post empty,
and insure the steering wheel would be
facing the driver. This will leave
one row of empty posts between the
drivers seat and the steering wheel.
Place six of the 1x2x5 clear bricks
along the back row of posts on the
base (directly behind the last row
of passenger seats) to form the back
windows. Use one 1x10 tan plate to
connect these bricks at the top,
leaving the end post on each side
empty.
Place six of the 1x2x5 clear bricks
along the front row of posts on the
base to form the front windows. Use
one 1x10 tan plate to connect these
bricks at the top, leaving the end
post on each side empty.
Place nine of the 1x2x5 clear bricks
along the left side of posts on the
base, starting from the back windows
to form the left windows. Note that
this leaves four empty posts between
the front windows and the forward
left window (this is the door area).
Use two 1x12 tan plate to connect
these bricks at the top, starting
from the empty post on the back
window assembly and ending on the
empty post of the front window
assembly.
Place eleven of the 1x2x5 clear bricks
along the right side of posts on the
base, starting from the back windows
to form the right side windows.
Use two 1x12 tan plate to connect
these bricks at the top, starting
from the empty post on the back
window assembly and ending on the
empty post of the front window
assembly.
Place four 6x12 green plates on top
of the plates connecting the window
bricks. This forms the roof of the
bus.
Build the door portion of the door
assembly. Use one 4x6 tan plate.
Connect one 1x4 gray plate to the
underside of the tan plate, three
posts in from one of the four post
ends and spanning the entire four
post width. This creates one 3x4
and one 2x4 area on the underside
of the 4x6 plate. The hinges will
mount in the 2x4 area on the
underside of the plate. Place one
of the 1x2 female parts of the hinge
sets so that the two posts travel
from the edge of the 1x4 plate along
the post acceptors in the 2x4 area
to the edge of the 4x6 plate and
the hinge part extends beyond the
4x6 plate. This should be aligned
with the right edge of the 4x6 plate
(when the underside of the 4x6 is
facing you and the hinge is facing
downward). Place the other one of
the 1x2 female parts of the hinge sets
so that the two posts travel from the
edge of the 1x4 plate to the edge
of the 4x6 plate on the underside
2x4 area and the hinge part extends
beyond the 4x6 plate. This should be
aligned parallel with the other hinge
piece and be two posts to the left of
it, leaving the two leftmost post
acceptor areas empty.
Build the door holder portion of the
door assembly. Use one 2x4 gray
plate. Place the two male 2x1 male
hinge parts on top of the 2x4 plate
so they cover one four post side of
the 2x4 plate and both hinge parts
extend beyond the 2x4 plate facing
the same way (being two posts apart
from each other). Place one 1x4
gray plate on top of the hinge pieces
to anchor them.
Cpnnect the door and door holder
assemblies together by joining the
hinge pieces, insuring that when
attached the posts of both assemblies
are facing the same way. Note that
the assembly is NOT even. When
viewing the side with the posts, there
is an extra rightmost row of six posts
on the 4x6 plate.
To connect the door assembly to the bus,
position the bus so the door area is
facing you and position the door assembly
with the posts facing upward and the 4x6
plate facing toward you. Attach the 2x4
plate of the door assembly to the underside
of the bus base so that the hinge pieces
on that 2x4 plate are flust with the
edge of the bus base. The 2x4 plate fits
between the front of the bus base and the
edge of the 4x6 base connecting plates.
To open or close the door, place a finger
on the 2x4 plate below the door (to keep it
from coming loose) and raise or lower the
door using the action of the hinges. If
everything is positioned properly, when the
door is closed (against the bus) there is
only a small gap between the door and the
windows AND the door underside is facing
outward AND the front part of the door has
the hinge along its edge.
Finally, attach the wheels (with axles
assembled) to the underside of the bus base.
Place these on the 4x6 base connector plates
for better bus support. Insure the front
wheel is far enough back to not contact the
door in its lowered position. I used the
rear side of the first and last connector
plates, but they could be one post forward
if desired. In this build the bus rides low
to the ground so optionally plates or bricks
could be added between the wheels and bus
base to improve ground clearance.
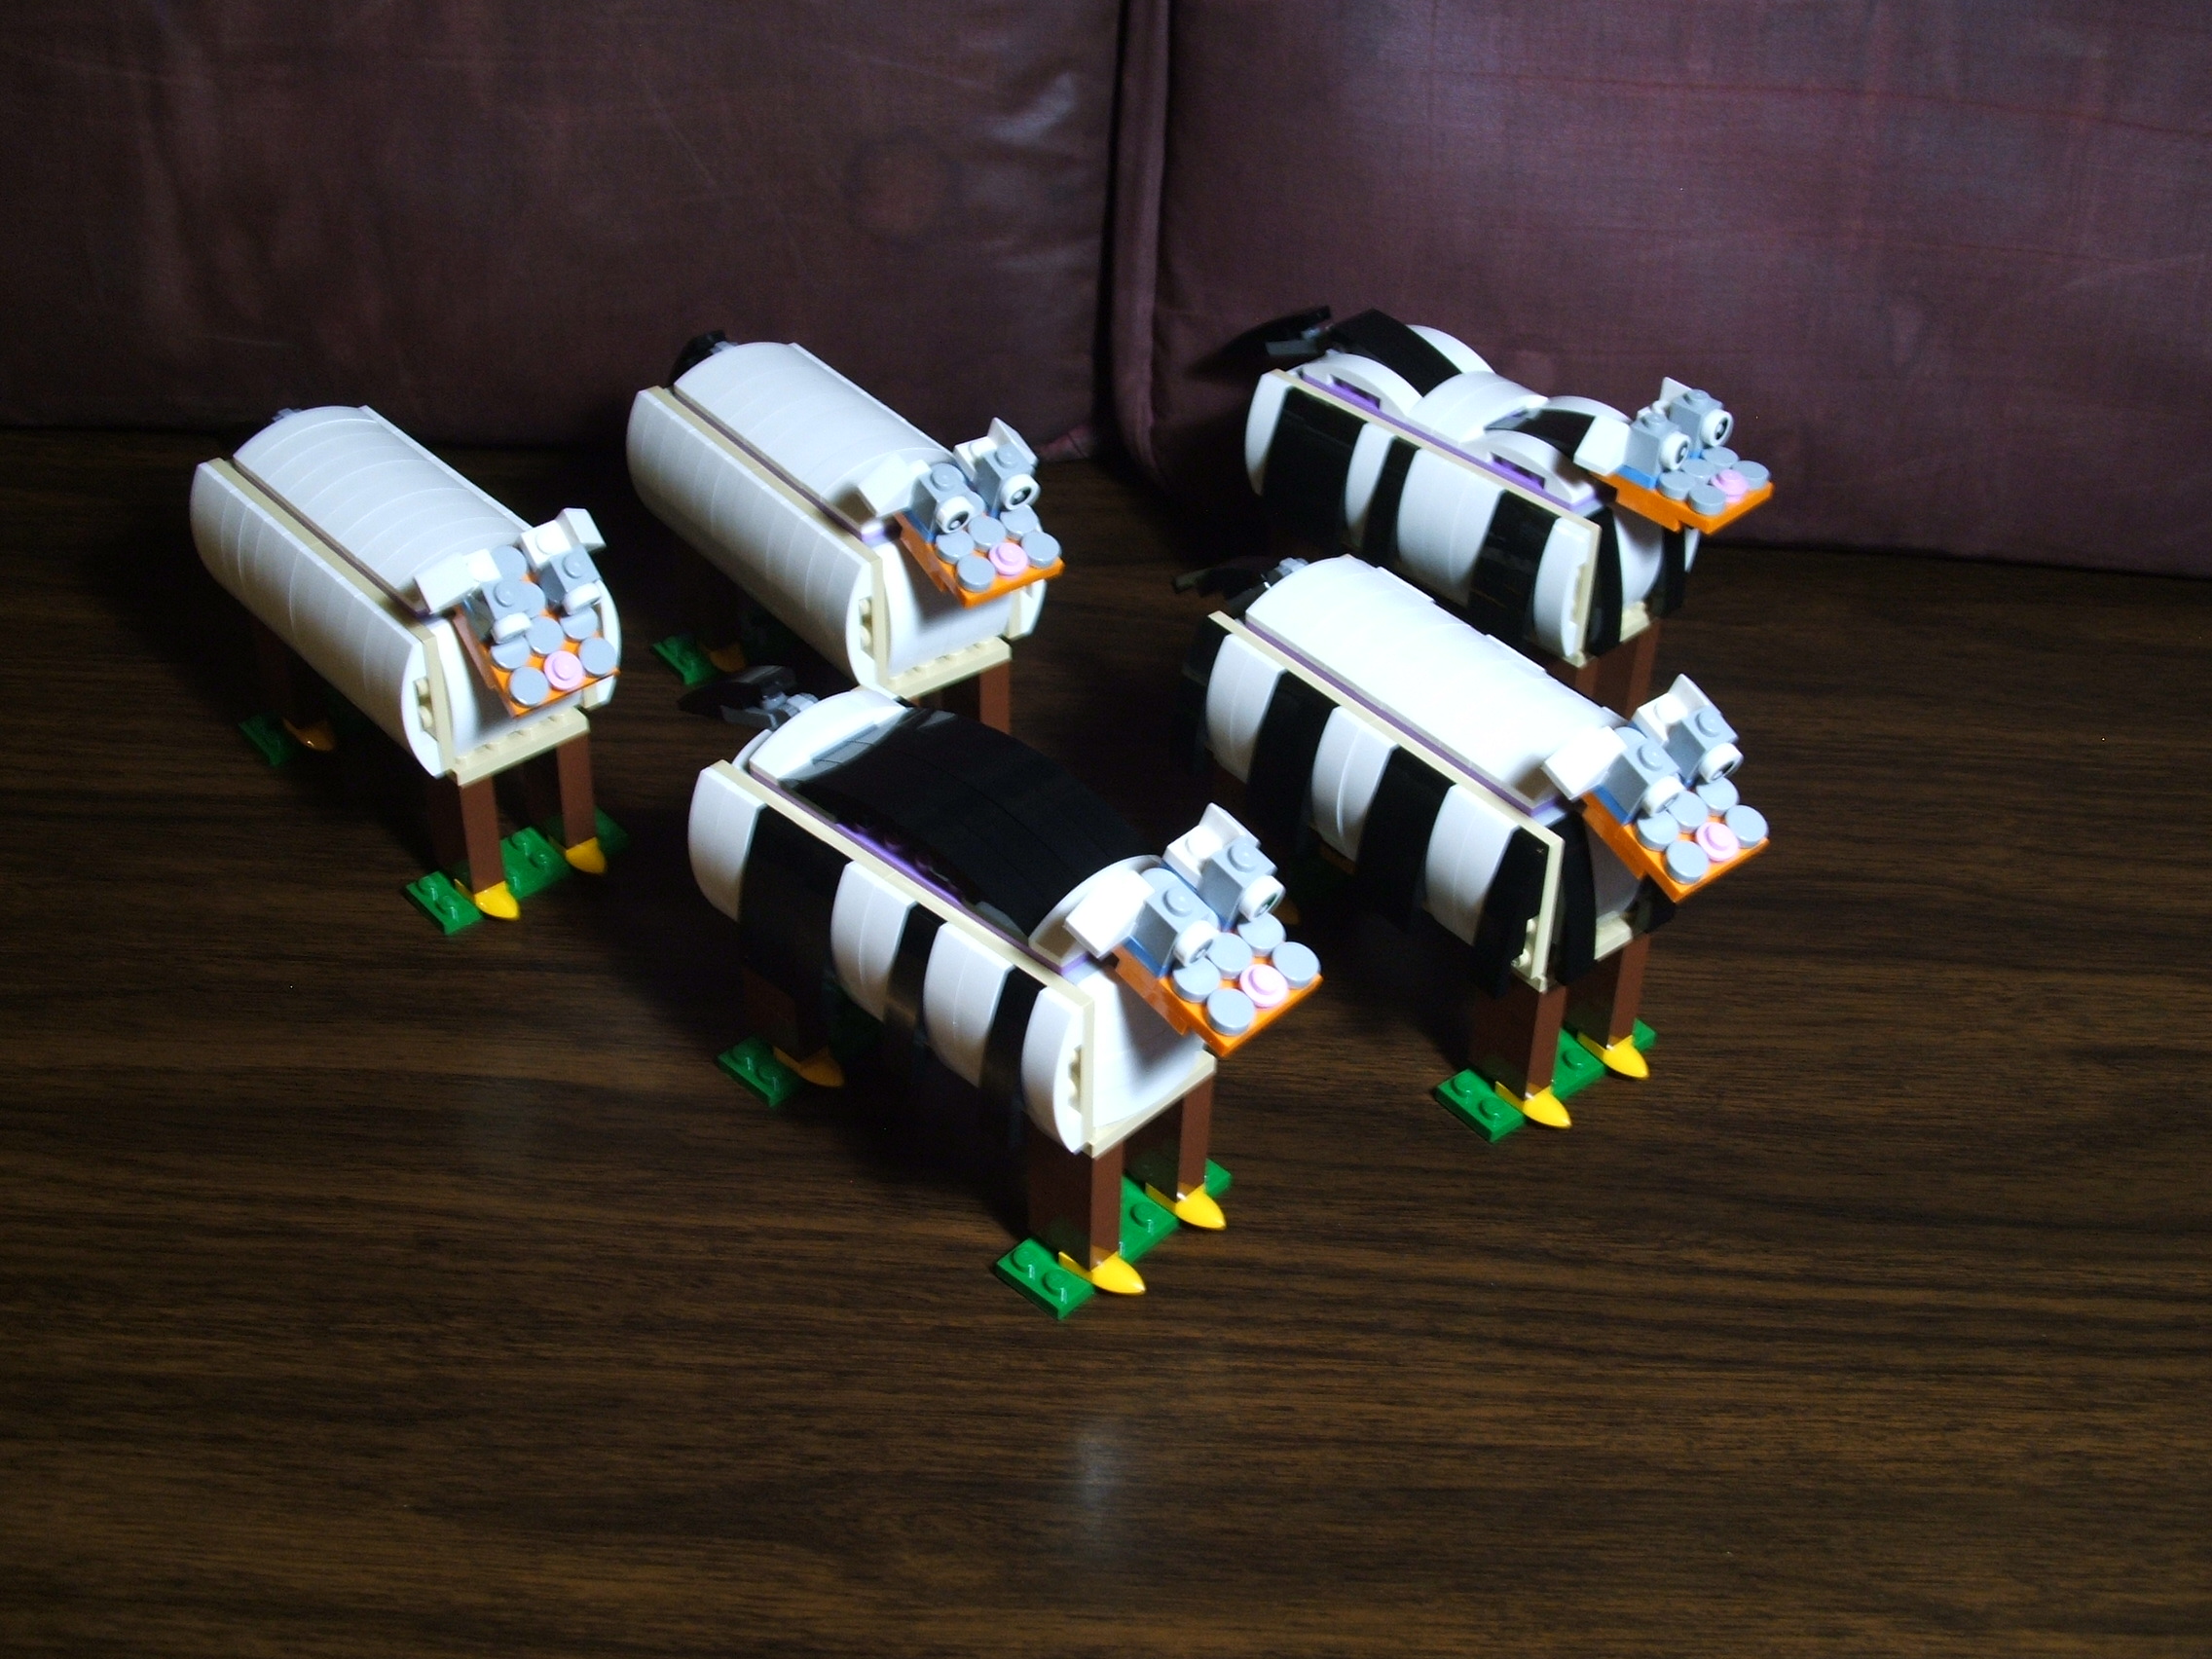
Terrys Lego cow
What started as desire to create a decent sized
Lego cow resulted in the ability to make a few
different animals from a similar design.
Here are 2 sheep (white body), 1 zebra (even
black and white strips side body), and 2 cows
(random black and white pattern body).
Measures 2x5x4 inches
Terrys Lego pine tree
My first positive approach to making a pine tree
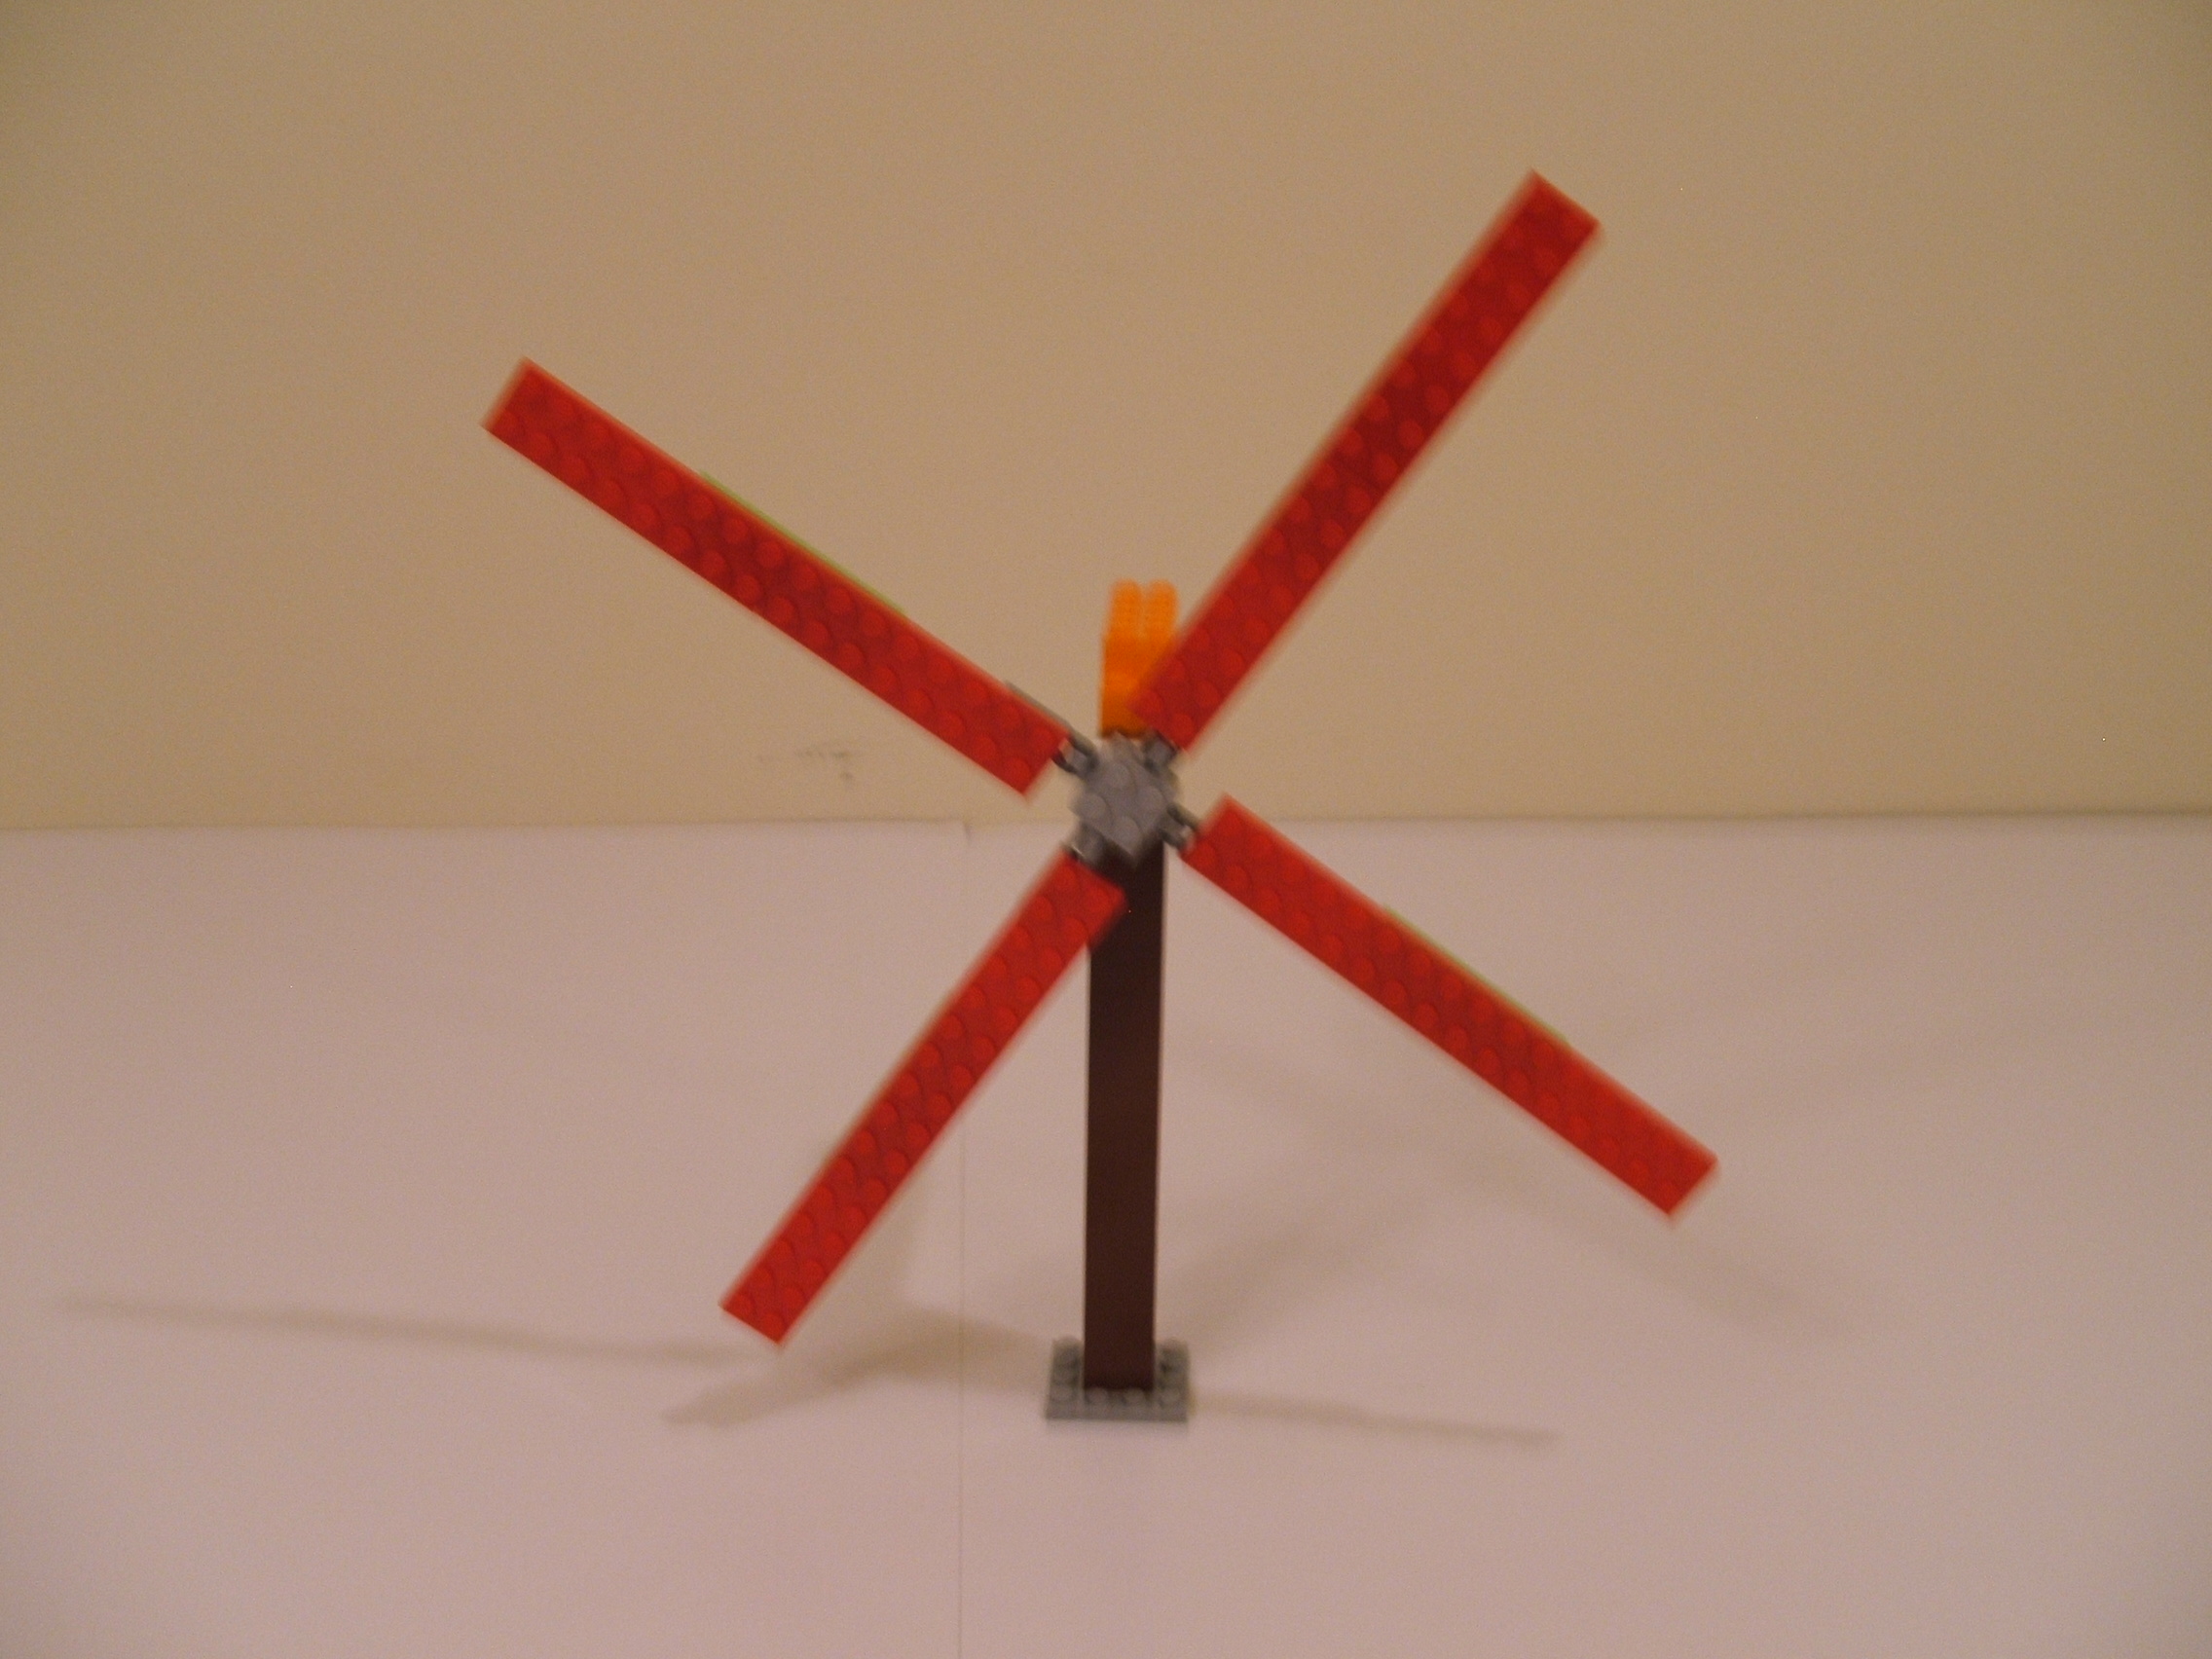
Terrys Lego wind turbine
A wind turbine made from Legos
Wind turbine:
A wind turbine can be made in a
variety of ways and sizes. The
basic model will include a base,
trunk, ballast, swivel (a
turntable piece), and arms.
Below are the key points to pay
attention to.
The base and trunk support the
rest of the structure so it must
be sturdy enough for the weight
and movement.
The ballast extends both ways
(180*) from the trunk. One end
holds the turntable and arms,
which are usually mounted close
to the trunk. The other end of
the ballast contains weight to
counteract the weight of the
arms so as to balance the ballast
with equal weight on both sides
of the trunk.
The arms (also called wings, fins,
or propellers) should be designed
to balance on the swivel piece.
My model uses four arms of equal
weight spaced 90* apart. Optionally
use more or fewer arms, spacing them
uniformly apart (360* divided by
number of arms gives uniform angle,
so three arms would be 360/3 or 120*
spacing).
The model pictured above uses hinge
pieces to attach the arms to the
swivel, but the instructions below
uses plates as the arms do not need
to adjust, although optionally your
model can include them.
Some wind turbines have the ballast
also rotate to allow for changing
wind direction. So optionally your
model could use a turntable piece
to connect the ballast to the trunk.
Parts:
1 4x4 plate (or larger)
14 2x2 brick (or larger)
3 2x12 plate
1 1x2 plate with 90* mount 2x2 knobs (4654580)
8 2x2 brick (can be more or less)
1 2x2 turntable (368001 and 4540203)
12 2x8 plate (or whatever you like)
2 4x4 plate
Instructions:
Modify as need be.
Use 4x4 plate as base. Stack
the fourteen 2x2 bricks as one
tall column onto the center of
the base plate.
Build the ballast. Use one
2x12 plate for ballast base.
Place another 2x12 plate on
top of it, leaving one row
of two posts not covered.
Place the 1x2 base part of
the angle piece (1x2 with
90* 2x2 knobs) on those two
posts. Place another 2x12
plate on top of the second
using it to cover the angle
piece to anchor it.
Place the eight 2x2 bricks at
the end of the ballast opposite
the angle piece to form the
counter weight. These can take
any shape or size (should match
the weight of the arms), you may
make them resemble a motor for
the true effect of an electric
generator.
Place the 2x2 assembled turntable
onto the 2x2 side mount of the
angle piece on the ballast. Place
one 4x4 plate so the center has the
turntable posts.
Build four (or whatever number and
length you wish) arm assemblies.
Use two 2x8 plates to form a 2x16
arm and use a 2x8 plate to connect
them (2x4 on each plate). Do this
four times.
Connect the four arms to the 4x4
plate mounted on the turntable,
leaving the center posts (a 2x2
area) empty. Then place a 4x4
plate over the posts of the four
arms to anchor them. Note that
if you change the number of arms
you have to install the arms at
different angles, which can be
tricky in some instances.
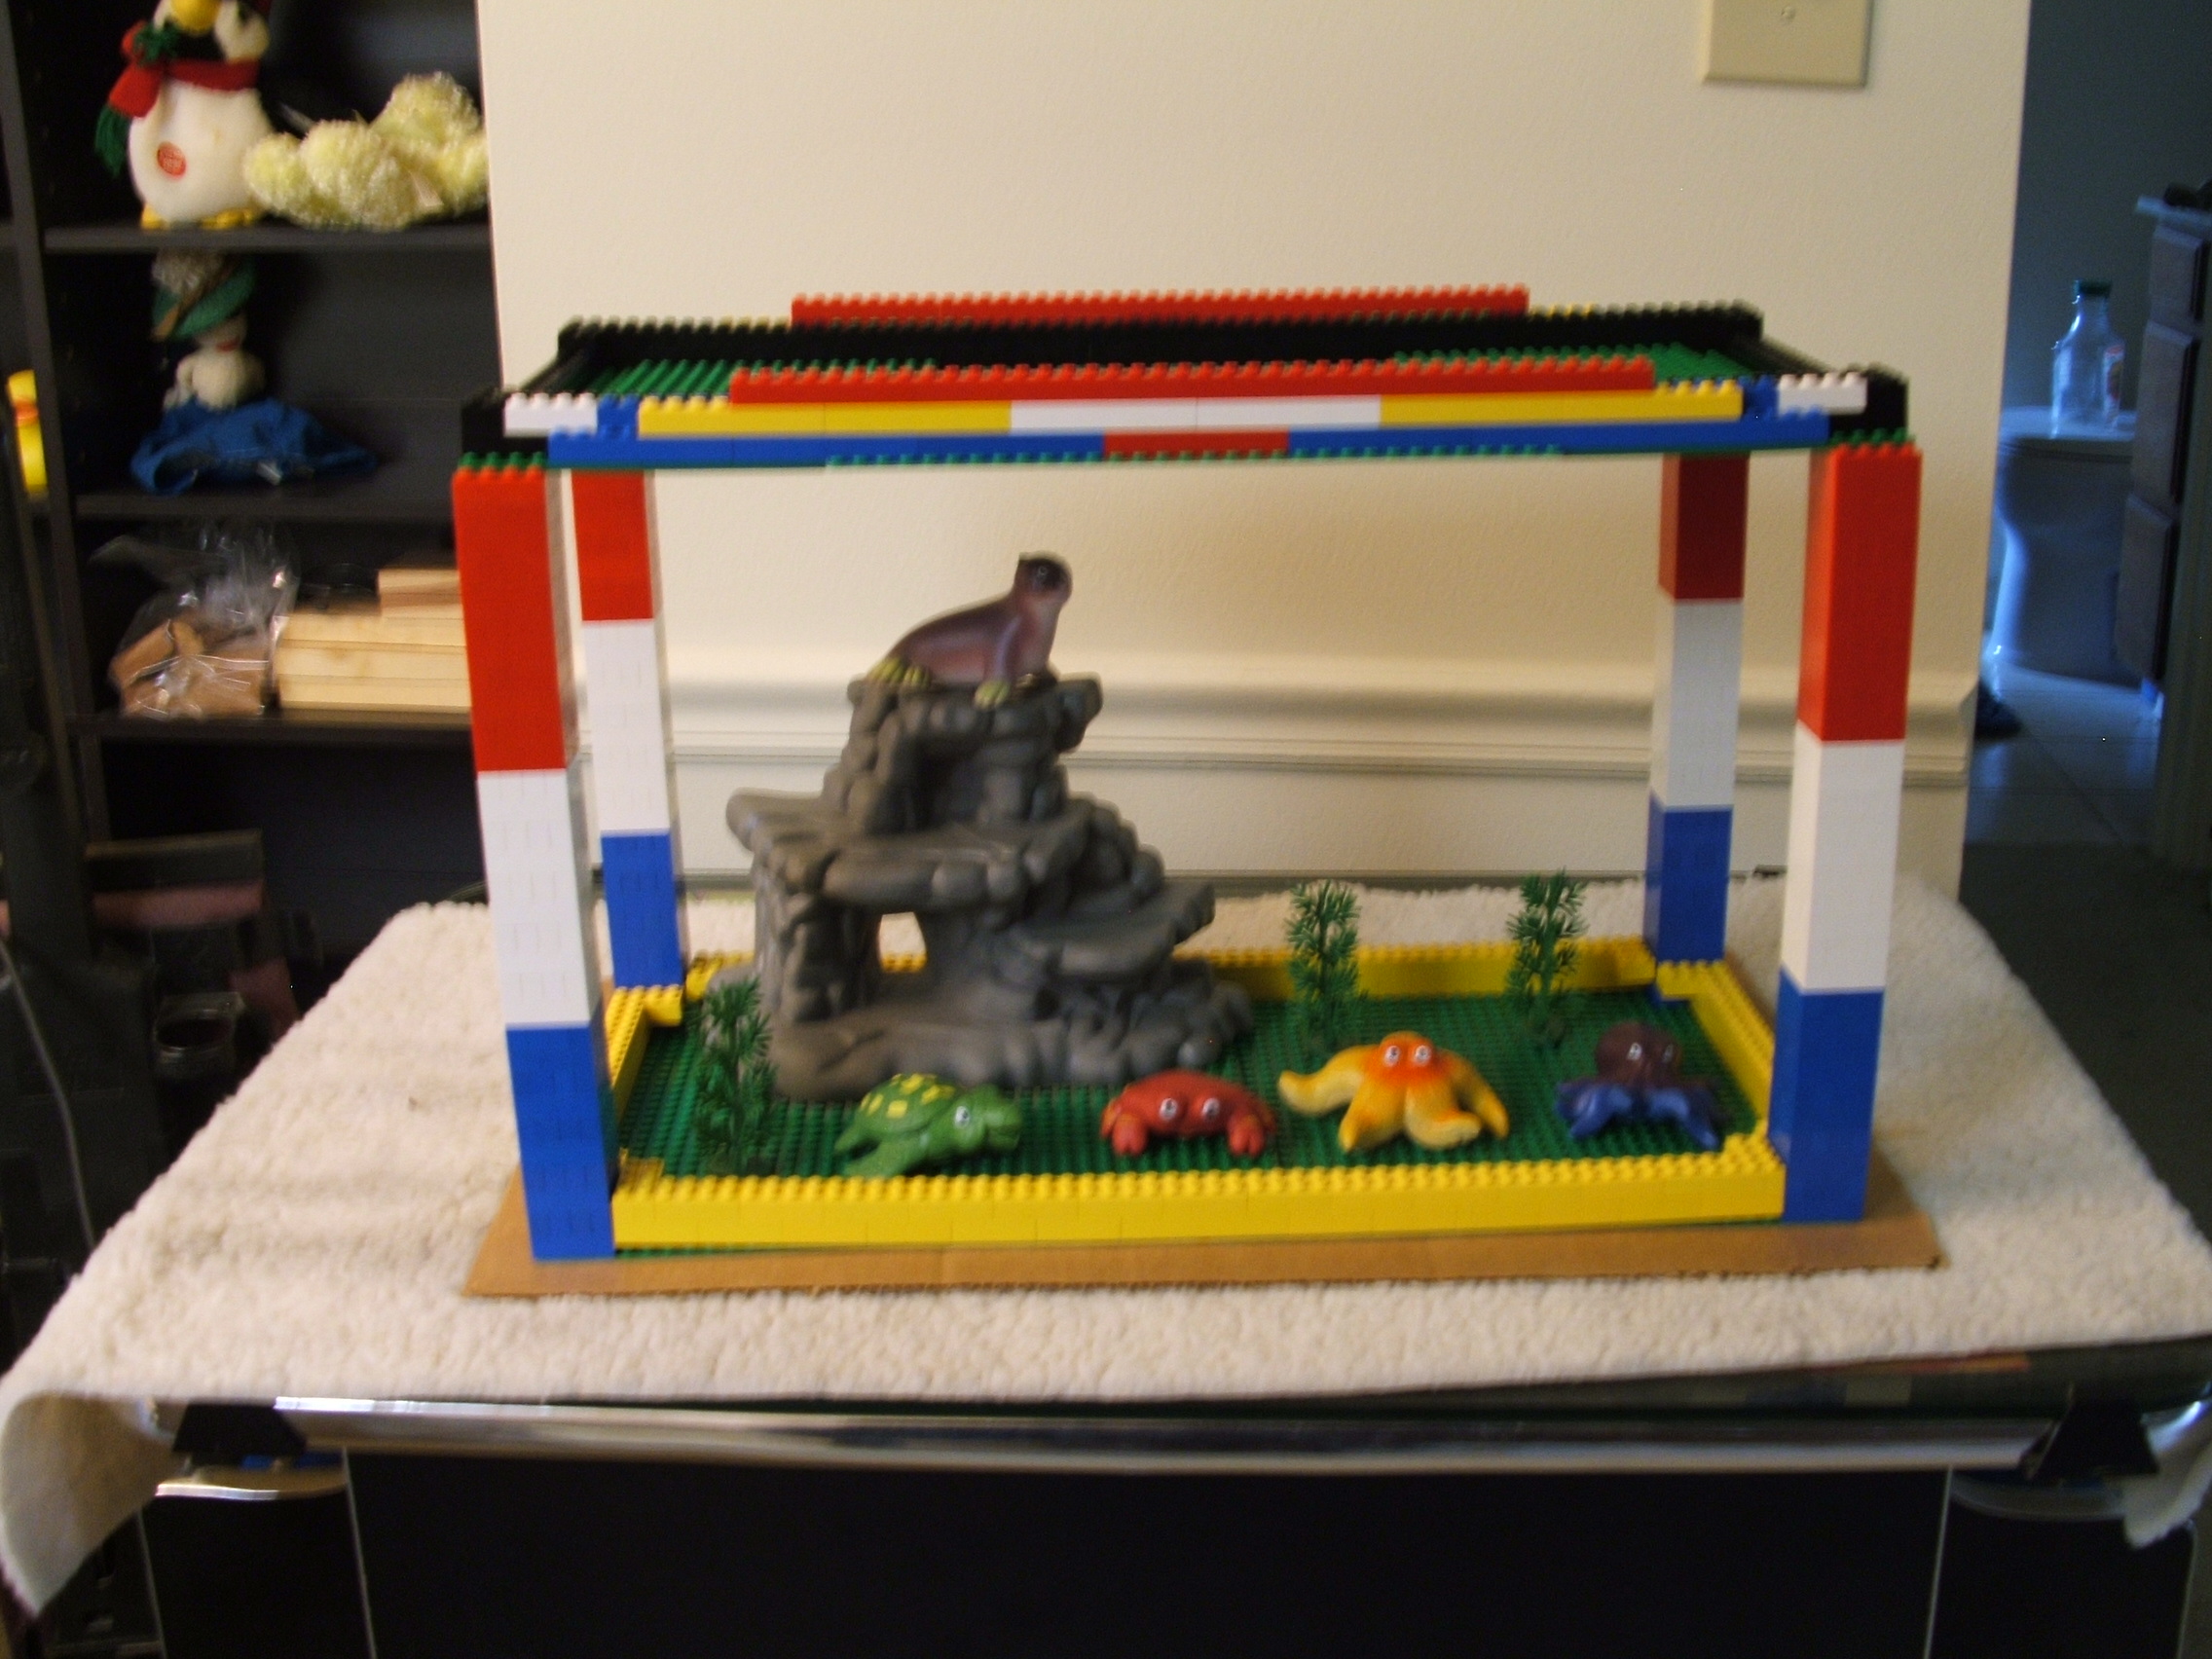
Terrys Lego aquarium
So I kinda wanted to get Glo-fish and a small aquarium setup
to have something nice to look at around here. Saw that some
people made aquariums out of Legos and decided that provides
for a lot less cleaning, food, and funerals. So I got some
fake animals and built myself an aquarium.
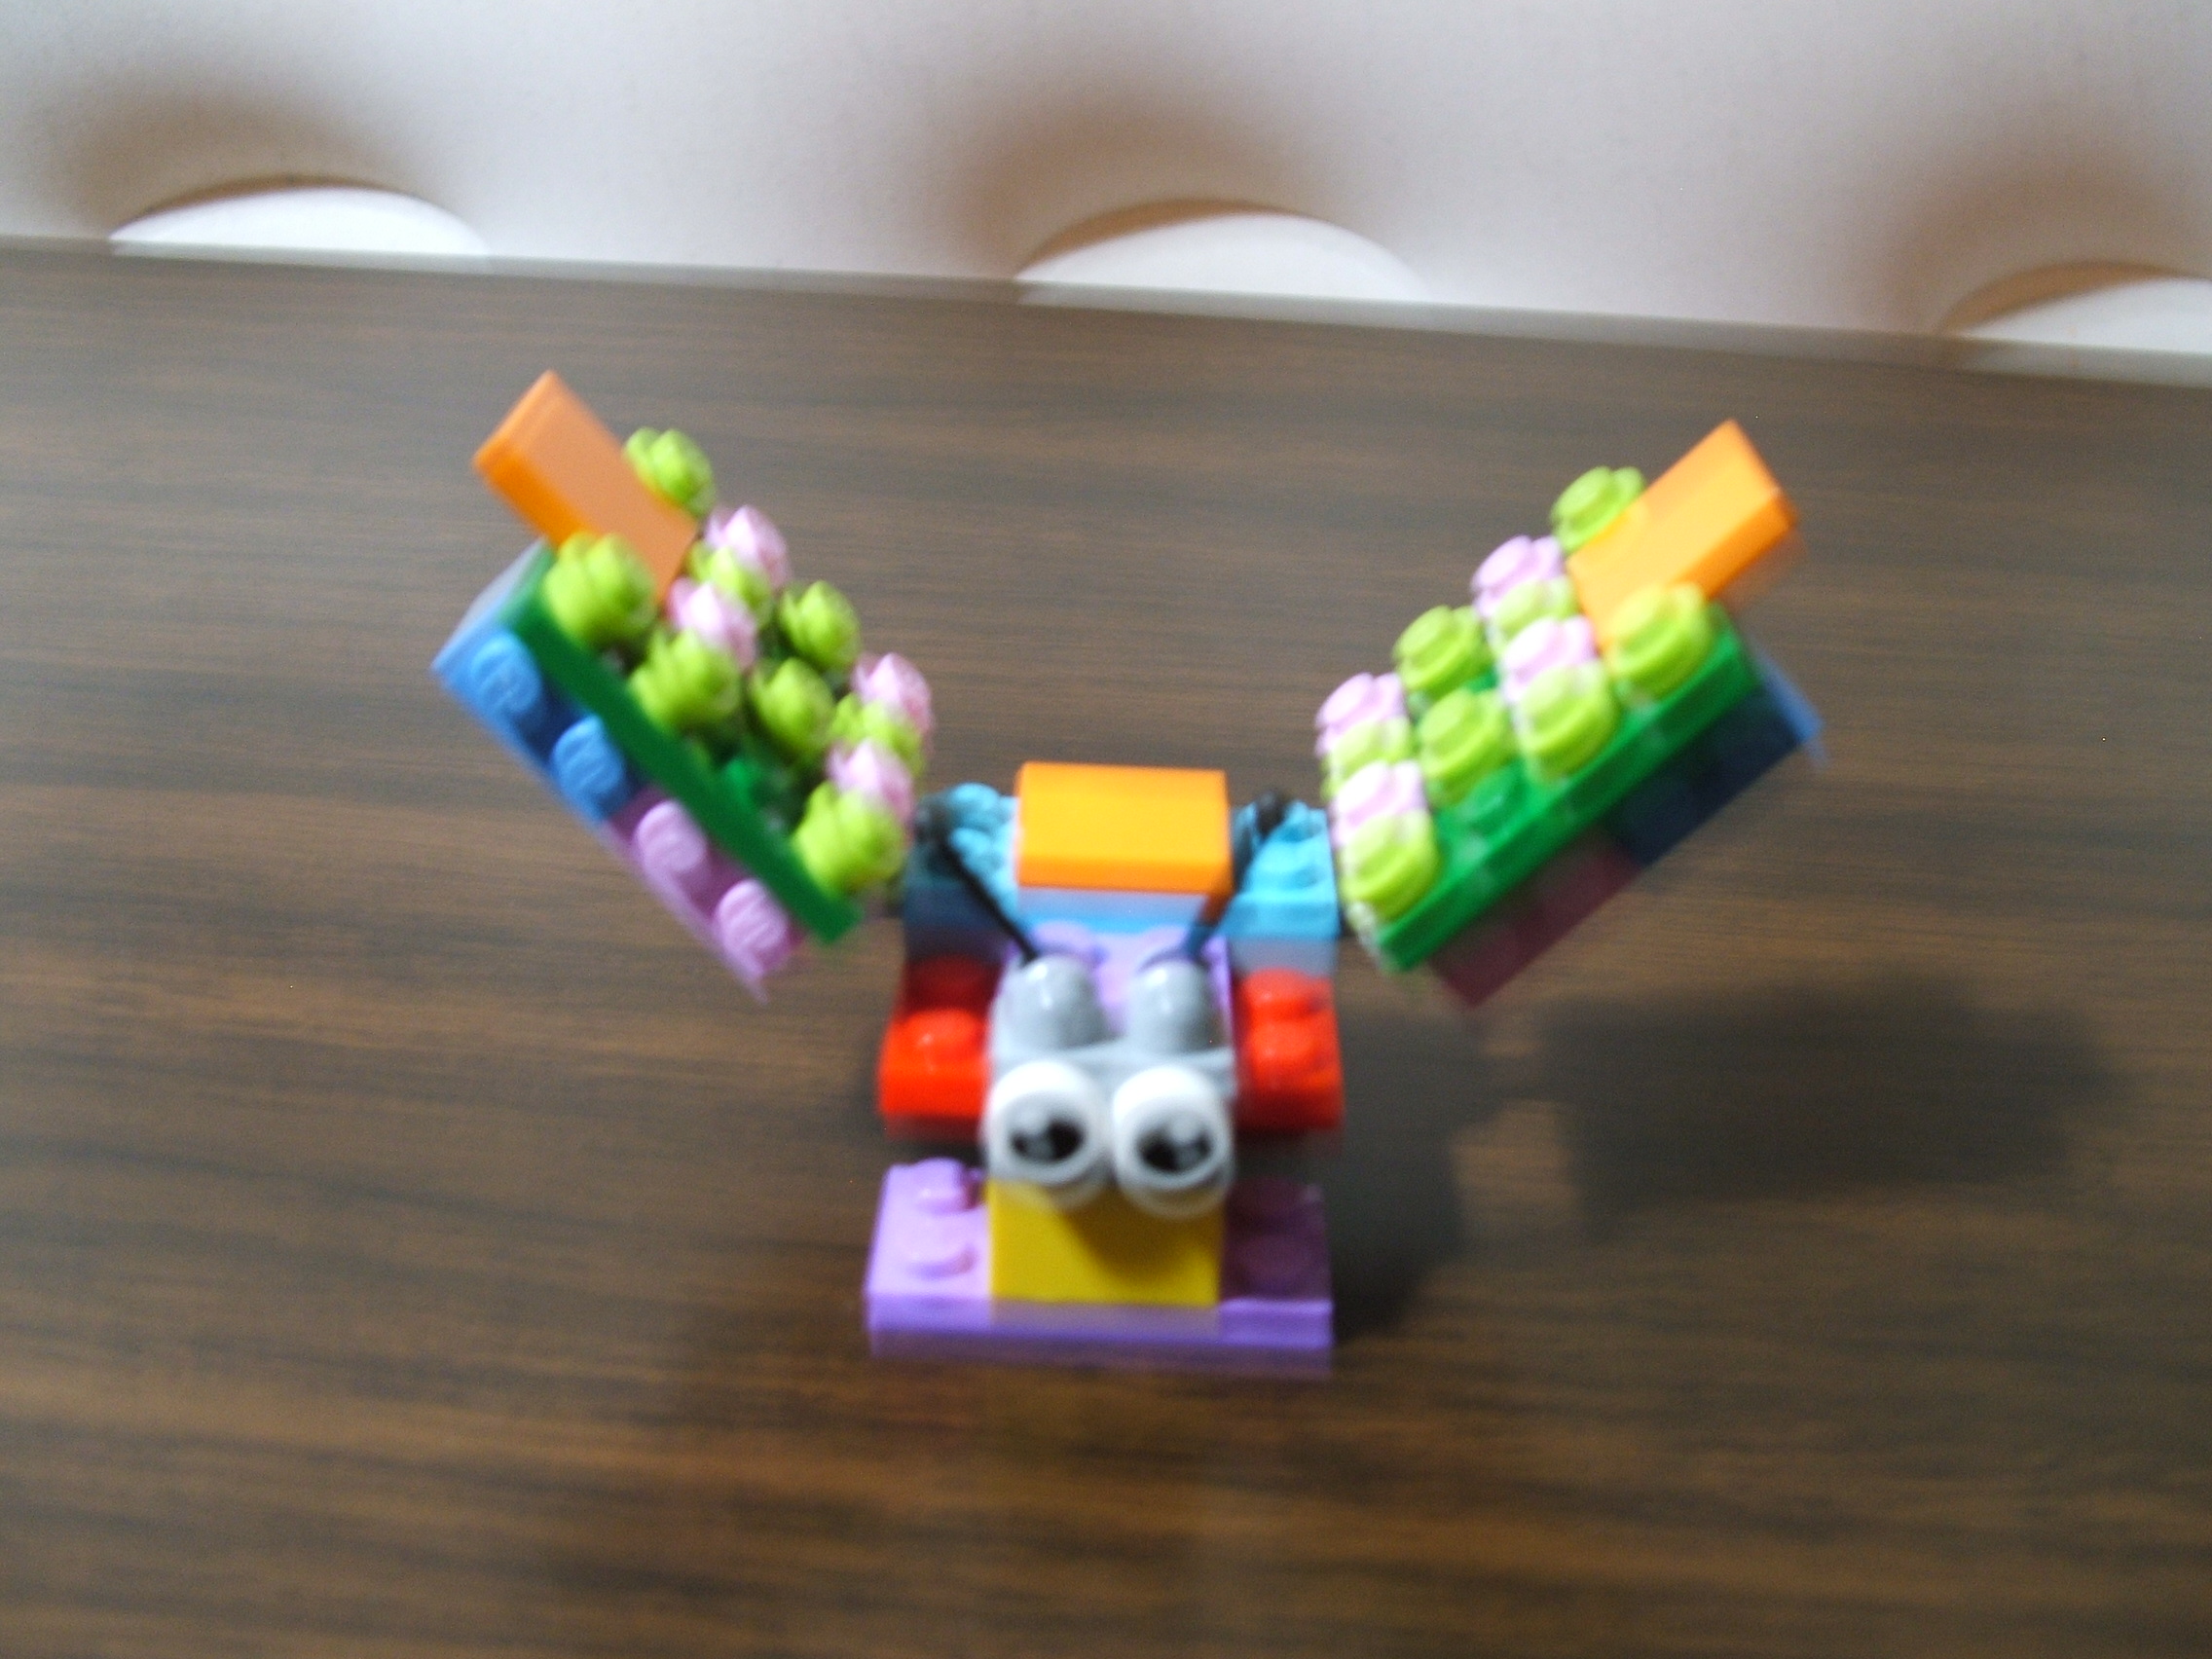
Terrys Butterflies
While at the Lego store noticed they had a butterfly model to build.
Theirs was okay but to me it lacked the colorful nature of butterflies.
So using their basic design as a guide I gathered colorful pieces and
built one similar. Okay, I built eight of them. These are probably
not finished yet as I can add a few more pieces with other colors.
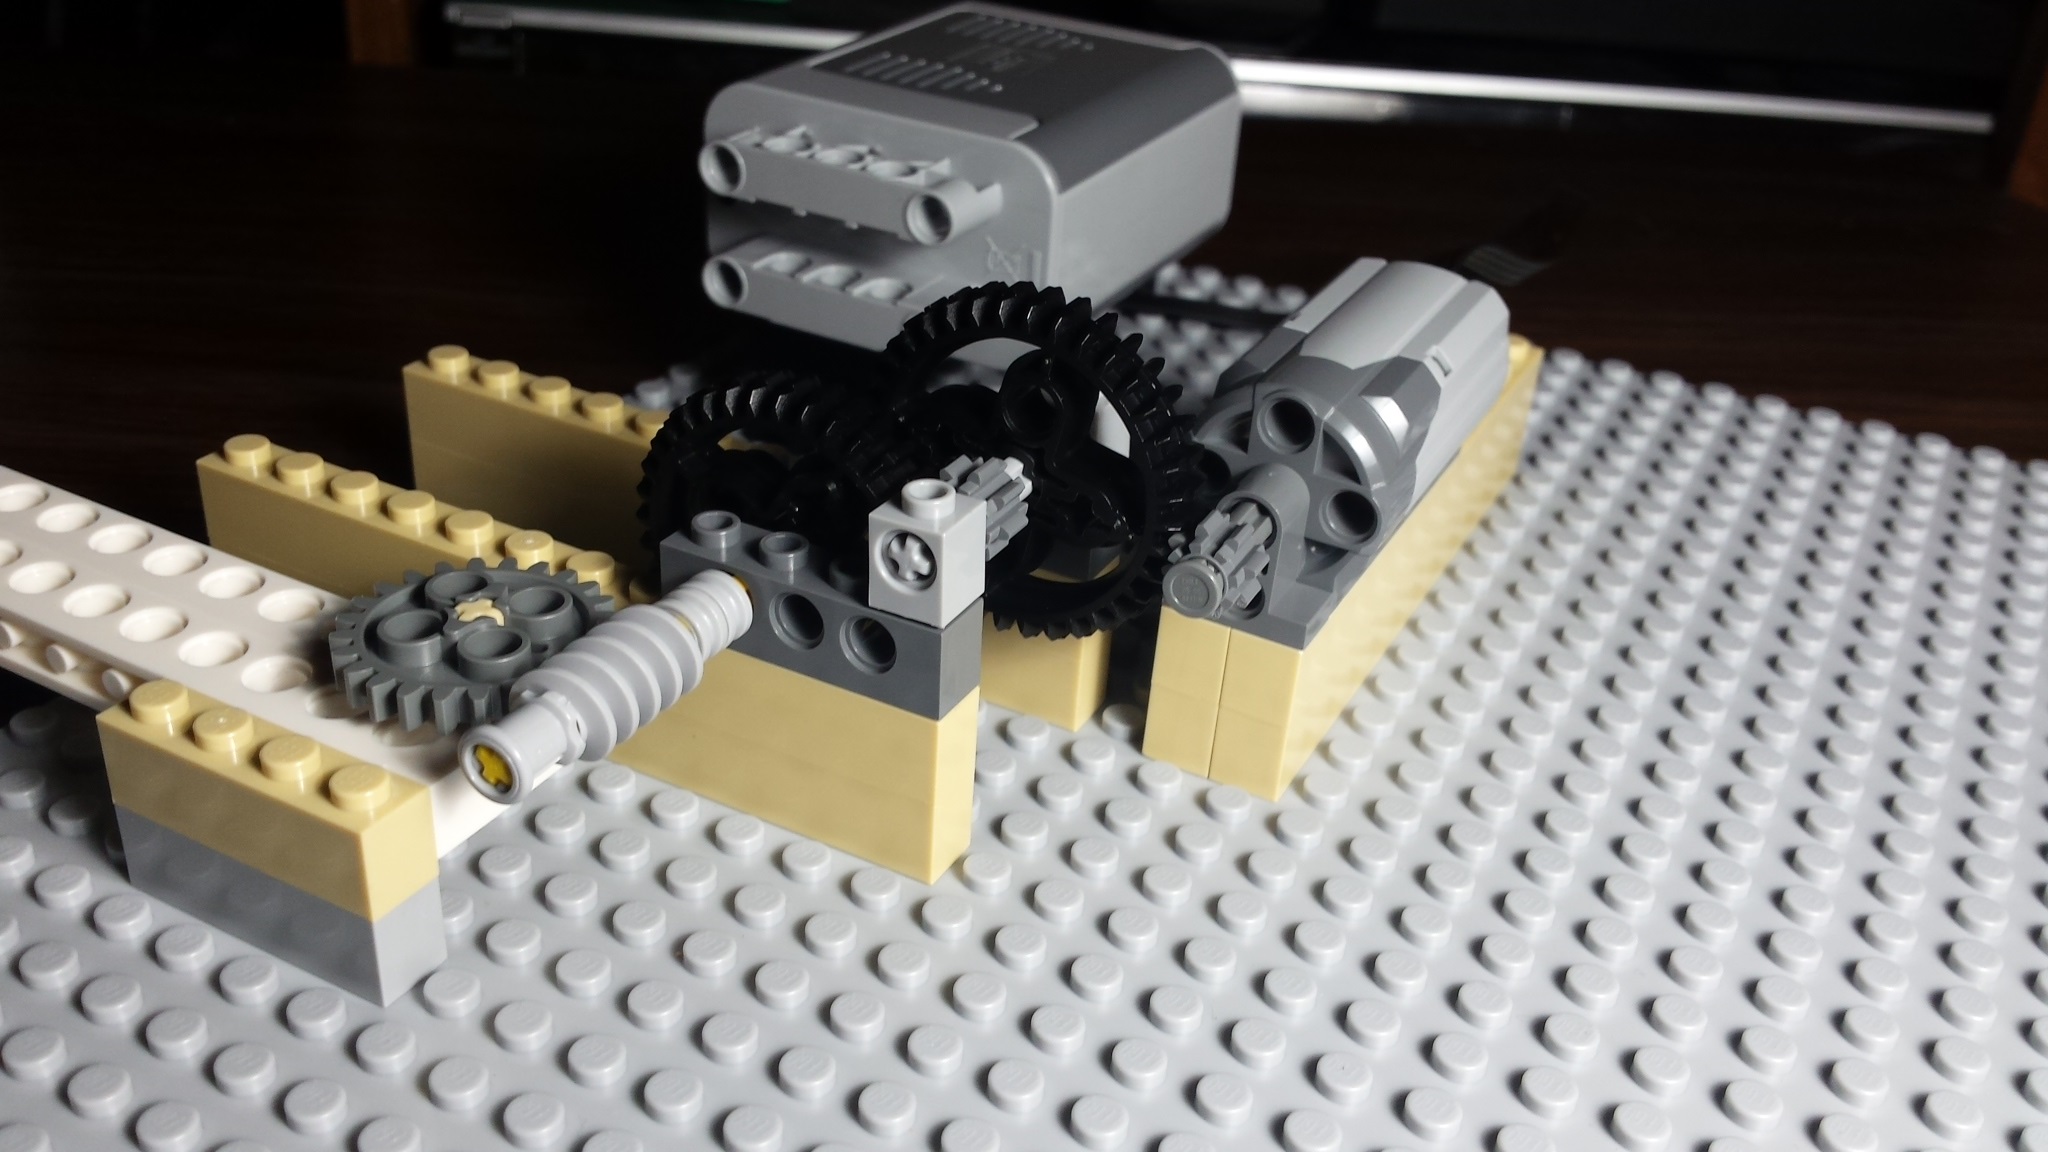
Terrys first motor
After getting the Lego Power Functions motor
I started learning about meshing the
gears. This was my first experiment just to
see how it works. I plan to add more pages
to the website on Lego and Technic logistics.
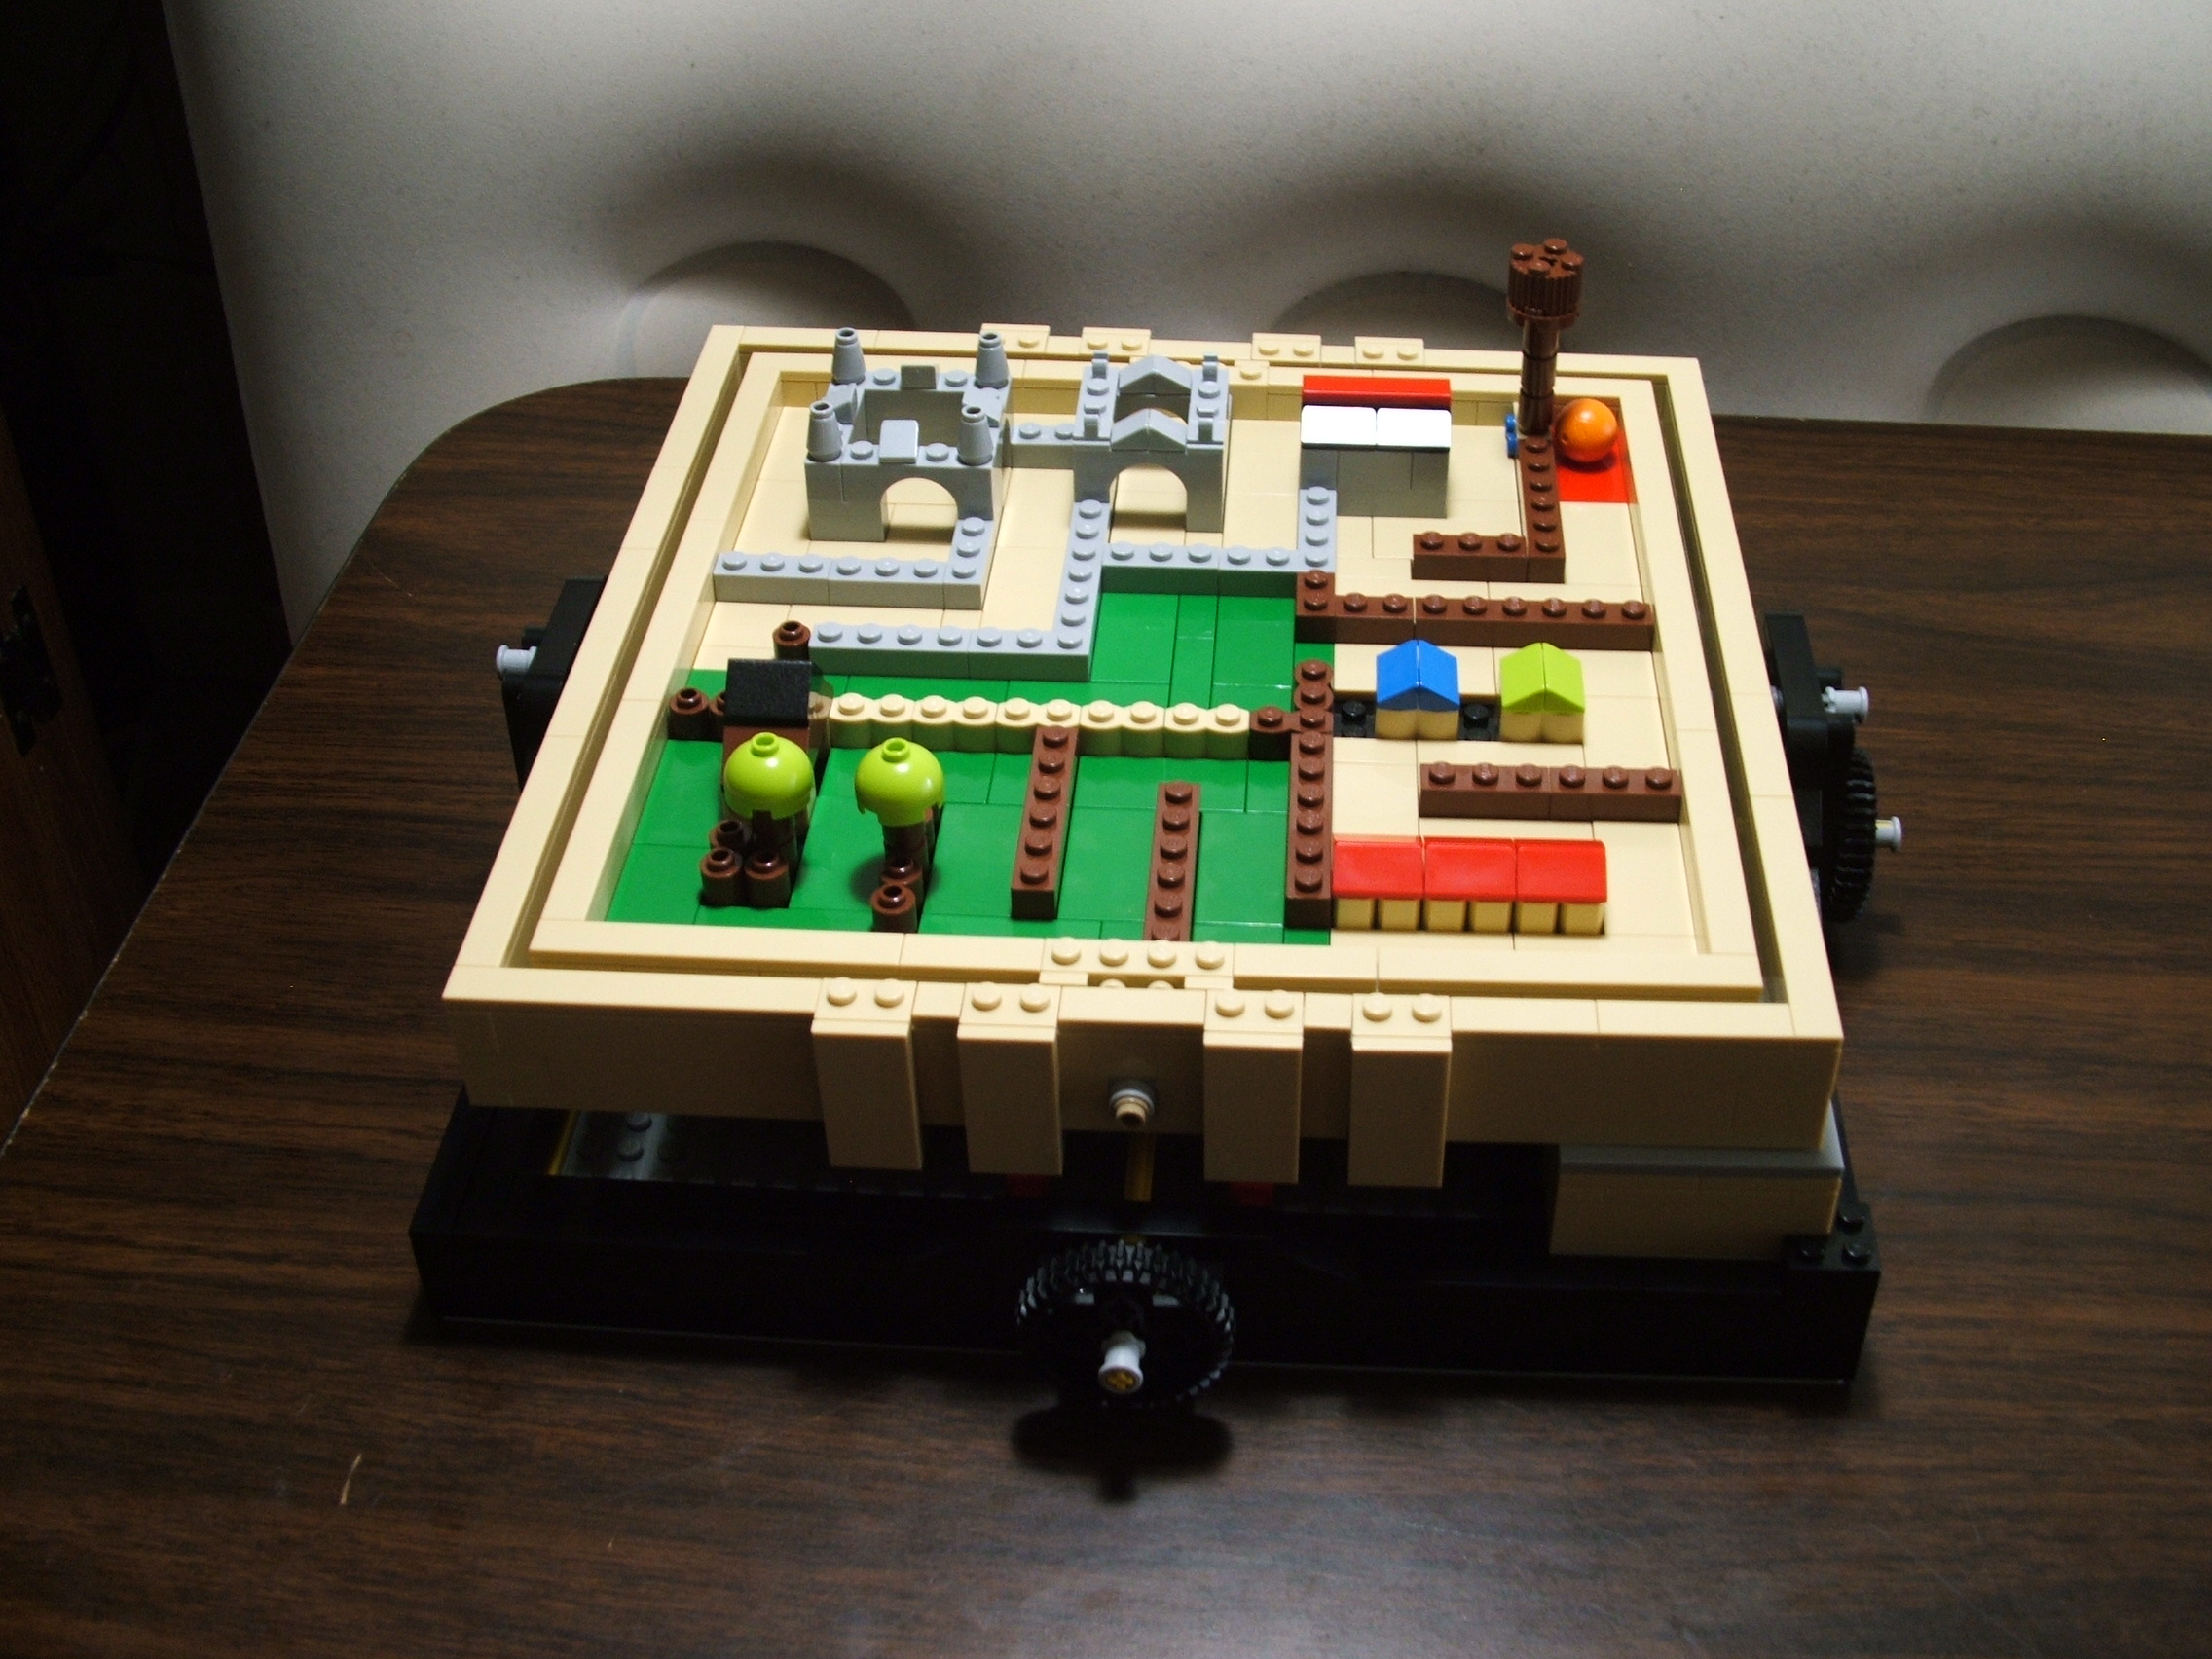
Terrys Maze setup
The Lego maze is pretty neat. The board plate is difficult
to put in with the layout in place and the balls have one
small flat spot which slightly affect rolling and can cause
it to stop. Other than that it does what it is designed to
do.
I used one of their example layouts as a guide. I built the
buildings with slight modifications. I created my own path
scheme (with no traps) so I could get used to the movements.
Also created a storyline to go with my layout, which is below:
   Welcome to Militleton!


   Militleton was built way back in
   the 1800's by its founder Ima
   Goodguy.  Ima was very wealthy.
   He built the town as his private
   playground.


   Your tour begins on the red brick
   under the towns majestic water tower.


   As you travel down the path you
   first encounter the old factory.
   The factory was created so that Ima's
   servants could build him whatever
   he desired.  The factory still serves
   as the hub for maintaining the town
   so you can not go through it.


   Next you travel through the warehouse.
   This was used to store all of Ima's
   possessions.


   Then you visit the castle.  This is
   where Ima lived.


   From the castle you travel through the
   north end of Militleton Park on your
   way to the residential district.  This
   is where the servants lived, far away
   from the castle so as to not disturb
   Ima.  The first two houses were for
   the primary servants, the cook and the
   maids.  The red roof building is the
   apartments for all of the other workers.


   As you continue on your journey, the
   beautiful south side of Militleton Park
   features the towns only remaining trees.
   Ima used the others as firewood.


   At the end of the tour is the Parks and
   Recreation Center.  Here you can enjoy
   a nice picnic lunch...provided that you
   brought some food.


   We hope you enjoyed your tour of Militleton!
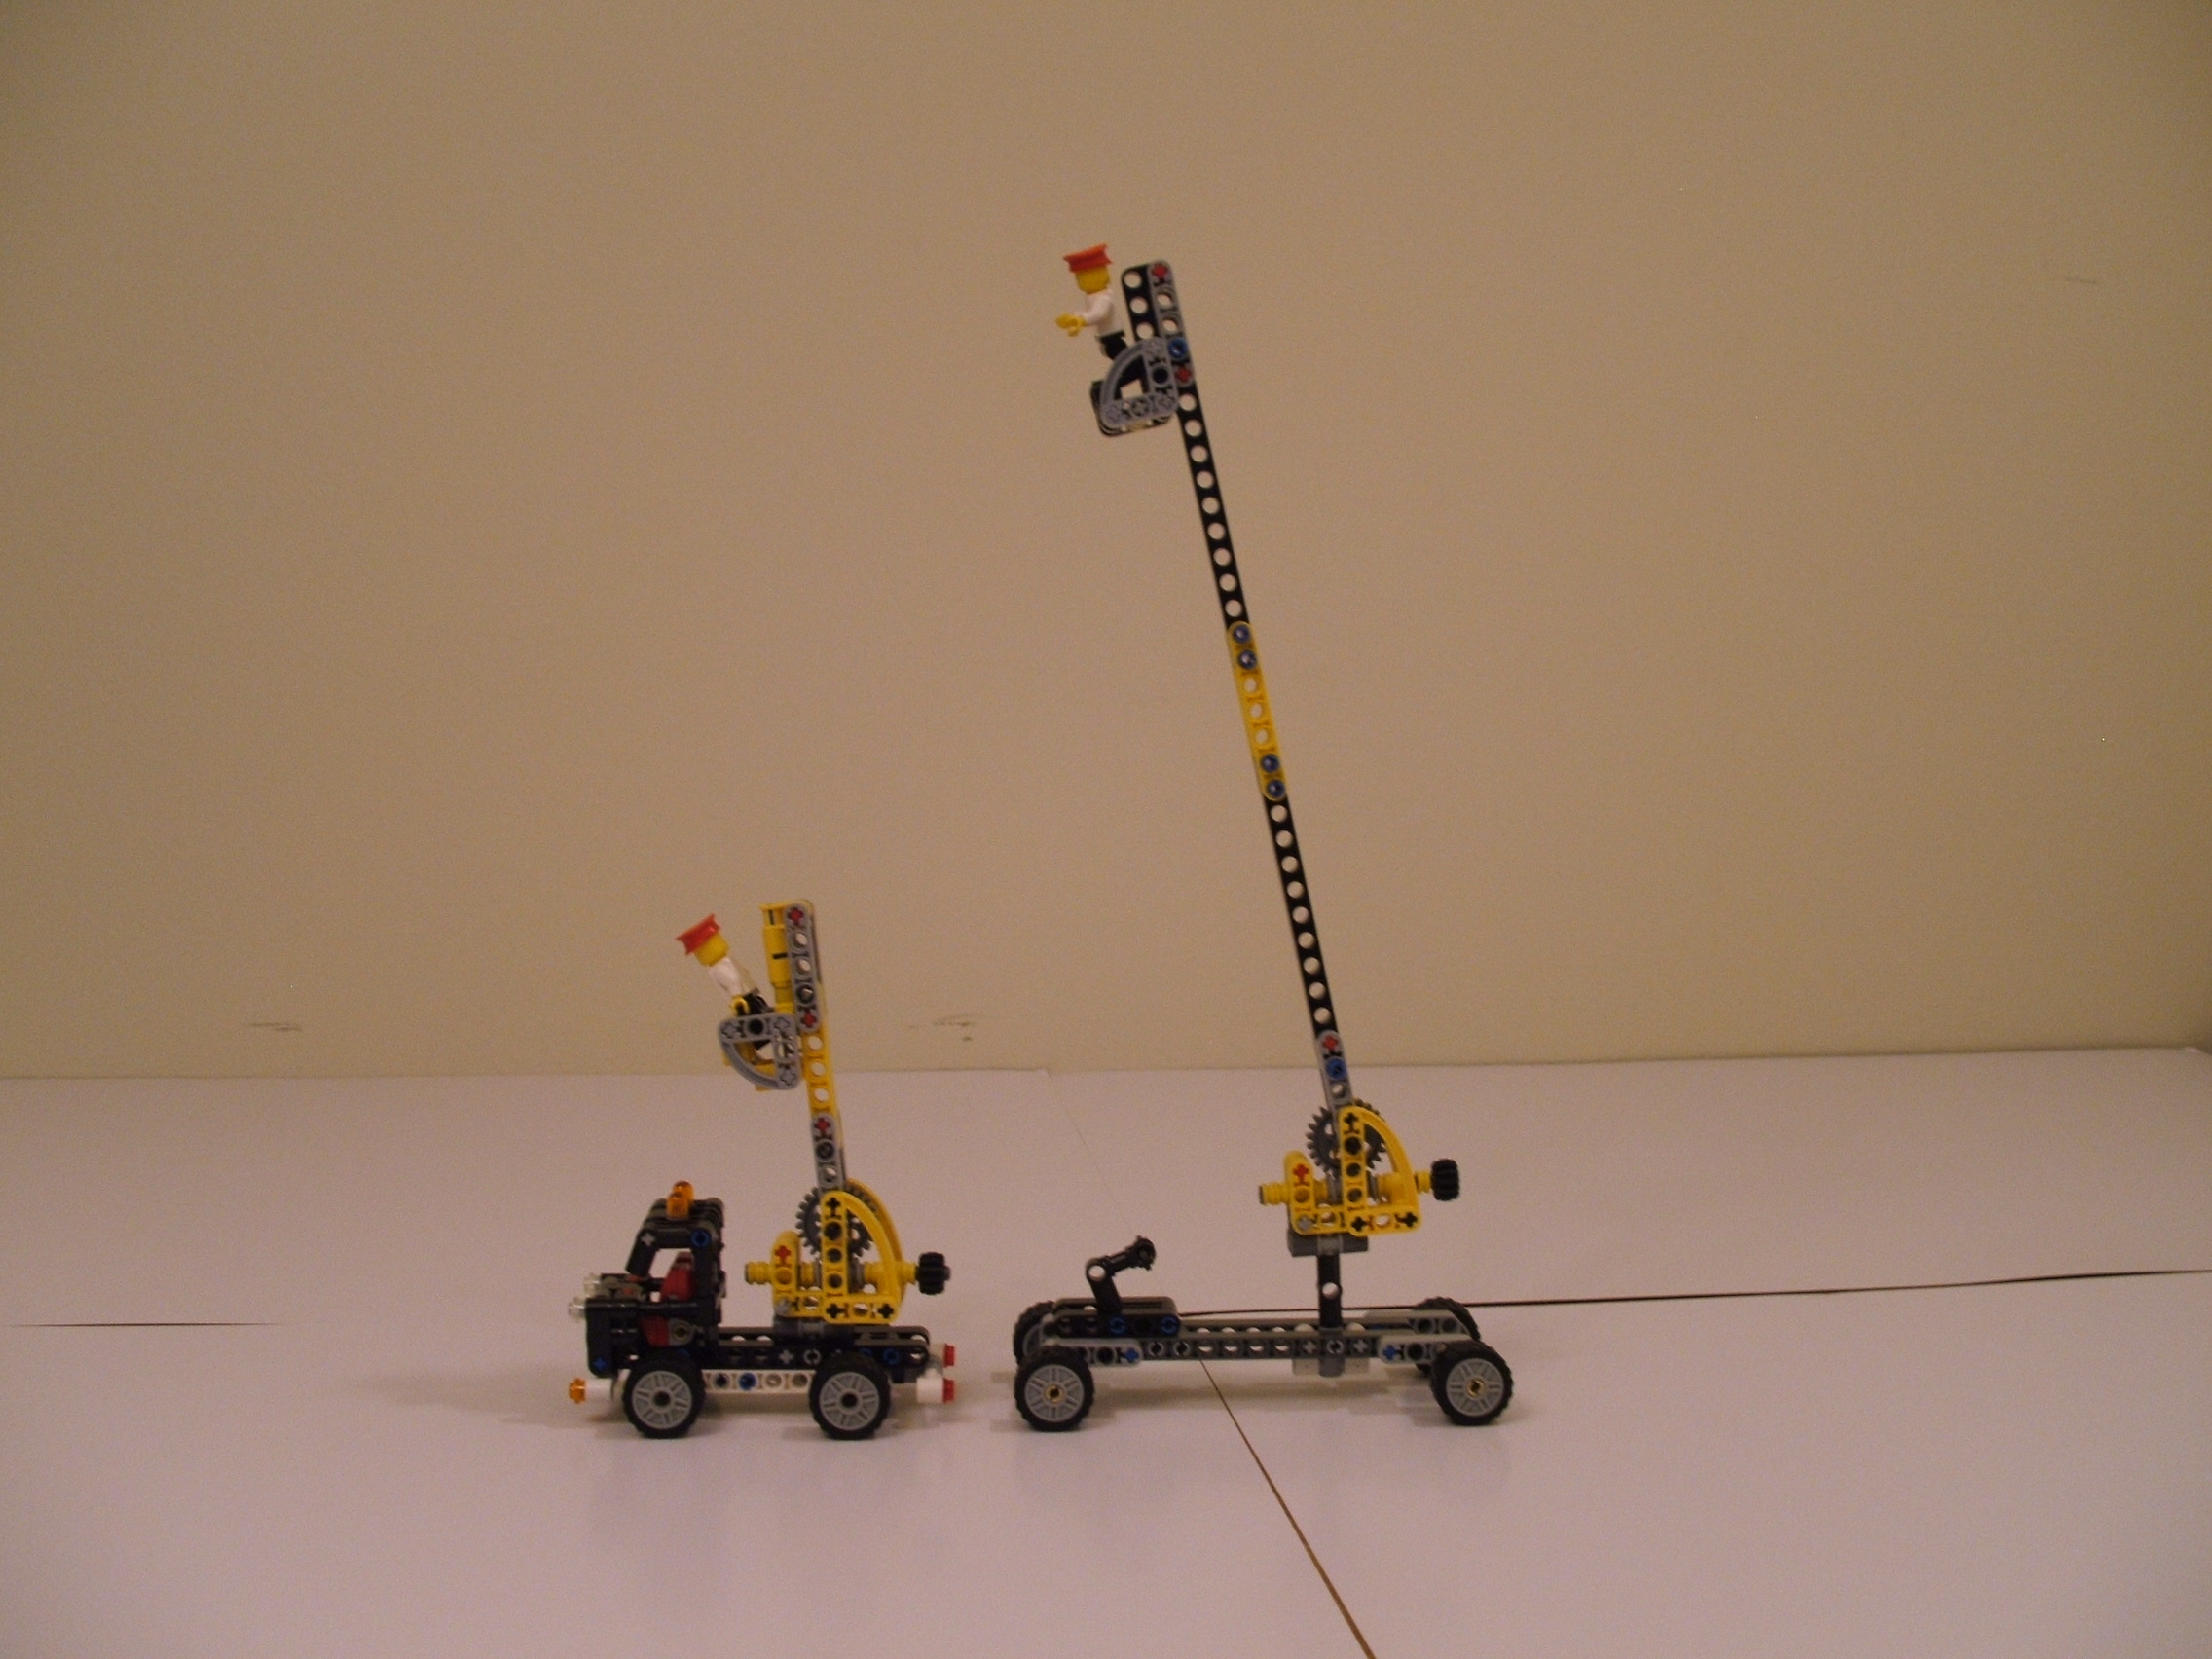
Lego Cherry Picker
My version of the Cherry Picker with the smaller Lego version (Lego 42031)
Terrys Lego Flag
A US flag I created with legos
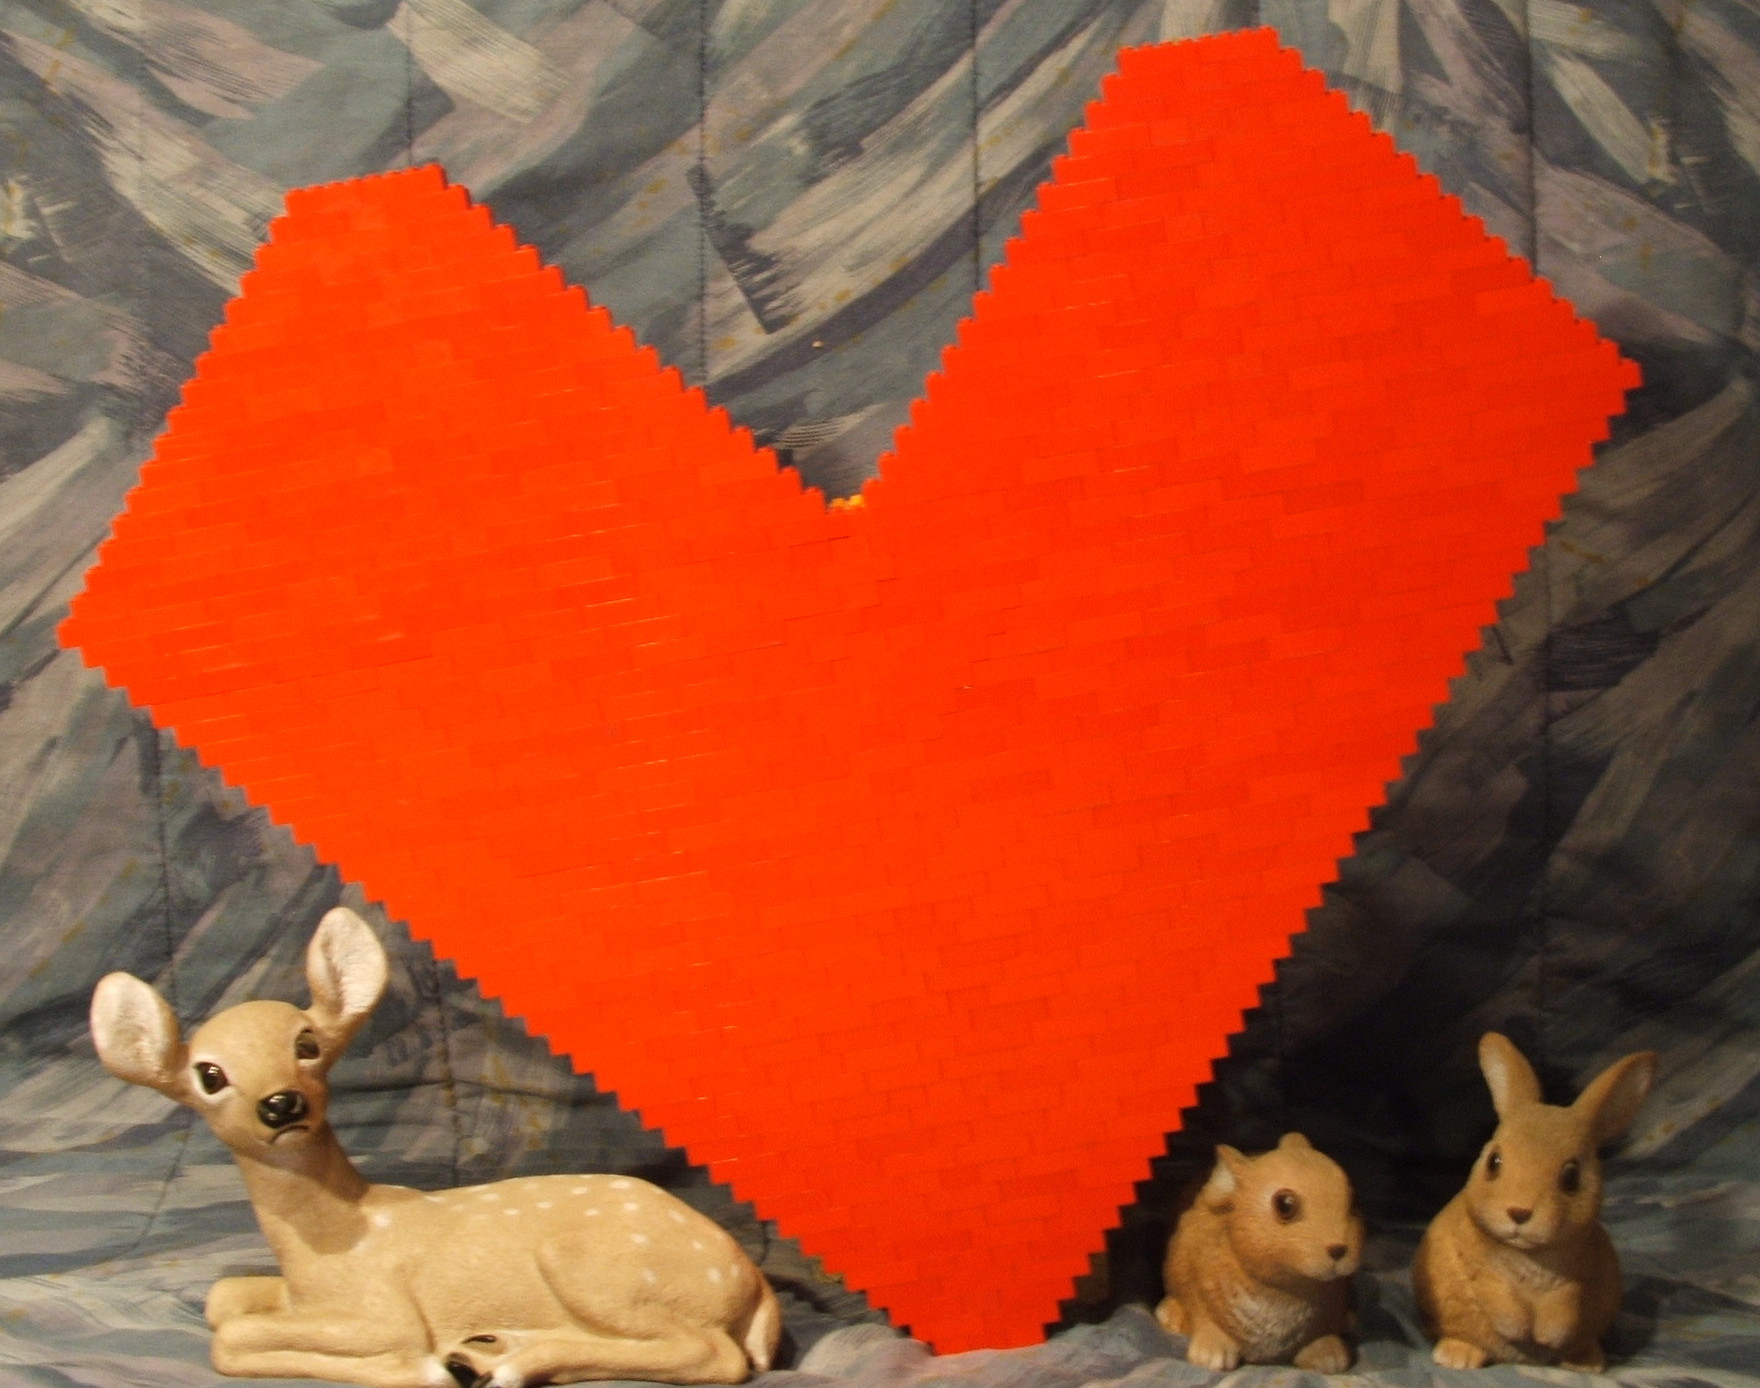
Terrys Red Heart
A big red heart made out of 2x4 Lego bricks
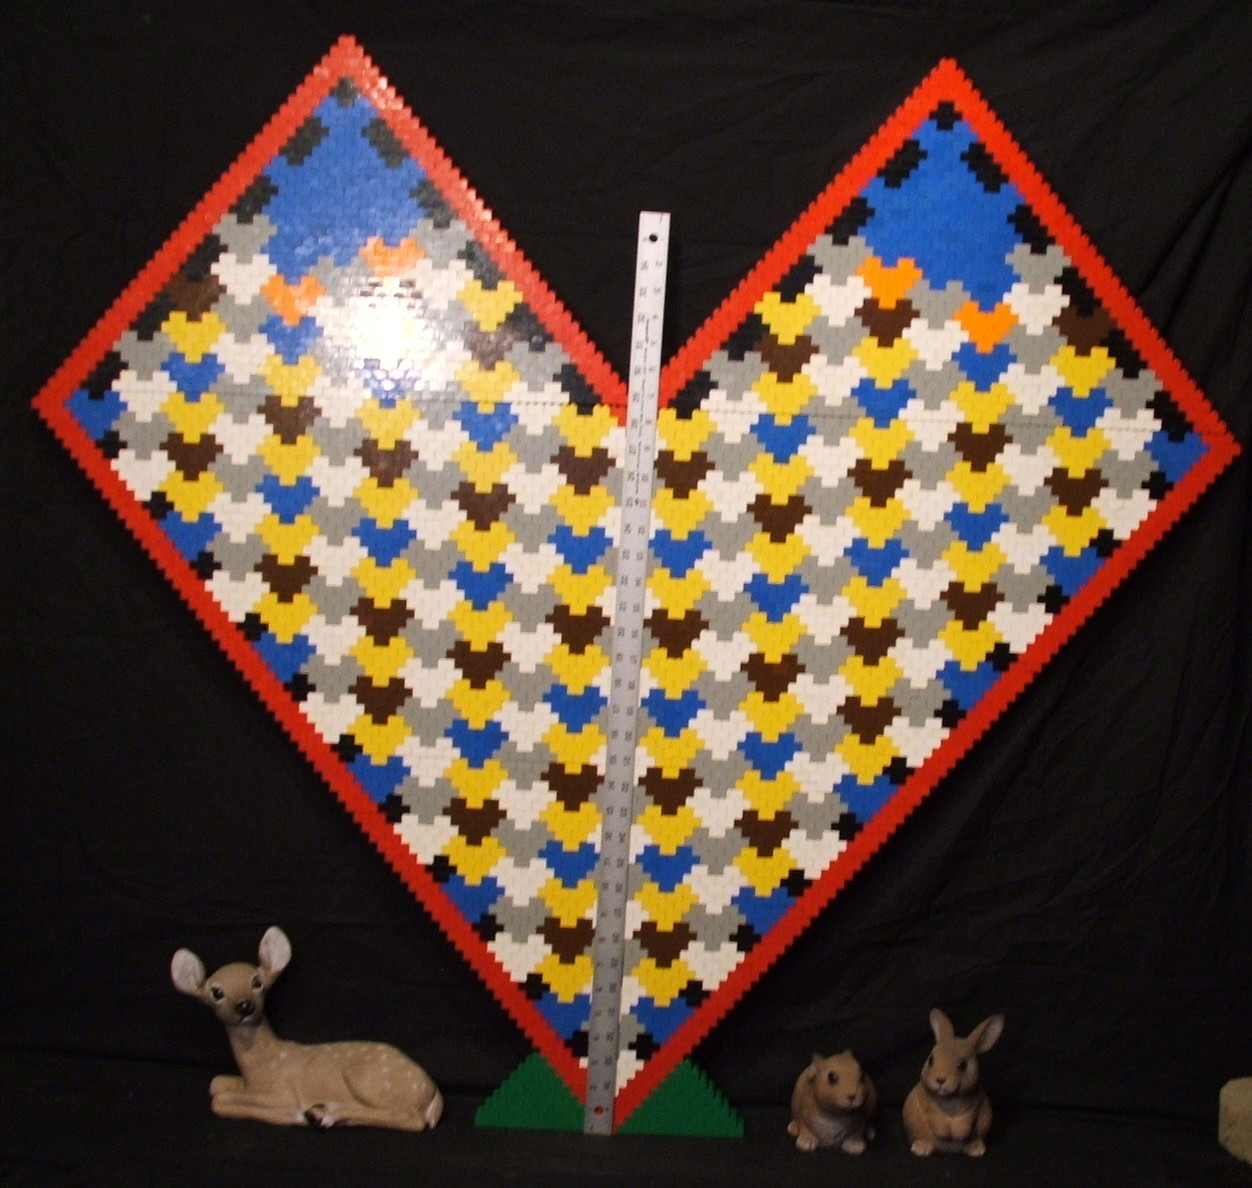
Terrys BIG Lego Heart
My BIG heart with a yardstick to prove it
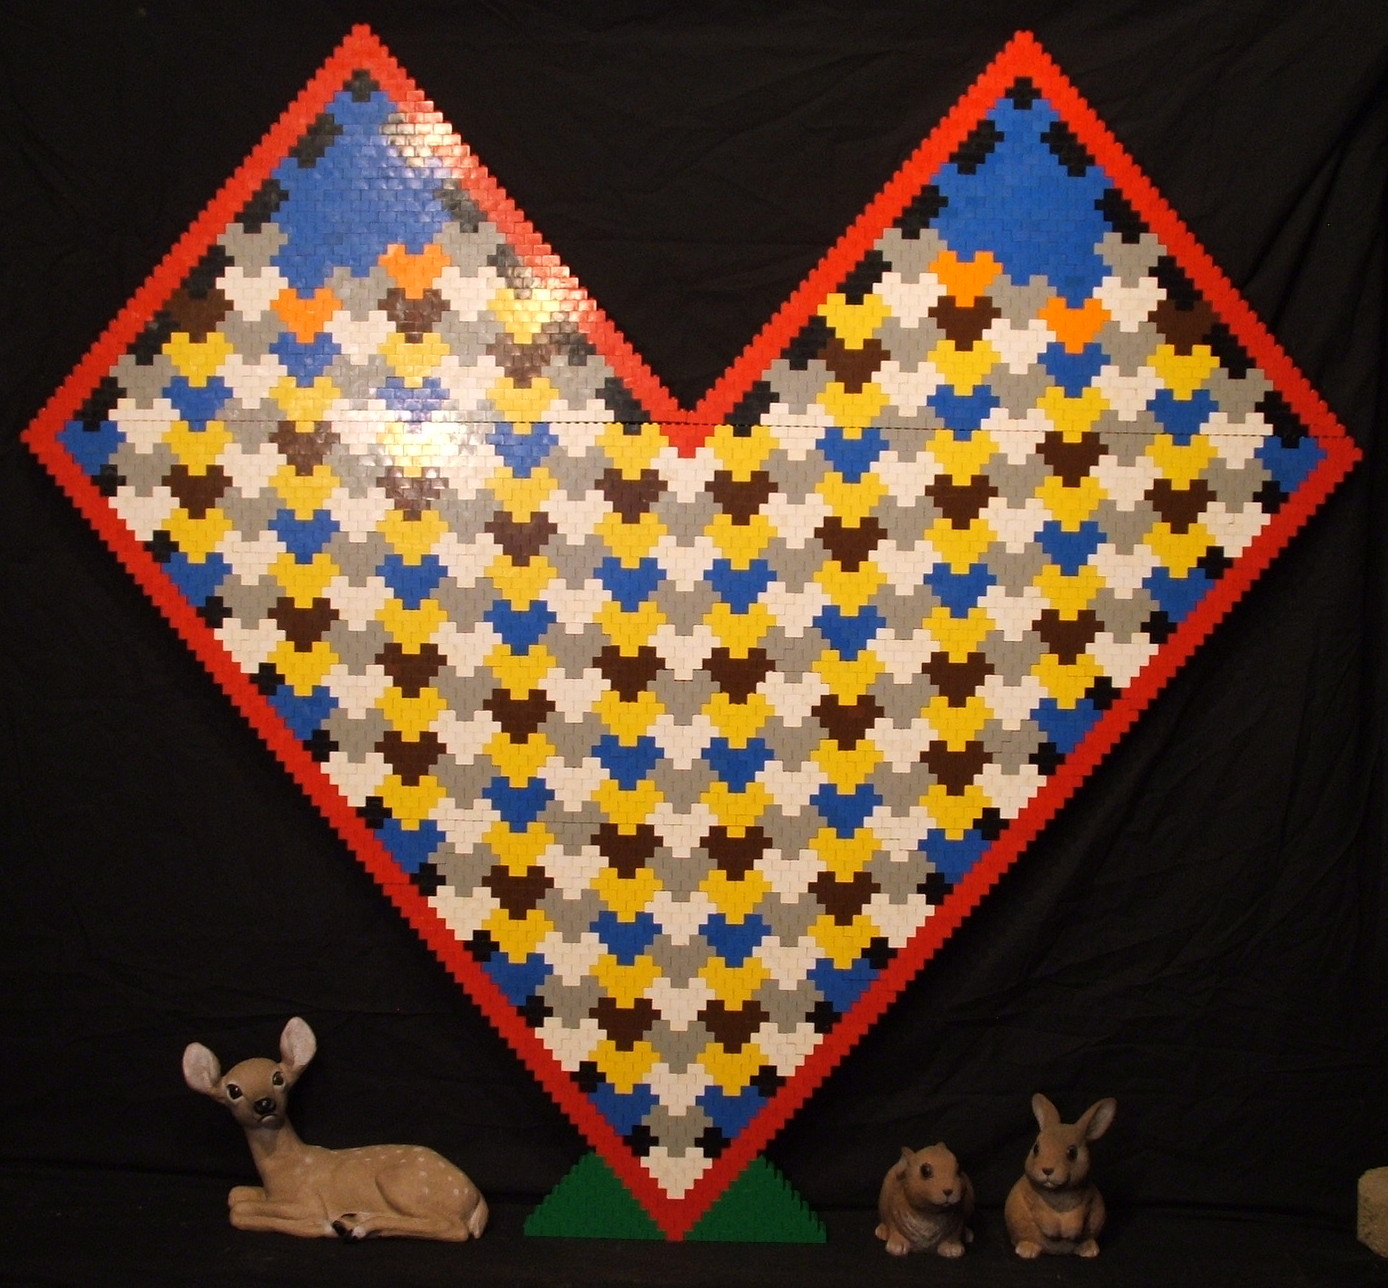
Terrys BIG heart again
The same as above without the yardstick
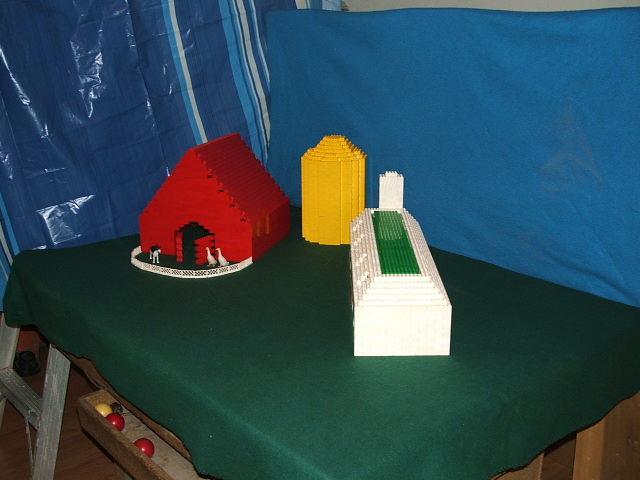
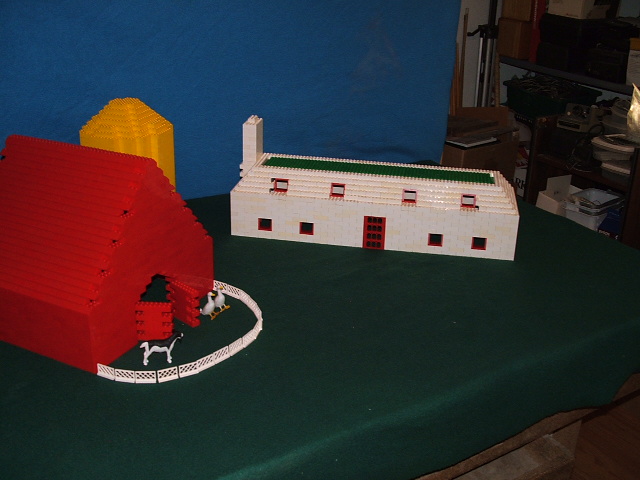
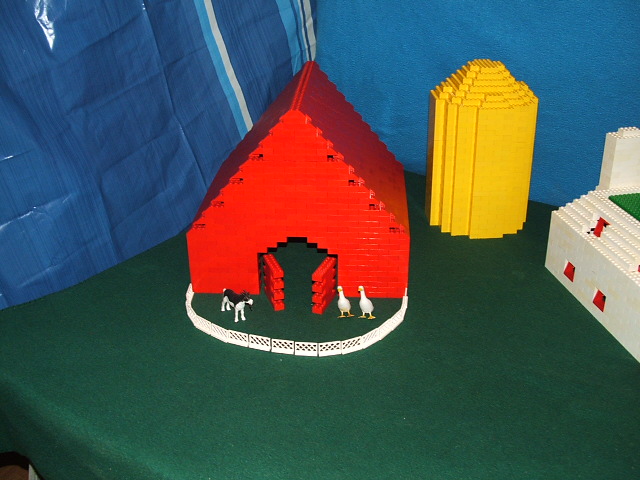
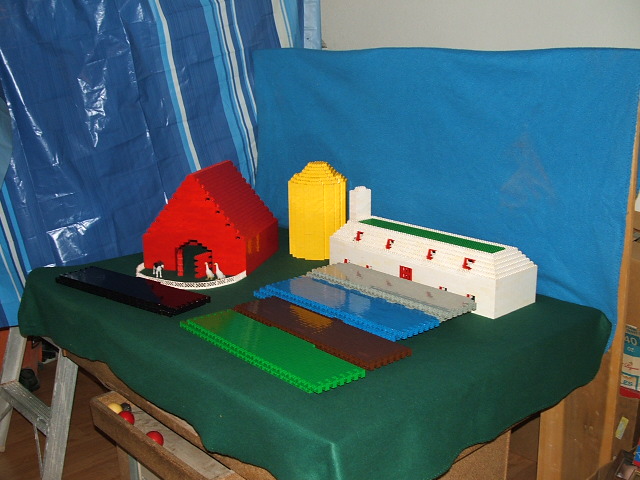
Terrys Lego Farm
Below are pictures of my Lego barn, silo, and
house which make up my small Lego farm. For the
purpose of this farm, imagine the dog is a COW
and not everything is to proper scale.
The Silo is made up of 646 yellow 2x4 Lego bricks.
It is a rough circle shape with a diameter of 6
bricks, which is about 7.5 inches across. It is
32 bricks high, which is about 12 inches high.
The House is made up of 808 white 2x4 Lego bricks
and 36 green 4x12 plates (for the roof structure).
It is 20 bricks side to side, which is about 25
inches. It is 6 bricks front to back, which is
about 7.5 inches. It is 16 bricks high, which is
about 6 inches high, not counting the chimney. It
has 8 windows (no glass) and one door panel.
The Barn is made up of 648 red 2x4 Lego bricks and
400 2x4 angled roof bricks. It is 11 bricks side
to side, which is about 13.75 inches. It is 10
bricks front to back, which is about 12.5 inches.
It is 32 bricks high, which is about 12 inches
high. The doors are not attached, they exist just
for show.
This shot shows the farm and the other 2x4 Lego
bricks that I had leftover.
What Is It answer
Expanded this makes a ladder with
hooks at the top. Did you guess
right?
In the future I want to build:
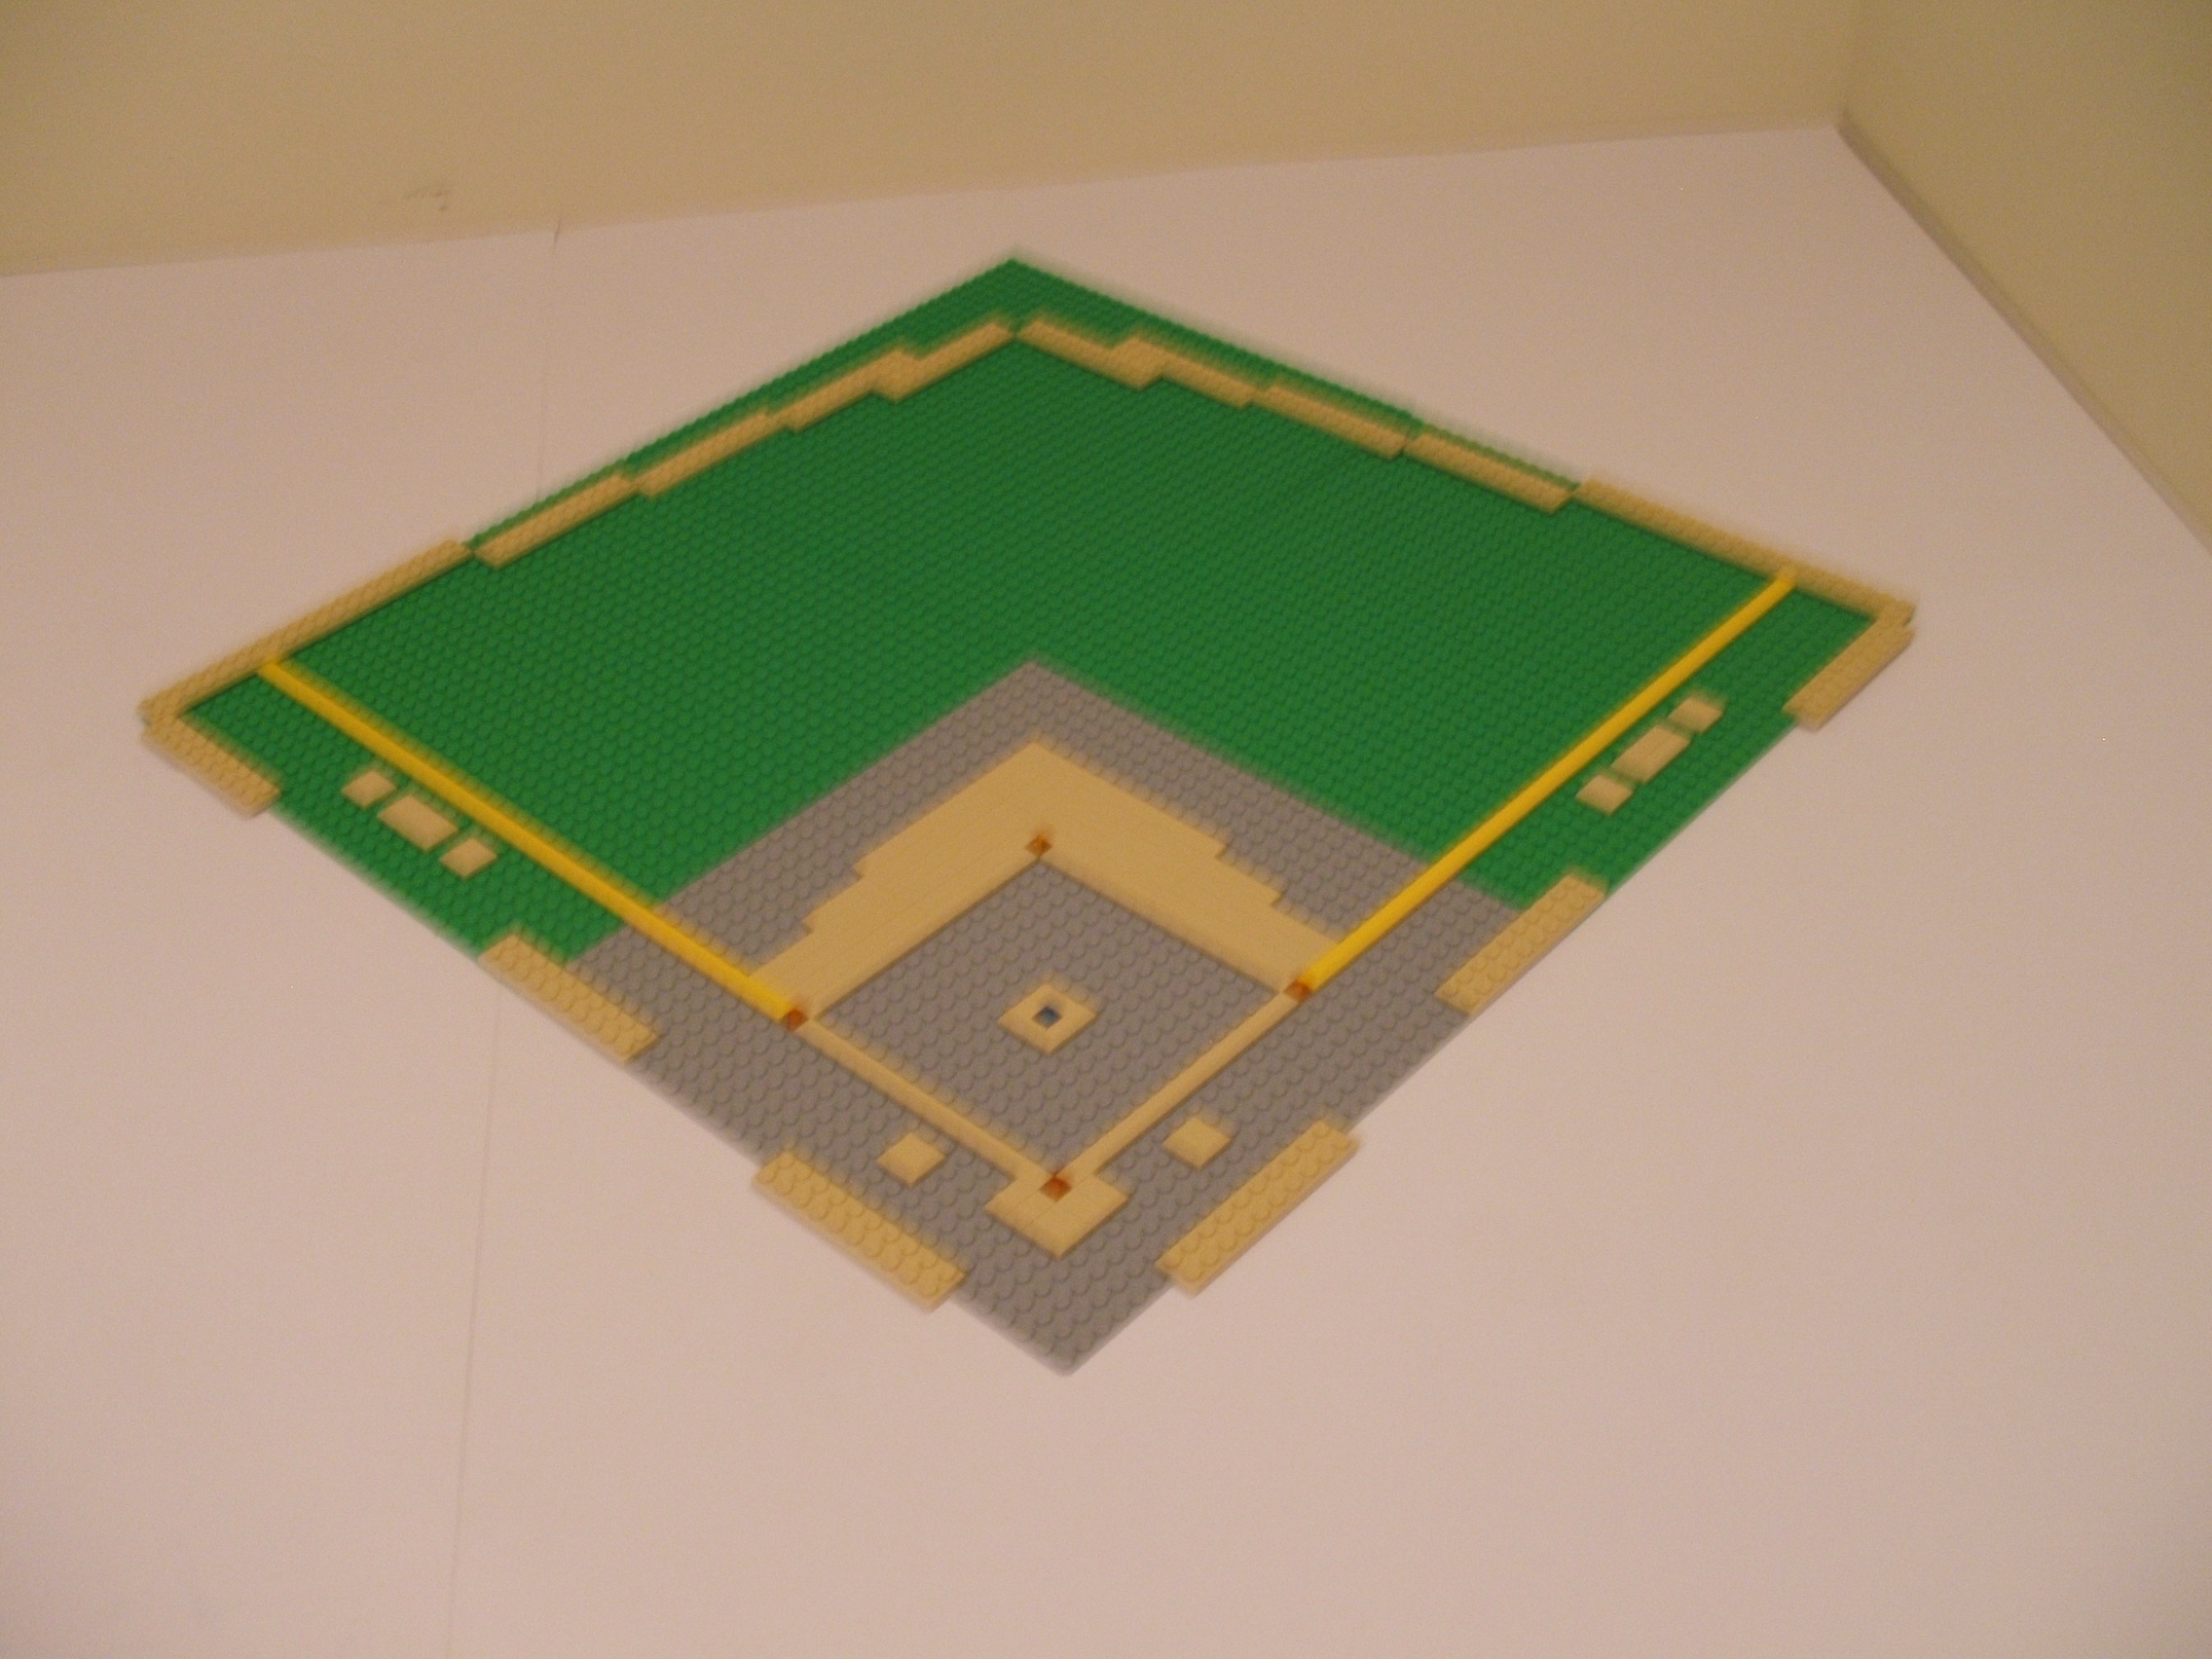
Baseball stadium
Layout of baseball field
Skyscraper
Mini city with train and park
COMING SOON!
Page last updated: August 04 2017 20:35:03. Page visited: 2109